Agency coordination overhead is predictable. Every day, the same checks repeat across every client: what is pending approval, what is scheduled to go live without sign-off, which stakeholders need a follow-up, and what needs to be reported by Friday. For a single...
Redesign For multi-location brands
all your locations, one content flow
For multi-brand companies
content collaboration at scale
For agencies
impress your clients and take on more
“The team loved it from the start. Planable helps us overview the entire marketing efforts.“
Your Instagram feed is a portfolio. One off-color post, one misaligned crop, and the whole grid looks careless to anyone who clicks your profile.
An Instagram grid planner fixes that. You drag posts into the order you want, see exactly how the feed will look before anything goes live, get the client or your manager to sign off, then schedule, without screenshotting nine images into Slack and waiting two days for feedback.
This guide covers what to look for in an Instagram grid planner, the five tools social media teams and agencies actually use, how to plan a grid in five steps, and what Instagram’s layout change means for the posts you’re planning right now.
What is an Instagram grid planner?
An Instagram grid planner is a tool that lets you arrange upcoming posts in a 3-column preview. It is the same layout people see on your profile, so you can check the look of the feed before anything publishes. The best ones add scheduling, approvals, and team commenting on top, so the planner replaces a content calendar instead of just sitting next to one.
Who needs one?
Social media managers running brand accounts, agencies managing client feeds, and any team where more than one person touches a post before it goes out. If you’ve ever screenshotted a feed mockup to get approval, you need a planner for your Instagram grid layout.
Plan your Instagram grid in Planable
Planable’s Grid view shows your upcoming posts in the same 3-column layout as the Instagram profile page. Drag posts around to test layouts. Click a post to edit it, comment on it, or approve it. Switch to Feed view to scroll the same posts in context. Switch to Calendar view to see what’s scheduled when.
Planable Instagram grid layout planner
Here’s what changes for a team using Planable Grid view calendar:
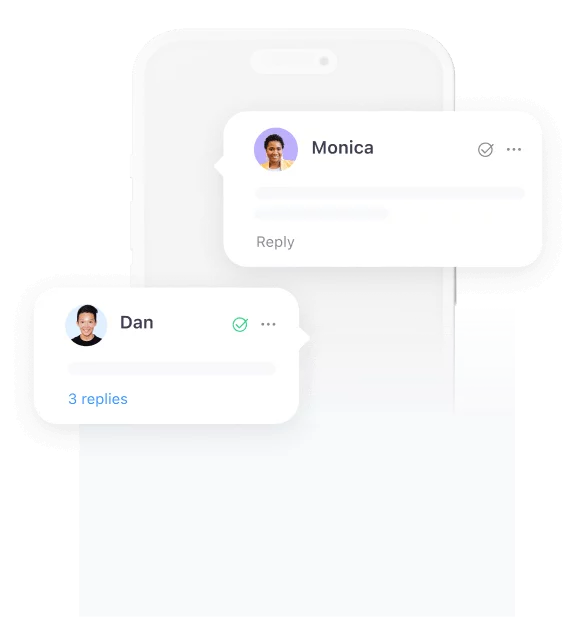
One link replaces ten screenshots. Generate a Guest View Link and send the grid to your client or manager. They open it in a browser (no account, no friction) and leave comments on specific posts.
Approvals happen on the post that needs them. Each workspace has a custom approval flow. Comments and sign-offs sit next to the post, not in a separate email thread.
Planable approval request button next to the scheduled post
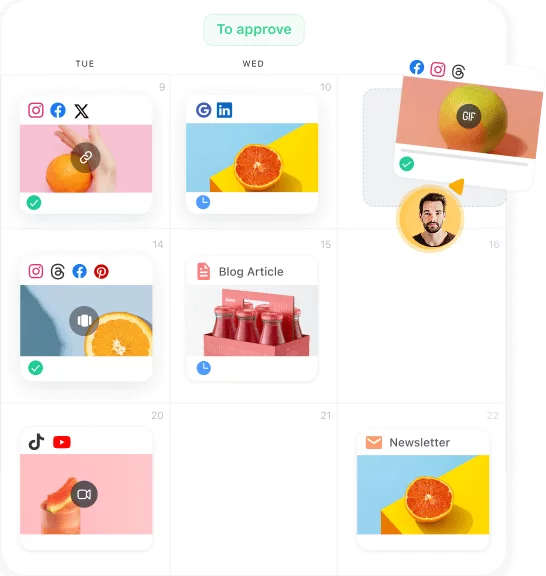
Drag-and-drop saves a custom order, not a schedule. Reorder the grid to plan the visual flow. Schedule each post with its own date and time when you’re ready. Sort by “Last scheduled” to double-check the live order.
Pixel-perfect previews. Every post renders the same way Instagram will render it, including the new 4:5 crop in the grid preview.
Media library per workspace. Upload once, reuse across posts. Filter by usage to find files you haven’t published yet.
AI captions, hashtag suggestions, and an in-app photo editor. Crop, filter, resize, or trim video without leaving the post.
Grid view is on the Free trial (50 posts), Pro ($49/workspace/month billed annually), and Enterprise plans. It’s the one feature that’s not on Basic.
What teams are saying about Planable’s Instagram Grid view
I like the Calendar view and the multi-tier approvals process. The interface is really user friendly. – Tiffany P., Marketing Specialist.
Calendar view is the best. All our clients like working with planable as its easy to use and has a great post share feature if the client doesn’t have an account or we just wanna share with someone. – Verified User in Marketing and Advertising.
I love that Planable makes it easy to move content from one date to another. I like the way I can go to one place, review a social media content calendar, add my feedback, and approve by simply clicking a checkmark. – Martie R., Creative Services Project Manager.
The calendar view is well-designed, and when I need support they are there pretty quick. – Verified User in Retail.
I enjoy the calendar view and being able to easily move my posts across the three main SM platforms that I use (FB, Insta, LinkedIn). I enjoy the generated AI feature to help spark inspiration by suggestions ( I always make the copy my own, but it’s a great starting point. –Cedar C., Marketing Manager.
Pick a color palette of two or three shades. Pick one font for any text-on-image posts. Pick one filter or preset. These three choices do 80% of the work. If every post on the grid uses the same palette and filter, the feed already looks intentional.
Step 2. Choose a grid pattern
The pattern decides what gets posted in what slot. Five common patterns work for almost any brand: checkerboard (alternating two themes), row-by-row (each row is a mini-story), column (each column has one type of content), puzzle (multiple posts form one image), and branded repeat (every third post is a product shot, a quote, or a UGC repost). Pick one and commit for at least 30 days before deciding it doesn’t work.
Step 3. Batch the content
Don’t plan one post at a time. Plan a month. Open your grid layout planner, drop in placeholders for every slot, then fill them in. This is faster than creating posts one by one and it forces the pattern to actually hold.
Step 4. Get one round of feedback before scheduling
Share the Instagram grid with the person who has the final say — the client, the head of marketing, the founder. One round, one link, one set of comments. If they want changes, change them in the planner before anything is scheduled. Don’t ship a half-approved feed.
Step 5. Schedule, then watch the gaps
Once posts are scheduled, the grid keeps updating as content goes live. Check it once a week. If a post lands wrong (color, crop, energy), you have time to swap the next one before the pattern breaks.
5 best Instagram grid planner apps in 2026
Five socia media tools cover almost every use case. The right one depends on whether you work alone, on a team, or for clients.
1. Planable — best Instagram grid planner for social media teams and agencies
Planable was built around the moment a social media manager hands a draft to a client and waits. Drag-and-drop grid planning sits inside a workspace with custom approval flows, in-context comments, guest view links, AI-assisted captions, a per-workspace media library, and scheduling for nine social platforms.
Drag-and-dropping posts to be scheduled in Planable’s content calendar
The grid preview renders Instagram’s new 4:5 aspect ratio correctly, so what you see in Planable is what shows up on the profile.
If more than one person needs to see a post before it goes out, Planable is the tool.
Best for: agencies managing 5+ client feeds, multi-location brands coordinating posts across cities, and in-house teams where marketing, legal, or a regional manager has to sign off.
Pricing: Free trial (50 posts, all features). Pro $49/ws/month — Grid view included. Analytics add-on $14/ws/month. Social Inbox add-on $9/ws/month.
Drawback: Grid View is available only on the Pro and Enterprise plans. If you’d like to test it before you commit, you can use the 50 free trial posts provided with your account.
Takeaway: Planable is best for teams and agencies that need structured collaboration and fast approvals. It pairs drag-and-drop grid planning with custom approval flows, in-context comments, guest links, and scheduling for nine platforms, so what gets approved matches what posts live.
Note: Planable allows you to plan, create, and schedule your Instagram posts from the same place; including direct publishing and scheduling for both Instagram Reels and Instagram Stories. If you want to see how scheduling works in action, watch our step-by-step video tutorial that walks you through the entire process of scheduling Instagram posts in Planable.
2. Later — best for solo creators and link-in-bio
Later started as an Instagram-only scheduler and still leans hardest in that direction. The Visual Planner is a clean drag-and-drop grid, and Linkin.bio (their landing-page tool) sits next to it. Approvals are basic — fine for a creator showing a manager, less so for a full client review process.
Best for: solo creators, influencers, small e-commerce brands.
Pricing: Starts around $25/month for one user, one set of social profiles. Pricing changes — check their site.
Drawback: Approvals are lightweight. No proper guest review.
3. Sked Social — solid Instagram-first grid planner with UGC import
Formerly Schedugram. The drag-and-drop grid planner is good, and Sked Social imports user-generated content directly so you can repurpose mentions into the grid. The Essentials plan doesn’t include approvals, which is the catch.
Best for: brands that lean heavily on UGC.
Pricing: 7-day free trial; paid from around $59/month for three accounts.
Drawback: Approvals locked behind higher tiers.
4. Hootsuite — for teams that need social listening
Hootsuite isn’t a grid planner first, it’s a social management platform that added a grid view through a free app integration.
If you already use Hootsuite for listening, inbox, and reporting, the grid add-on is fine. If you don’t, this is a heavy tool for one feature.
Best for: large businesses already standardized on Hootsuite.
Pricing: From $99/month for one user, ten accounts.
Drawback: The grid is an add-on, not a native feature. Expensive entry point.
5. Canva — best free option for one-off mockups
Canva isn’t a planner, it’s a design tool with Instagram grid templates. You can build a static grid mockup, screenshot it, and share. No scheduling, no approvals, no real planner workflow, but if all you need is to show someone what a grid could look like, it’s free and fast.
Best for: mockups and presentations, not ongoing planning.
Pricing: Free plan covers most needs. Paid plans from $15/month for more templates and brand kit features.
Drawback: No live profile preview, no scheduling, no collaboration on actual posts.
Note: If you want the whole content workflow, Planable has a native Canva integration, so you can create or edit designs in Canva and attach them to posts in Planable, then handle review, approvals, scheduling, and reporting in one place without downloading/re-uploading files.
Why a grid planner is worth the time
Three concrete things change when you plan the grid planner instead of posting ad hoc.
1. Feedback collapses from days to minutes. A grid link with comments replaces email threads, screenshot reviews, and “can you resend the JPG” requests. Most teams using a planner cut their approval cycle from 2–3 days to under a day.
2. The brand looks intentional. A planned grid means every post lands in a color, theme, or pattern you chose on purpose. Visitors clicking your profile see a portfolio, not a pile.
3. You stop making last-minute decisions. Batching a month of grid posts at once forces you to think about how content fits together. The 11pm “what do we post tomorrow” panic goes away.
What Instagram’s grid changes means for your planning
In January 2025, Instagram changed the grid preview ratio from 1:1 (square) to 3:4 (tall). The full post image still uploads at 4:5 (1080 × 1350 px). The grid thumbnail is now cropped to 3:4 (1015 × 1350 px).
Three practical rules:
Upload at 4:5 (1080 × 1350 px). Instagram crops to 3:4 in the grid preview automatically.
Keep critical elements in the 3:4 safe zone. Faces, text, logos, none of them past 1015 px wide.
Don’t upload native 3:4 (768 × 1024 px) photos. Instagram will crop them again.
Planable’s grid preview already renders the 4:5 ratio correctly, so what you build in the planner is what shows up on the profile.
Instagram grid layouts that work (with examples)
A lot of agencies and creators don’t stick rigidly to one pattern anymore. They go for a real, simple look (authenticity over perfection) and use the planner mostly to make sure the colors stay consistent.
Marketing agencies
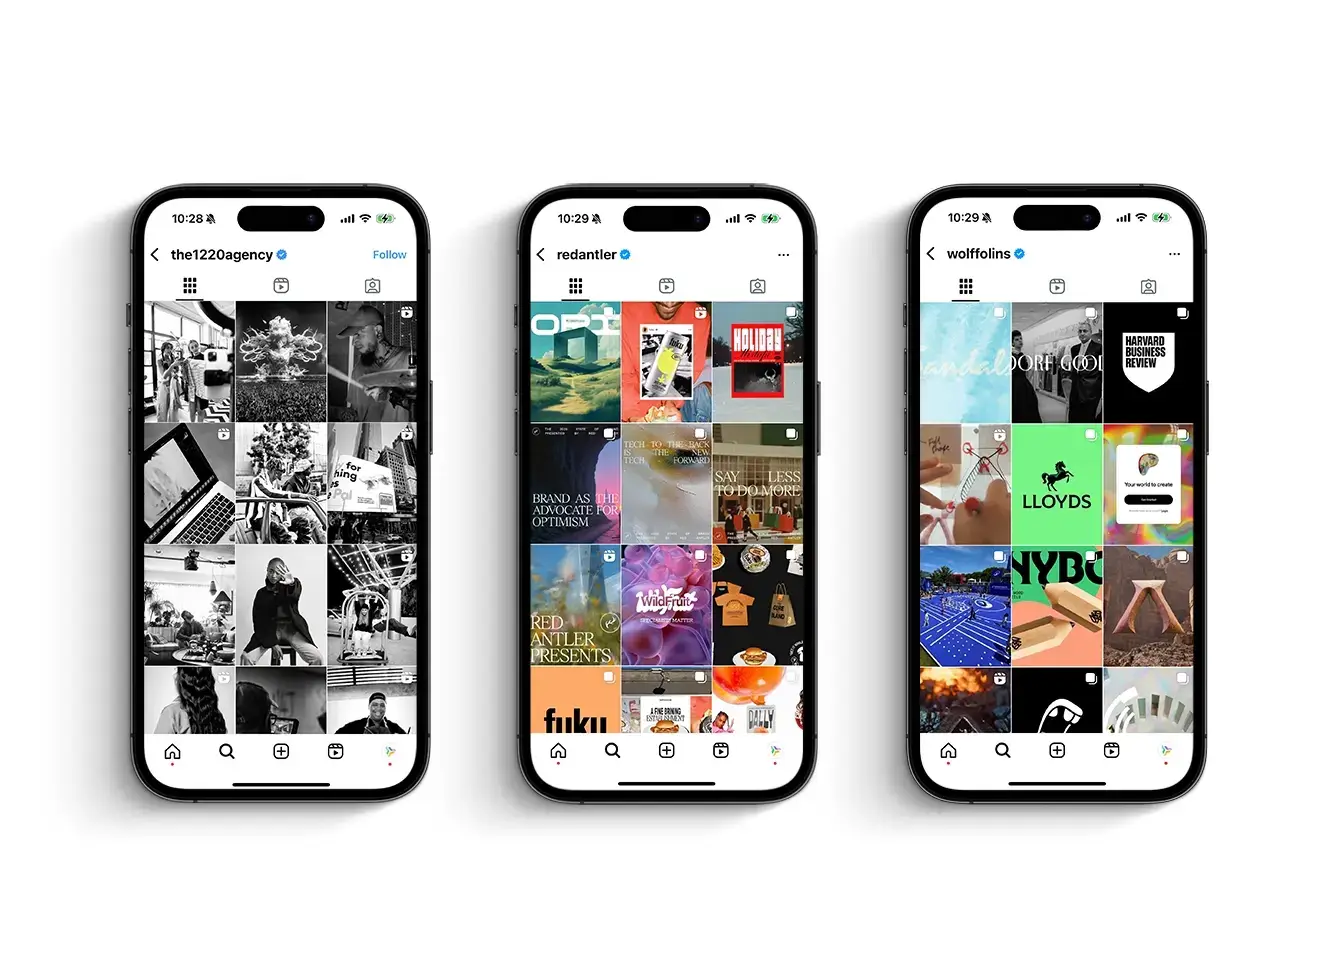
Wolff Olins uses a row-by-row grid to highlight its ‘Life Is Good’ campaign, arranging logos alongside campaign imagery.
The Twelve Twenty Agency takes the opposite route, a strict black-and-white identity that runs across every post for a tight column look.
SmartFlyer uses a column grid: one vertical column of text posts running down the profile, with destination imagery filling the other two. Easy to copy if you’ve got a quote, caption, or itinerary format you can run on every third post.
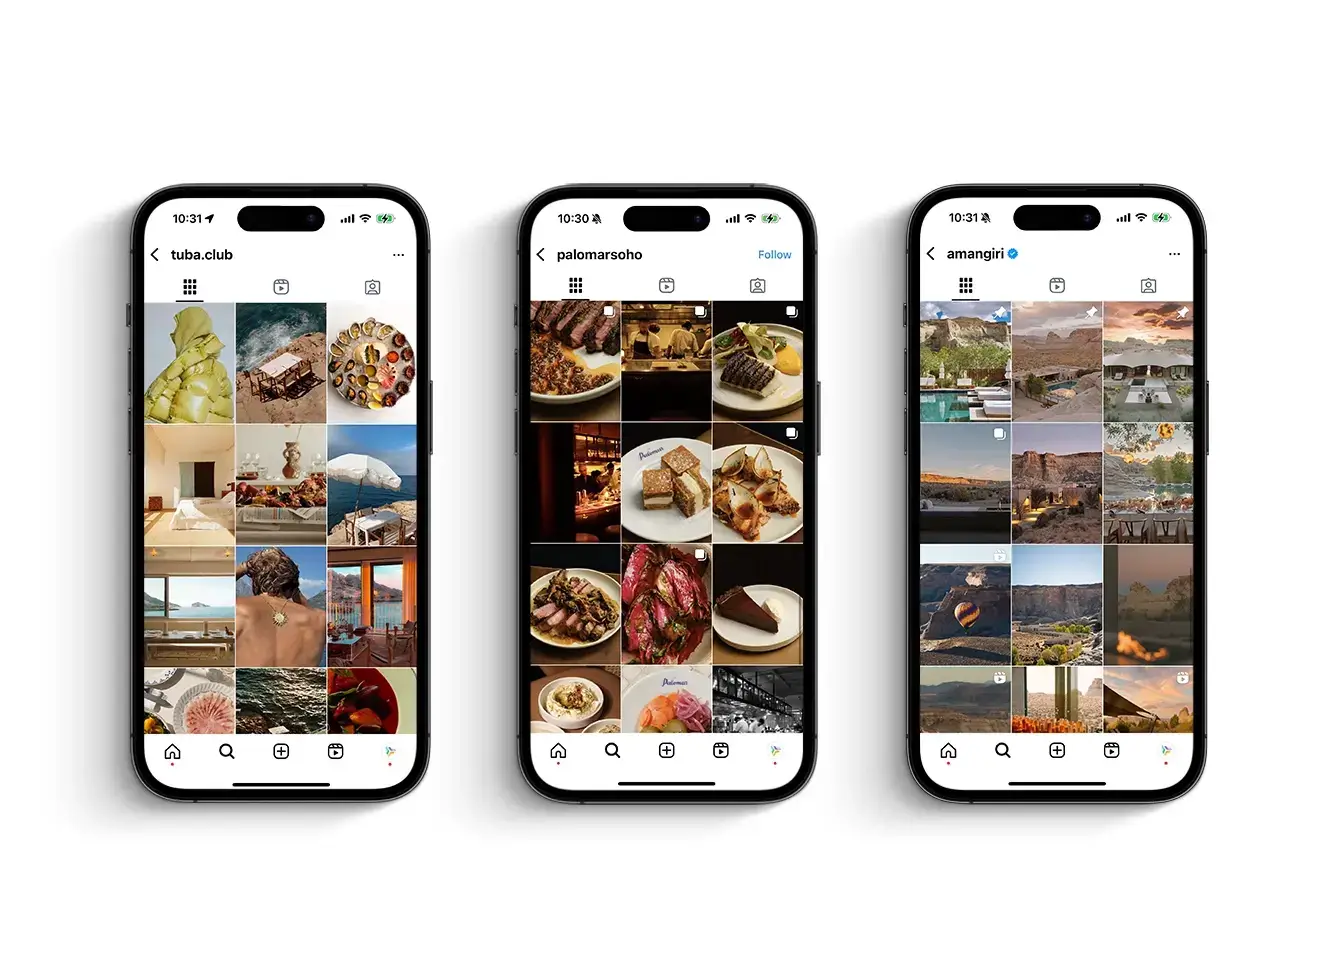
The Palomar restaurant uses branded repeat: plated food shots interleaved with warm-lit ambient images at a steady rhythm. The result reads like a menu and a mood board at once.
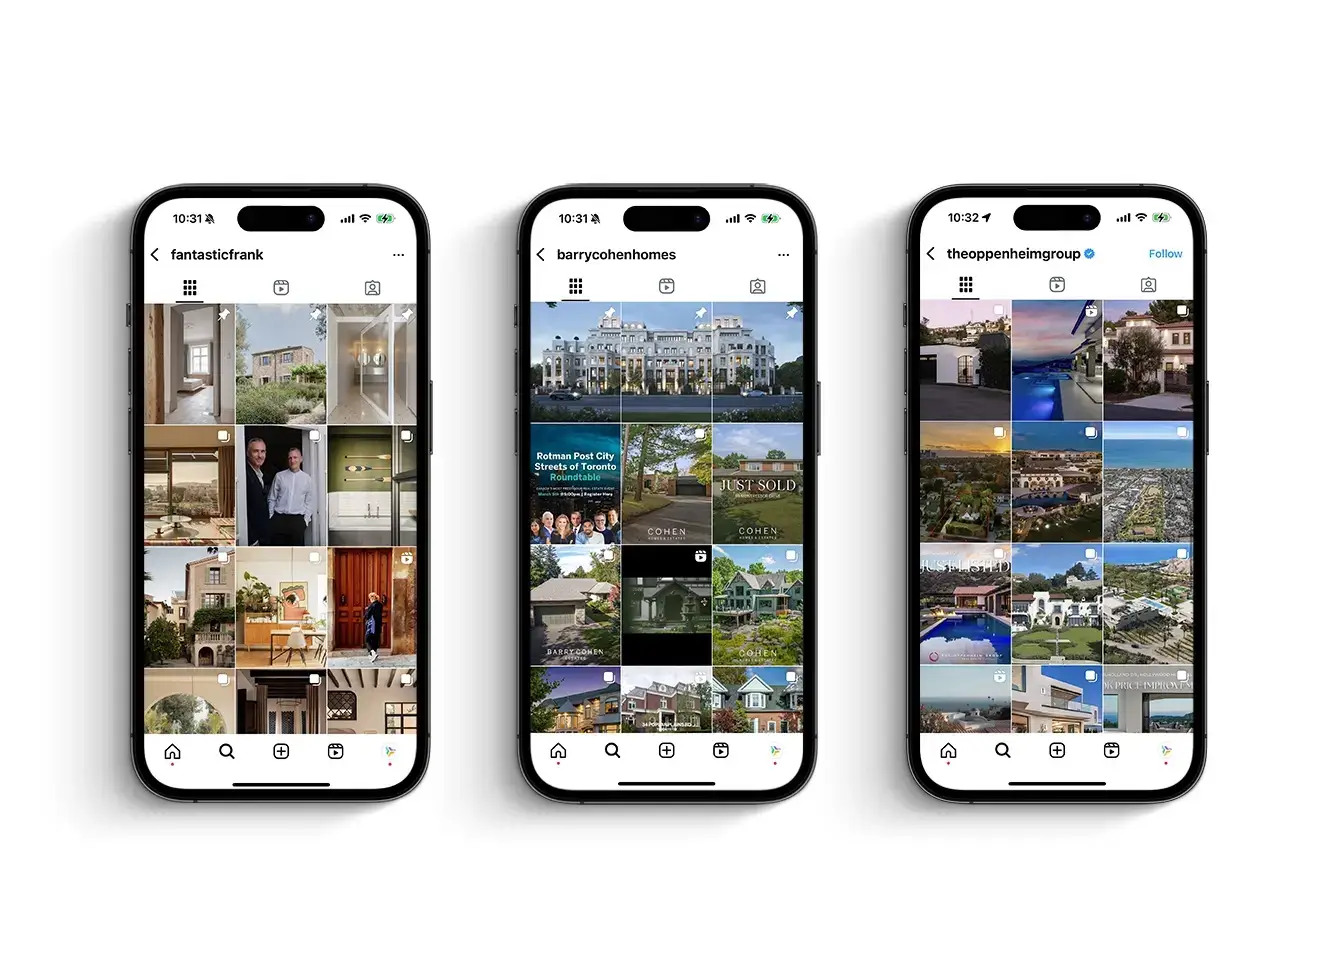
Fantastic Frank runs a subtle checkerboard across its real estate feed, alternating exterior shots with interior detail. Same property, two angles, one post apart, and the grid reads as a portfolio.
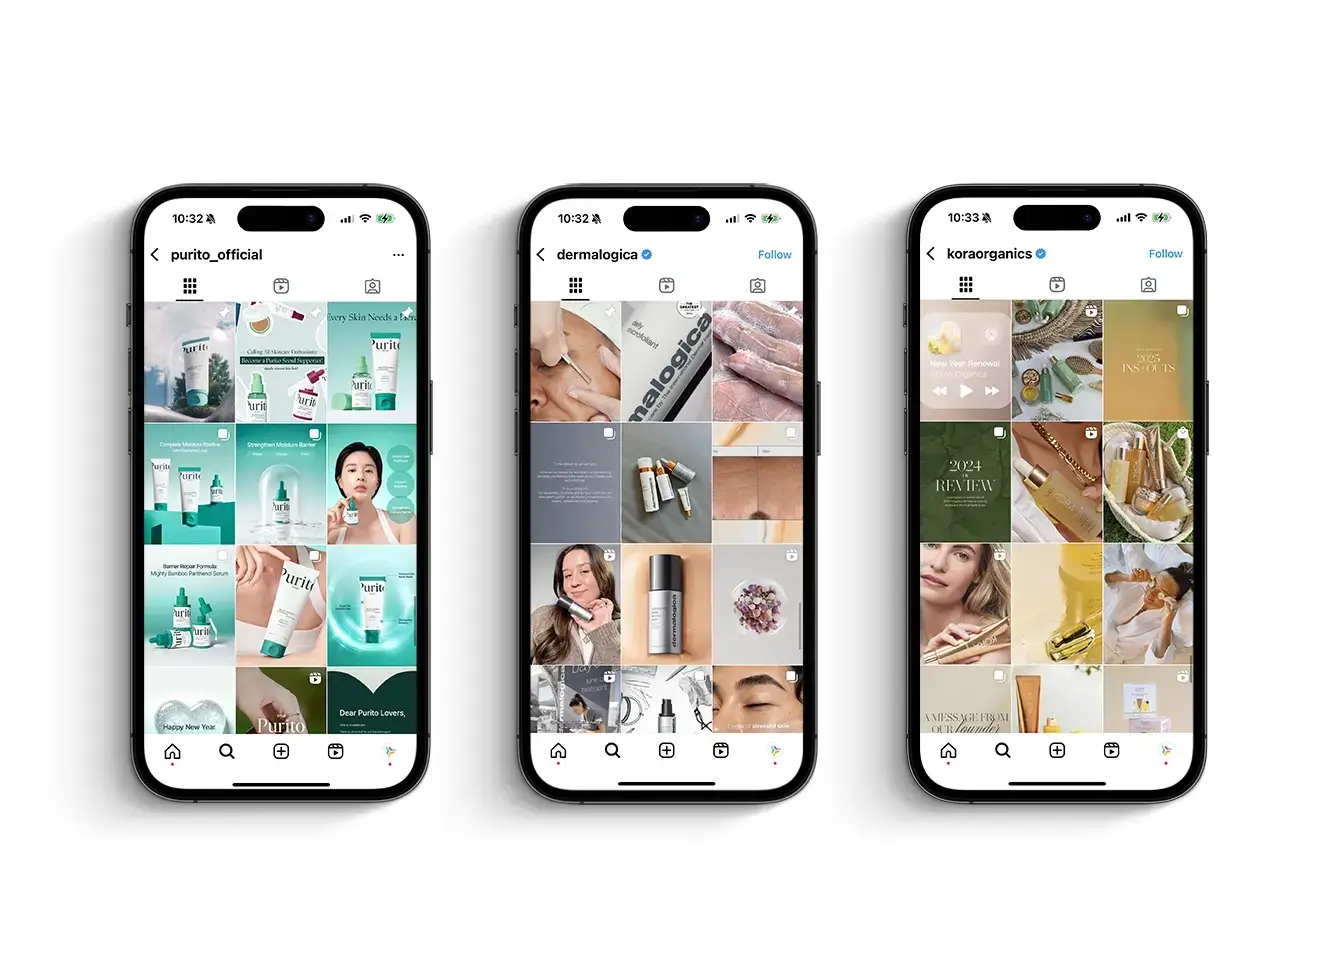
Dermalogica uses an offset diagonal pattern with a consistent color theme: product close-ups on the diagonal, model shots in between. Works for any brand with a small product range and a clean palette.
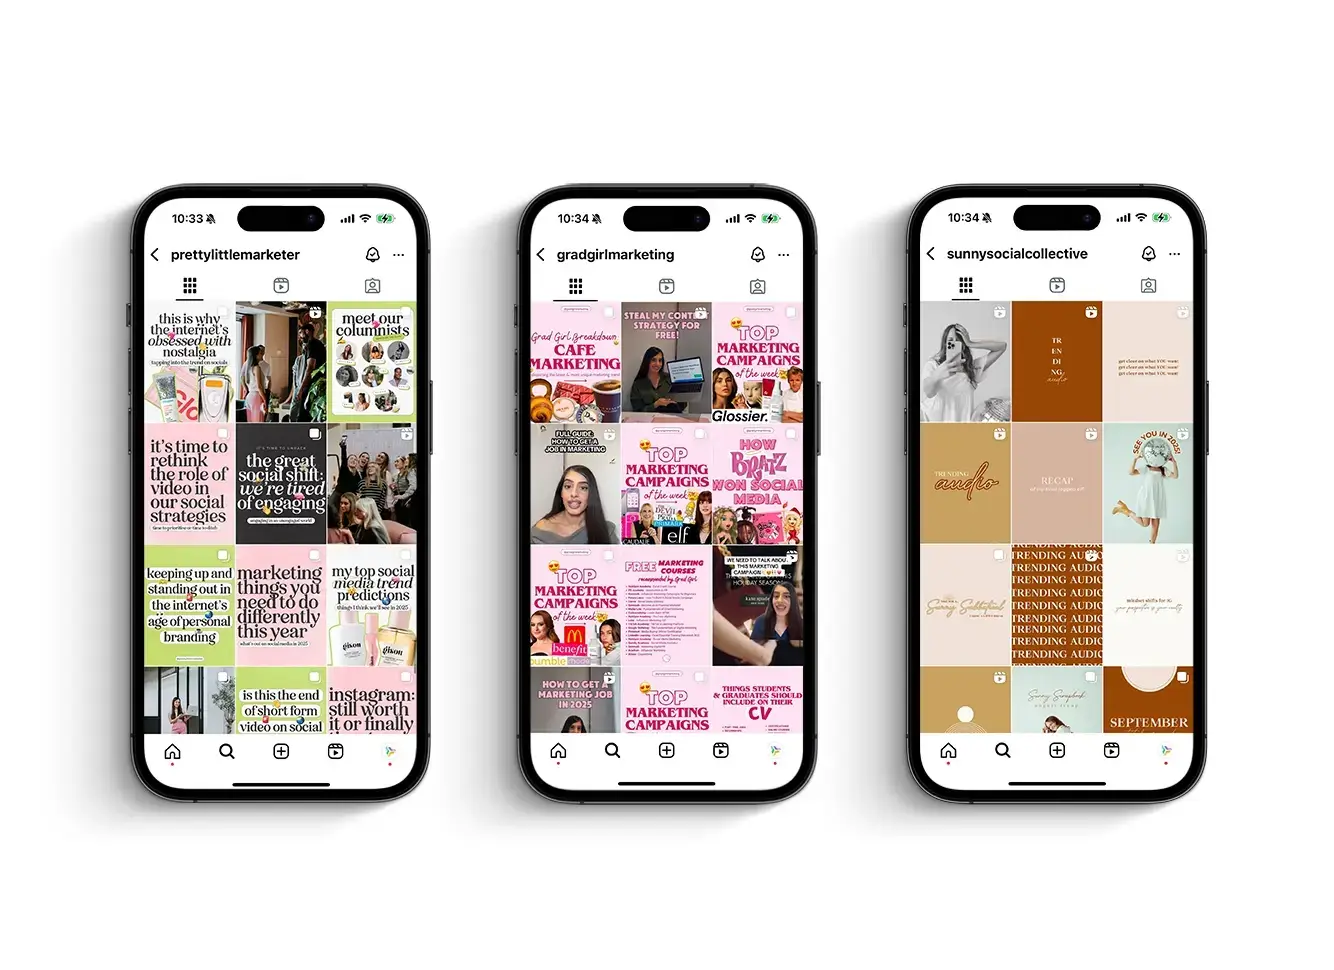
Pretty Little Marketer runs a diagonal feed; Grad Girl Marketing and Sunny Social Collective both use checkerboard. All three lean on a consistent color, font, and post style, proof that you don’t need a huge production budget to make a grid look planned.
For social media teams and agencies, Planable is the best Instagram grid planner because it combines drag-and-drop grid planning with approvals, guest review links, and scheduling in one wor
kspace. For solo creators, Later is the most popular choice. For UGC-heavy brands, Sked Social.
How do I plan my Instagram grid in advance?
Use a planner with a drag-and-drop grid view (like Planable). Upload your planned posts, drag them into the order you want, preview the feed, share for approval, then schedule. The whole process takes about an hour for a month of content once you have a pattern.
Did Instagram change the grid format?
Yes. In January 2025, Instagram changed the grid preview ratio from 1:1 (square thumbnails) to 3:4 (tall thumbnails). The full post image still displays at 4:5 (1080 × 1350 px) when tapped. To avoid awkward cropping, upload at 4:5 and keep important elements within the 3:4 safe zone.
Can I rearrange posts on my Instagram grid?
You can rearrange posts before they’re published using a grid planner like Planable. Once posts are live, Instagram lets you reorder thumbnails on the profile through the post’s Adjust Preview menu, but you can’t change the publish order retroactively.
What’s the difference between an Instagram grid and an Instagram feed?
The grid is the 3-column view on your profile page, what visitors see first. The feed is the chronological scroll inside Instagram. A grid planner helps you control the profile-page look; a scheduler helps you control the publish times. The best tools do both.
How much does an Instagram grid planner cost?
Free options exist (Canva templates, Planable’s free trial). Paid planners range from around $15/month for design-first tools like Canva, up to $49/workspace/month for full team planners like Planable Pro.
Plan one grid. See the difference.
The gap between a planned Instagram grid and a posted-ad-hoc grid is the difference between a portfolio and a pile. The work isn’t more, it’s earlier, and it happens in one place instead of seven.
Grab the Planable free trial. Build one month of posts. Send the grid link to whoever needs to approve it. Then decide.
George – Content Marketing Strategist, storyteller, and self-appointed cringe detector. 7 years in marketing, starting from graphic design to social, campaigns, and content. Writes, shoots, edits - if it’s creative, he’s on it. Knows what’s funny, what’s fresh, and what should never see the light of day. Always up to date, always cooking up something (and trying to hit his protein goal), all while pretending to get 8 hours of sleep.