Ready to jump into the world of Instagram videos and learn how to make Reels?
You’ve heard all about Instagram Reels, you’ve watched hundreds, but you’re not sure where to start with creating them. Or even why you need Reels in your Instagram content strategy.
We’ve put together this guide for beginners on creating Reels to help you get started. It contains instructions for how to make Reels on Instagram, and how to schedule them ahead of time.
Contents
What is an Instagram Reel?
Instagram Reels are short video clips of up to 90 seconds. They are full-screen vertical videos usually accompanied by audio. They are a powerful content format that combines a visual journey with related audio.
Launched by Instagram in August 2020, Instagram Reels have become a significant player in the short-form video category. Together with TikTok and YouTube Shorts, Reels have delivered on our thirst for the fast-paced consumption of engaging video content.
Instagram Reels educate, inspire and entertain viewers, and they certainly deliver on this objective. Stick with us. They will for you too.
Why do you need to make Instagram Reels?
Like all video content, Reels tell stories and build connections better than any other form of content. Adding Reels to your Instagram content calendar is currently the easiest way to reach out to new audiences. Reels have turned this social media platform into a lively, entertaining, and enticing conversation.
And that’s why they need to be embraced as a key part of your Instagram marketing strategy.
Where to find Instagram Reels
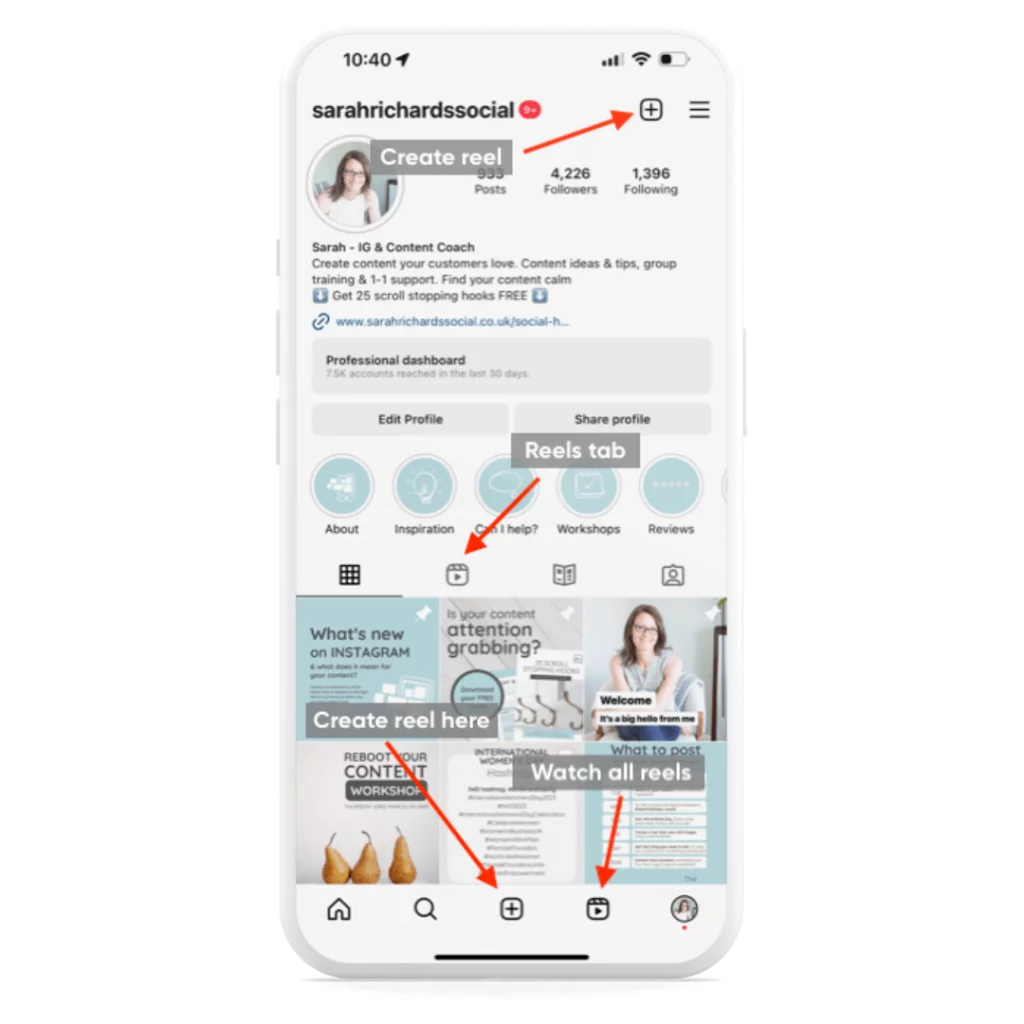
On your Instagram account, you will see a Reels tab to house your own Reels, plus a Reels icon at the bottom of the screen where you can view all Instagram Reels.
How to create Reels on Instagram
Let’s dive straight into how to create Instagram Reels.
1. Find the angle for your Reel
- Start with your business goals – just as you would with any content you create. What content do you need to put out to support your business strategy?
- Follow up with your content goal. What do you want the Reel itself to achieve for you? What message are you looking to communicate to your audience? Does this Reel fit within one of the content pillars you created for your Instagram marketing strategy?
- Decide what you want to achieve. Do you want to entertain, educate, inspire, or connect? Maybe you want to show off a brand-new product about to be launched, give a window into real life behind the scenes; maybe it’s to show the attention to detail you have with your packaging, or inspire new ideas. Think about entertaining videos that would hit the spot for your audience. Like this Reel from @thegoodsitter:
View this post on Instagram
- Let a trend lead the content. Sometimes you’ll need to work backward. Rather than starting with the goal, find a trend on Reels that sparks an idea perfect for your brand. Then you can frame your content around it. Is there a trending audio or format that could deliver your message?
- Plan out your Reel. Think of it like a story – there’s a reason filmmakers have classically created storyboards. Your Reel needs a start, a middle, and an ending. The start needs to hook your audience in, the middle is the detail, and the end is the result, the conclusion, or the call to action – what is the desired outcome you are looking for? Here’s how @victoriarosepark masterfully does this:
View this post on Instagram
2. Film your Reel
Now that you have done the planning, it’s time to create a Reel. You can do this in a few ways.
A. Use existing video clips or still images
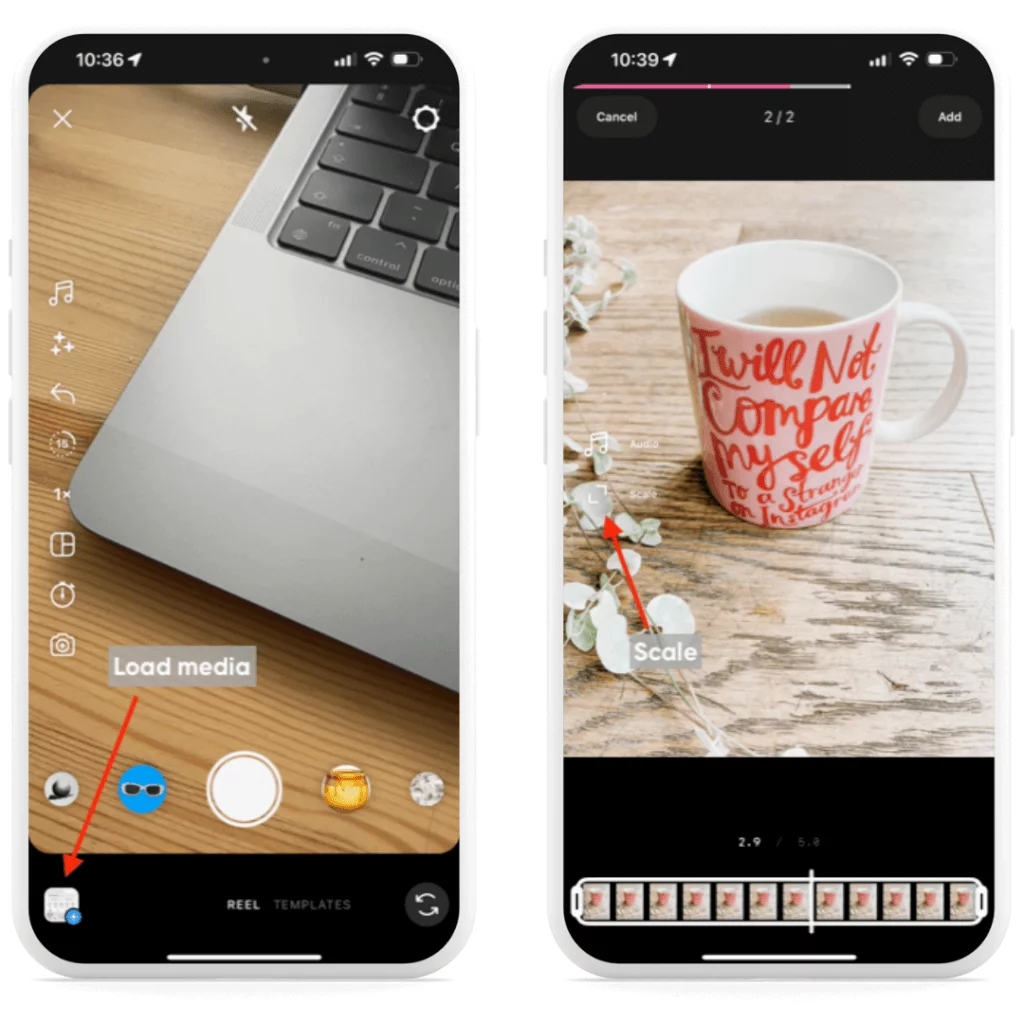
To use existing video, upload video clips from your camera roll into the Reels app using the load media button. You can select a single piece of video or multiple video clips, which will be stitched together with seamless transitions.
To use existing still images, use the load media button to upload photographs. When uploading images or video, make sure that they cover the full height of the screen. Look out for the scale button. Note how the image of the mug needs to be scaled as it’s currently showing black borders, top, and bottom.
B. Film new video clips
To film new video, you can record directly using the Instagram camera in Reels or outside of the app e.g. directly into your smartphone camera. You can then upload the video clips to Reels in the Instagram app.
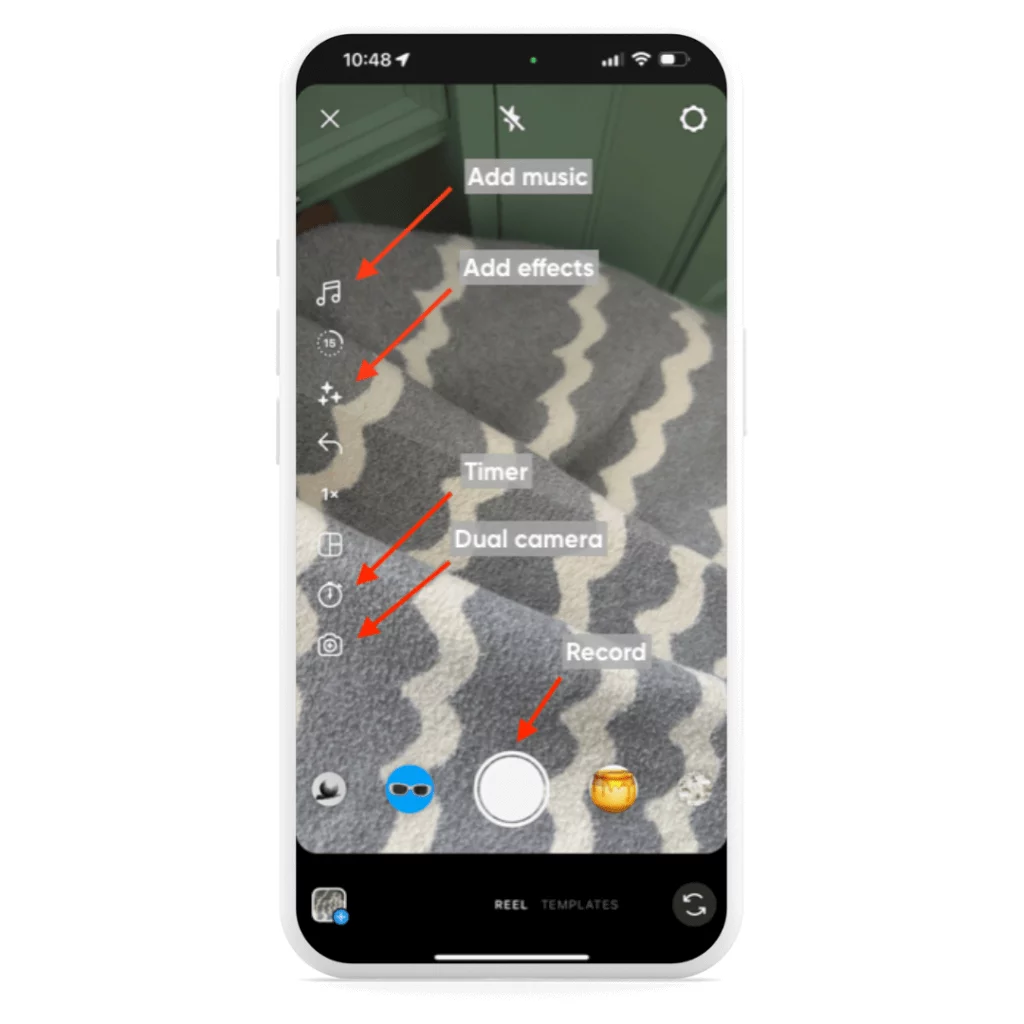
To film directly on Instagram, from your Instagram profile, tap the + button to create new content. Select Reel. You will see a round button at the bottom of the screen. To record videos tap this button to start recording and tap again to stop recording. You can film one video or multiple clips. Just tap again to record the next clip. Filming is very similar to using the Instagram stories camera.
Use the creative tools on the left-hand menu. You can select audio from Instagram’s music library and add effects from the effects tray. There are a number of other tools too.
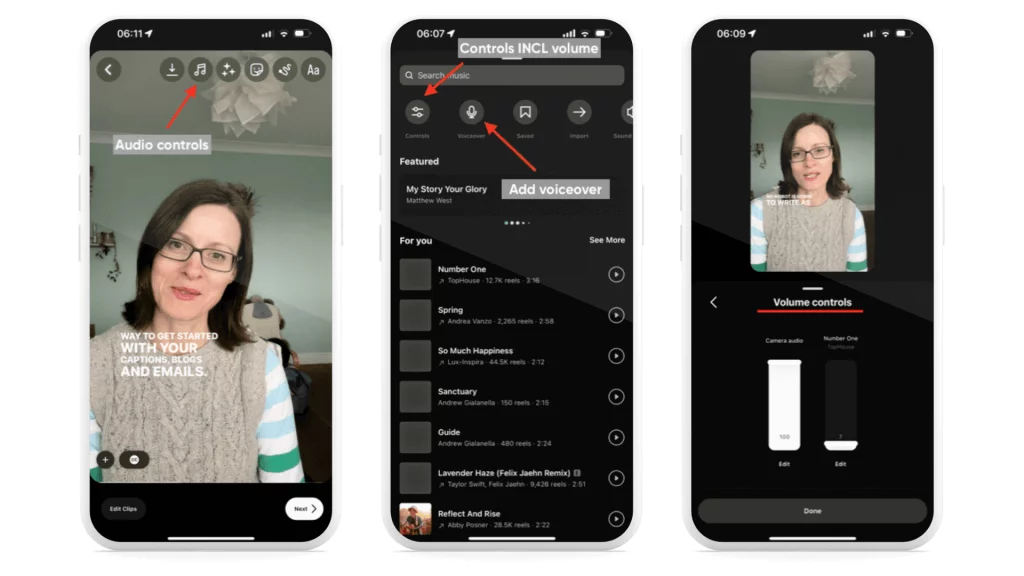
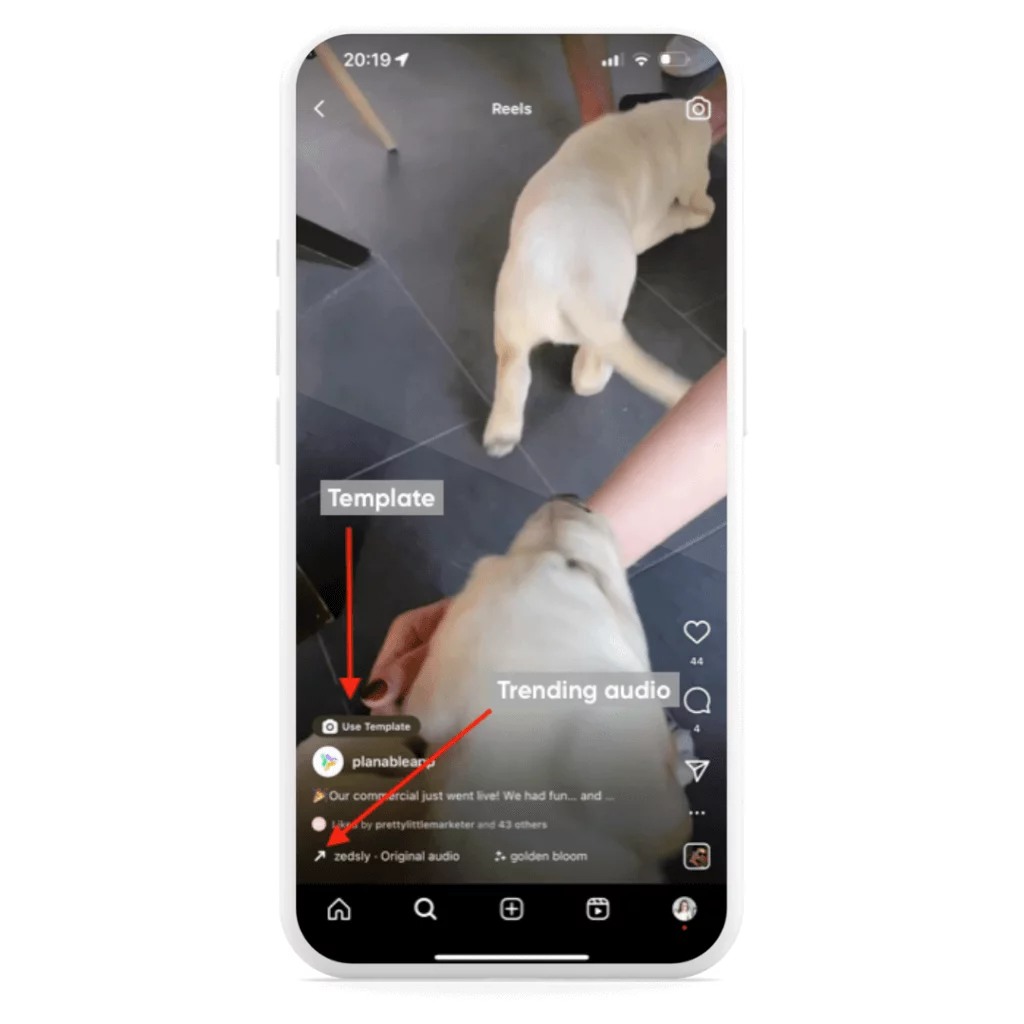
- Add music using the music note icon. You can select any audio track from the list. Instagram will recommend tracks for you and categorize tracks by genre, new releases, and original audio. Each track shows the number of times the track has been used. An arrow next to the track indicates popular trending Reels audio. Trending Music ‘may’ accelerate the performance of your Reel.
On the audio screen, you will also see ‘Saved’. This is where any tracks you have saved while scrolling Reels or the explore page can be found.
You can also use your original audio. For example, talk to the camera as you record the video, record a voiceover in the Reels editor on the next screen, or import your audio from any video stored on your camera roll.
- Select the effects icon to add an effect, which is a visual edit to the video content. There are thousands of effects that you can use on your Instagram Reel. From changing your hair to pink and adding sunglasses to creating 10 of your product on one screen.
- Use the timer, and the clock icon. Use this to delay recording for 3 seconds after you press the record button. This gives you time to get the subject into position or to start recording a lip sync.
- Try out the dual camera, which allows you to record using the front and back cameras simultaneously.
Pro tip from our Social Media Expert, Andreea Coroian:
When it comes to Reels, practice makes perfect. The more you create, the better you get at it. Think about how you can keep the viewer watching your video for a longer. The tricks I use most are starting with a hook, keeping it short, and creating dynamic videos with different angles. These are key to capturing and maintaining viewers’ attention, the fundamental goal of Reels.
Now that you have uploaded your video or filmed it using the Reel camera, you are ready for the next step. The fun bit is where you bring the video to life and edit clips. Tap next to access the Reels editor, where many unique editing tools are available.
3. Edit your Instagram Reel
You could post your Instagram Reel in its current format. But there are a number of steps you can take to improve your Reel and increase its opportunity to perform.
A. Add music to your Reel
If you didn’t add music on the first screen, tap the audio icon to add it.
- Original audio. The video you filmed or uploaded may already contain the perfect audio. If this is the case, add nothing. If you filmed the subject talking, you could add instrumental background music from the Instagram music library. Keep the music track below 10%, using the volume controls and your voice at 100%.
B. Add captions to your Reel
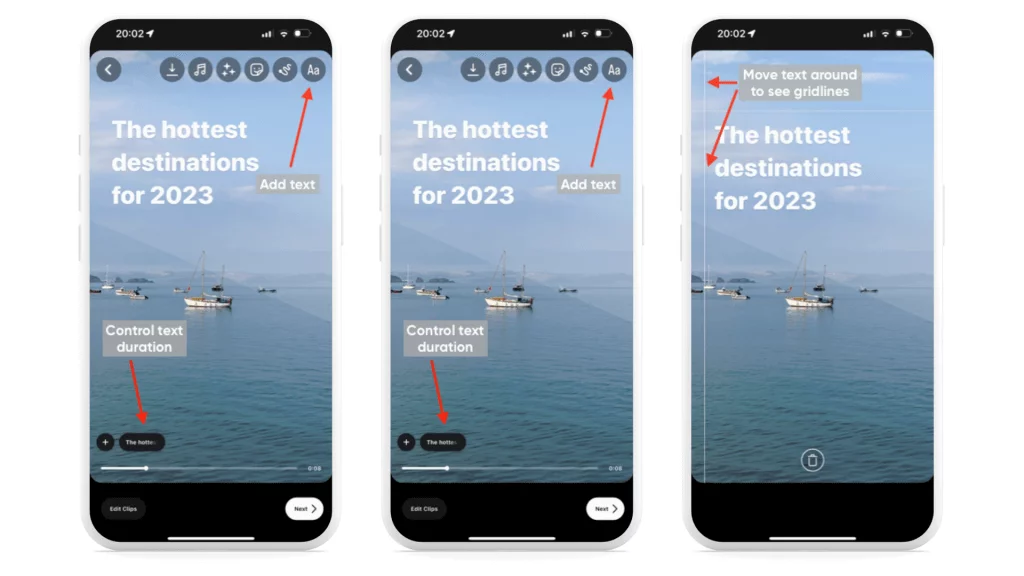
- If you have spoken words on your Reel, it’s important that you make your Reel accessible to those who consume Instagram without sound. You can add auto-generated captions using the captions sticker in the sticker tray. Place your captions within the grid lines.
C. Add text
- Add text such as the all-important marketing hook on the first frame of the Reel. Just like on Instagram stories, choose the font and the color of your text. Select the duration for how long the text stays on screen by tapping the text bubble at the bottom of the screen and moving in the ends of the progress bar.
D. Add a light filter
- You can switch between the standard Instagram light filters by swiping across the screen from right to left.
E. Add effects
- There is a second opportunity to add an effect by tapping the effects tray icon.
TOP TIP. Once you have put the work into creating and finessing your Reel, we recommend that you always download Instagram Reels to your phone to have a backup copy.
4. Share your Reel
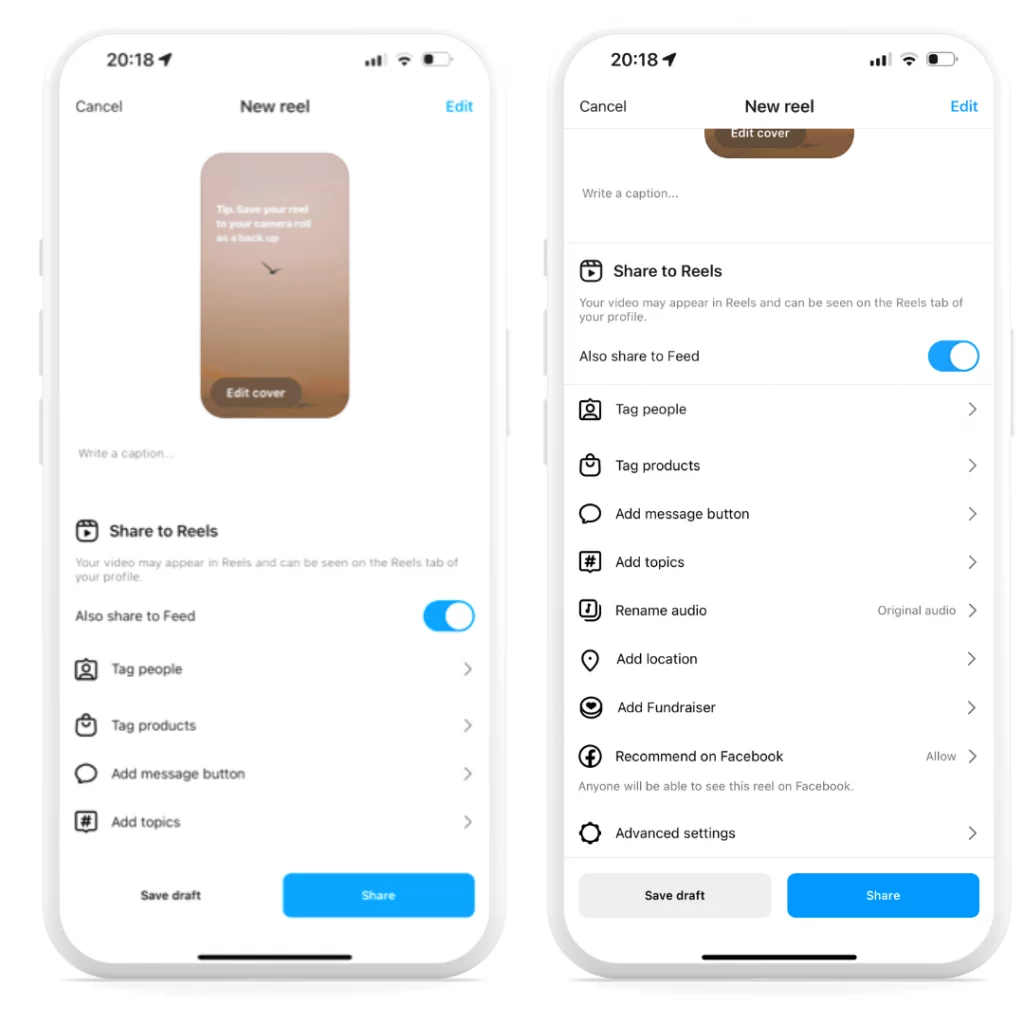
You now have a Reel, and it’s almost ready to be posted to the Instagram feed! Before posting Reels, tap next to access the final screen, where you will add a written caption, hashtags, topics, and a cover shot.
-
- Add your cover image, which is the image that will be shown on your profile grid and Reels grid. It will not be seen as part of the Reel when it plays in the Instagram feed. Select either a frame from the Reel itself or choose an image from your camera roll.
- Write your caption in the same way that you would for any other post.
- Add up to 30 hashtags at the foot of your caption.
- Toggle ‘Also share to feed’ on to ensure that your Reel is shared to your own profile grid rather than just playing in the Instagram feed.
- Tag relevant people and products, such as products from your Instagram shop, or tag a relevant person the Reel includes. Via tag people, you can also add a collaborator if the Reel is a partnership between 2 accounts.
- Add up to 3 topics from the list.
- Rename audio if it’s your own audio. It’s not advisable to rename tracks that don’t belong to you.
- Add your location, especially if you are trying to attract a local audience.
- Other settings include the add message button and add fundraiser.
- Recommend on Facebook if you would like to extend views of your Reel onto Facebook. Unlike Instagram stories, this does not mean the Reel will be shown on your Facebook profile or feed, just within their recommended Reels.
- Advanced settings include scheduling the Reel, hiding the like count, adding a paid partnership label, and choosing to upload the Reel at the highest quality.
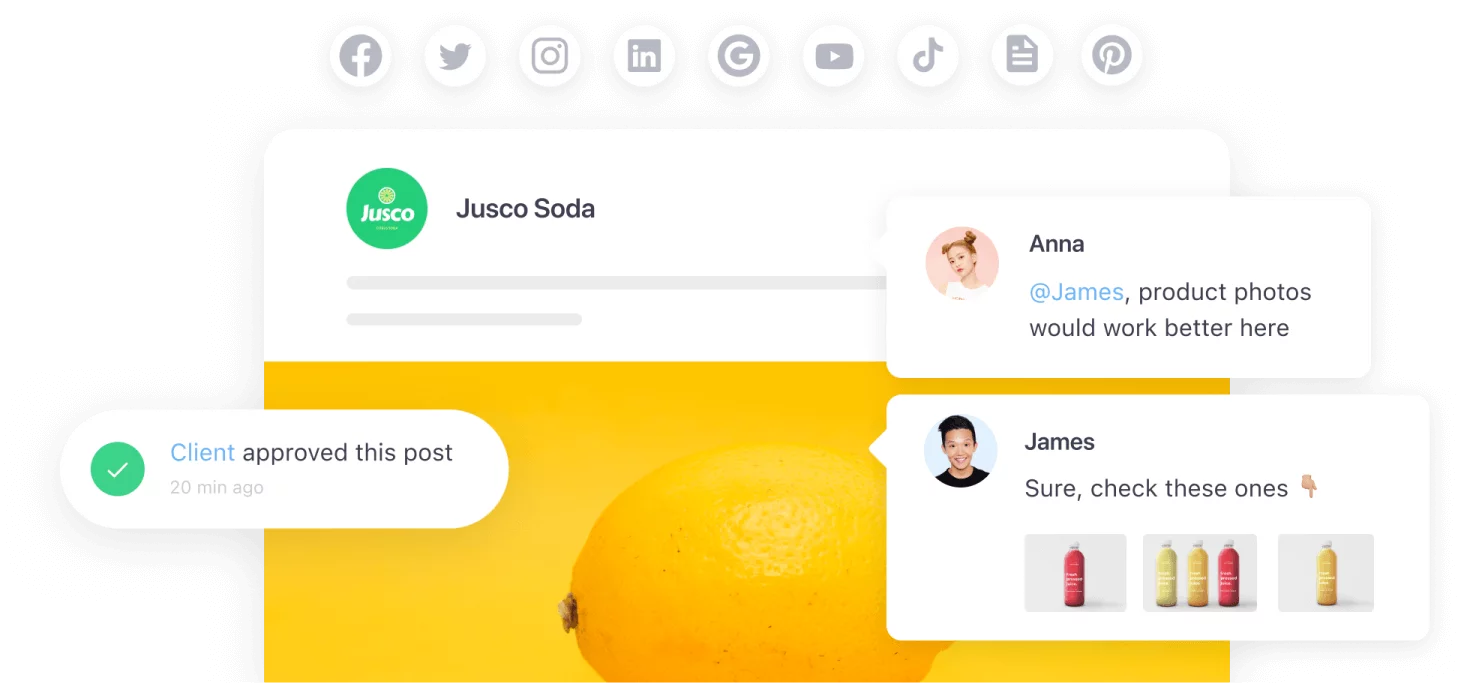
With Planable you can schedule Instagram posts, Reels and Stories ahead of time. By planning and scheduling your Instagram content in advance, you’ll have your Reels organized in one place together with the rest of your content to be posted to up to 8 social media platforms. Clients can approve or comment on Reels at the same time as approving other content.
Reels vs TikTok – which one should you choose?
How to make Reels on Instagram that stand out
Amongst the millions of Reels shared on Instagram, and an audience consuming information at lightning speed, it’s essential that you do everything you can for your Reel to stand out and grab attention. Here are a few ways to do this:
- Leverage trends. Similar to TikTok, there are trends you can get involved in on Instagram. If they are on brand for you and help you to create informative, inspiring, or entertaining videos, have a go.
- Use trending audio. These are tracks marked with an arrow, which means it’s gaining popularity.
- Use trending formats. They’re usually tied into a particular audio track. “27 photos from 2021” immediately comes to mind, an audio track by @SwingLynn which told us to “Add 27 photos to this sound and let it sync” and then 27 photos were timed to music. That was a trend that went wild.
- Consider the first 3 seconds – they matter most. Your Reel needs to immediately grab attention. Instagram users are scrolling and looking for something that resonates enough for them to stop. Movement and quick transitions help, as do powerful ‘hooks’ – words on the screen that work as an invitation to watch or discover more. A moment of stillness also works beautifully. In our fast-paced world, a moment of quiet can make a big impact.
- Get creative with your Reels. Aim to be bold, brave, and different. If it’s a personal brand, don’t hesitate to show up as yourself. Instagram Reels content doesn’t have to be super polished; it just needs to connect.
- Collaborate. Is there a brand, content creator, or individual who shares a similar target audience to you that you can collaborate with? This is a useful strategy for extending your reach and getting new eyeballs on your social media content.
- Create seamless transitions. There’s as much fun to be had creating as there is viewing clever transitions. This can be as simple as the subject being in one place on one frame and magically being in another for the second. Cover the screen with your hand or another object at the end of the previous clip and the beginning of the next.
- Create Instagram Reels that are entertaining. Aim for Reels that inspire, show transitions from A to B, teach and share knowledge, and, most of all, create Instagram Reels that connect with your target audience. Post Reels that answer the questions your audience has.
- Use Instagram Reels templates – they are also a great way to start. As you watch someone else’s Reel, look out for the word ‘template’ towards the bottom of the screen. These allow you to quickly produce your Reel by uploading your own media to a pre-timed template.
Ready to create stunning Instagram Reels?
Even with Instagram’s recent admission that they leaned too far into video in 2022, video is where it’s at if you want to make a significant impact to your Instagram results.
Commit to making Instagram Reels a core part of your social media strategy. Be brave, press the buttons, explore, and have fun embracing this exciting chapter of short-form video. Reels can actually be a lot of fun and do many positive things for your account.
Whilst viral Reels are out of your control and not a dream to be chased, you never know when the Instagram Reels algorithm might send one flying.
Sarah is a Content Specialist and Instagram trainer who dedicates her days to making sure no business ever runs out of ideas for marketing themselves online. She’s a career marketer, having worked for big brands in Australia and the UK before setting up her own content-focused social media business in 2013. She offers 1-1 training, group courses and content management.

