If your Instagram keeps disconnecting, your scheduler swallows the post and silently fails, your support ticket has been “with the team” for a week, or your monthly bill creeps up every time you add a channel, you’re not the only one running out of patience with...
Redesign For multi-location brands
all your locations, one content flow
For multi-brand companies
content collaboration at scale
For agencies
impress your clients and take on more
“The team loved it from the start. Planable helps us overview the entire marketing efforts.“
Every week, social media teams repeat the same workflow: draft a post, request feedback, revise the copy, secure approval, and schedule the final version across multiple platforms.
That process becomes difficult to manage when a team publishes dozens of posts across LinkedIn, Instagram, Facebook, TikTok, and other channels. Each post may involve different formats, reviewers, approval rules, and publishing dates. As the volume grows, teams spend more time coordinating the workflow than creating content.
A social media AI agent can handle many of those handoffs while keeping people in control of what gets published.
By connecting Claude with Planable, you can build an agent that:
drafts platform-specific social media posts;
creates posts in the correct workspace and channel;
The agent manages the repetitive steps, but the team retains final approval. This guide explains how to build that workflow using Claude as the reasoning layer and Planable as the content collaboration and publishing layer.
What is a social media AI agent?
A social media AI agent is an LLM-powered system that can interpret a goal, decide which actions are required, use external tools, evaluate the results, and continue working until it completes the task or requires human input.
A standard AI writing tool usually generates copy and stops. An AI agent can generate the copy, create the post in a social media management platform, send it for approval, check its status, and take the next permitted action.
In this setup:
Claude provides the reasoning layer. It interprets the request, breaks the goal into tasks, selects the appropriate tools, and decides what to do next.
Planable provides the workflow layer. It gives Claude the tools and workspace needed to create, review, approve, schedule, and manage social media content.
Your team provides oversight. People review important decisions and approve content before it is published.
For example, you might give Claude the following goal:
“Draft product launch posts for LinkedIn and Instagram, add them to Planable, and send them for approval.”
Claude can then:
identify the required platforms;
adapt the message to each platform;
create separate posts in Planable;
route the drafts through the approval workflow;
check whether each action succeeded;
stop when human approval is required.
This workflow follows a continuous cycle:
Perceive: Understand the goal and inspect the available context.
Reason: Decide which task or tool should be used next.
Act: Call the relevant Planable tool.
Observe: Check the result and determine whether another action is needed.
This perceive, reason, act, and observe cycle is central to agentic workflows. It allows the model to respond to changing conditions instead of relying on a fixed sequence of predefined steps.
Agent-based automation is most useful when the workflow contains variable inputs, multiple tools, approval checkpoints, or tasks that cannot be predicted completely in advance. For simpler and fully predictable processes, a conventional automation may be easier to build and maintain.
Anthropic’s Building Effective Agents guide provides additional background on common agent patterns and when to use them.
How an agent differs from a simple AI writing tool
A standard AI writing tool generates text and hands control back to you. You copy the output, open your social media platform, paste it in, and manually push it through your approval flow.
An agent connected to Planable does all of that itself. One goal in. Posts drafted, submitted, and queued for approval out.
What you need before you start
Three things, and none of them require a developer.
A Planable account — the free trial works. The MCP connector is available on all plans, so you don’t need to upgrade to get started. Your API token lives in Settings → Integrations → Public API.
A Claude account — works on any plan. If you’re on a Claude team or Enterprise plan, an admin can add the Planable connector once and make it available to the whole organization.
10 minutes — the connection itself takes about two minutes. The rest is your first prompt.
The connection uses a standard called MCP (Model Context Protocol), an open protocol that lets Claude talk to external tools through a URL, without any code or custom integration work on your end.
Once connected, Claude has access to your Planable workspace: your pages, your approval queue, your content.
That’s it. No code, no terminal commands, no API keys to paste into files. Once you authorize, Claude can see your Planable workspace and act on it.
A note on permissions: Claude can only do what you can do. If you manage three client workspaces in Planable, Claude can access all three. If you don’t have the Analytics add-on on a workspace, Claude won’t be able to pull analytics for it either. Also, if you don’t have approve permission, it can’t approve. Your plan and workspace permissions always apply. The agent isn’t a workaround for access you don’t already have.
Connection details worth knowing: Your connection expires after 8 hours of inactivity and refreshes automatically. Your authorization is valid for 180 days. After that, you’ll be prompted to reconnect automatically.
What Claude can do in Planable once connected
Once the connection is active, Claude has access to multiple tools across four categories:
Workspace & pages: List your workspaces and connected social media pages
Content pipeline: Create, read, update, and list posts
Approval workflow: Approve or reject posts in the review queue
Collaboration: Read comments and add comments to posts
The approval workflow tools map directly onto Planable’s built-in social media approval workflow, so Claude participates in your real review process.
Using your social media agent: what to prompt
Once Claude is connected to Planable, you use it the same way you’d message a very capable colleague with specific instructions. No code, no commands, just plain-language prompts describing what you want done.
Claude figures out the steps, calls the right tools in Planable, and reports back.
Here’s what that looks like in practice.
Step 1. Getting oriented: ask Claude what you’re working with
Your first prompt can be as simple as:
“Show me my Planable workspaces and which social media pages are connected to each one.”
Claude queries your workspace, finds the connected pages, and summarizes what it sees. That output tells you exactly how to address each client account and channel in future prompts, so you can say “Client A’s LinkedIn page” and have Claude know exactly what you mean.
Step 2. Drafting a post for a specific platform
“Draft a LinkedIn post for [Client Name] announcing [topic]. Keep it professional, under 200 words, and add it to the approval queue in Planable.”
Claude drafts the post and adds it to the client’s Planable queue. Your reviewer opens Planable and sees it sitting there: ready to approve, edit, or send back with feedback. No copy-pasting, no tab-switching.
Step 3. Drafting across multiple platforms at once
“Take this campaign brief and create posts for [Client Name]’s LinkedIn, Instagram, and X pages. Adapt the tone and length for each channel and add them all to the approval queue.”
Claude reads the brief, writes platform-specific versions, adjusting length, hook, and structure per channel, and adds each to the right Planable page.
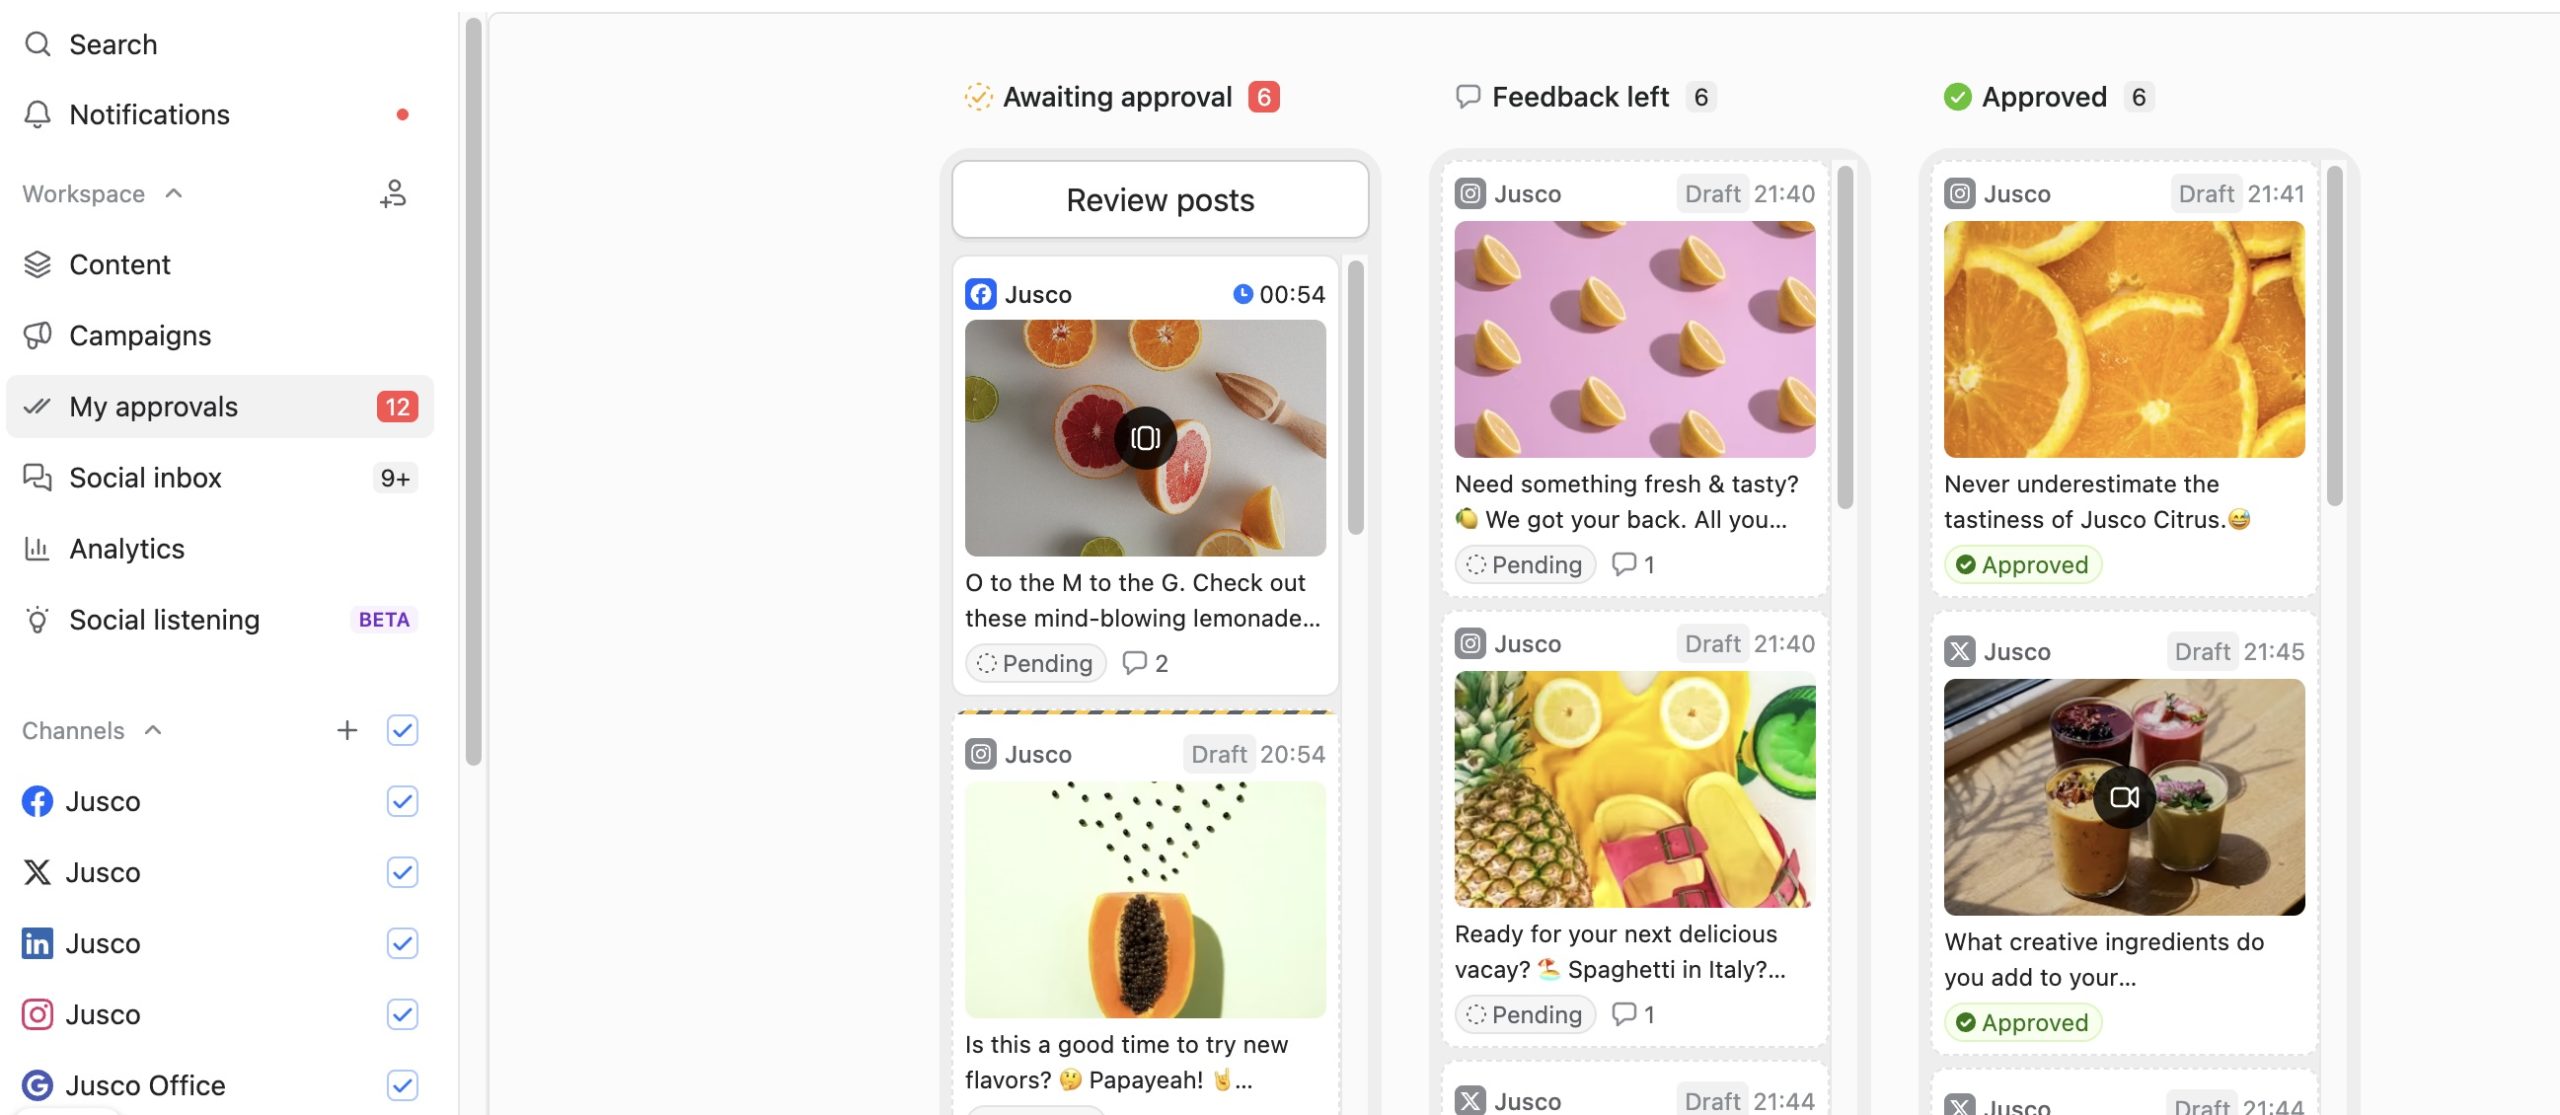
Your reviewer sees all three in one place and can approve or request changes per channel without juggling separate docs.
Planable social post approval dashboard
Step 4. Reactive content when timing matters
“A story just broke about [topic]. Draft a reactive LinkedIn post from [Brand]’s perspective, timely, professional, under 1,200 characters, and add it to the Expedited Review page.”
Claude finds the right page in Planable, creates the draft, and it’s in your queue within seconds. Fast enough to catch the moment. Your reviewer approves from mobile or desktop, and the post is ready.
The common thread: you describe the outcome in plain language, and Claude handles the workflow steps. You don’t need to know how it’s calling Planable under the hood, that’s the point.
Step 5. Let Claude work while you don’t
The prompts above are things you trigger. But Claude can also run on a schedule, with no nudge required. Here is an example:
“Every first Monday of the month, pull analytics across all my Planable workspaces and send a summary to our Slack channel.”
Set it once, and Claude handles it automatically. The report lands in Slack or your inbox on schedule, the audit runs without you having to remember. That’s where an AI colleague starts feeling less like a tool and more like a team member that actually takes things off your plate.
The common thread: you describe the outcome in plain language, and Claude handles the workflow steps. You don’t need to know how it’s calling Planable under the hood, that’s the point.
Building in the human approval layer
The agent doesn’t post on its own, and for most teams, it shouldn’t.
Nearly 4 in 5 MCP integrations are set up with write permissions, according to Planable data: teams aren’t just querying their content calendar, they’re creating and scheduling posts through their AI agent. That level of access makes a proper approval layer essential for most teams.
The design pattern that handles this is called human-in-the-loop: a human reviews and approves agent outputs before they take effect, preserving quality control without requiring the human to do all the drafting work. It applies here just as directly as it does in any other autonomous system.
How the approval loop works in practice
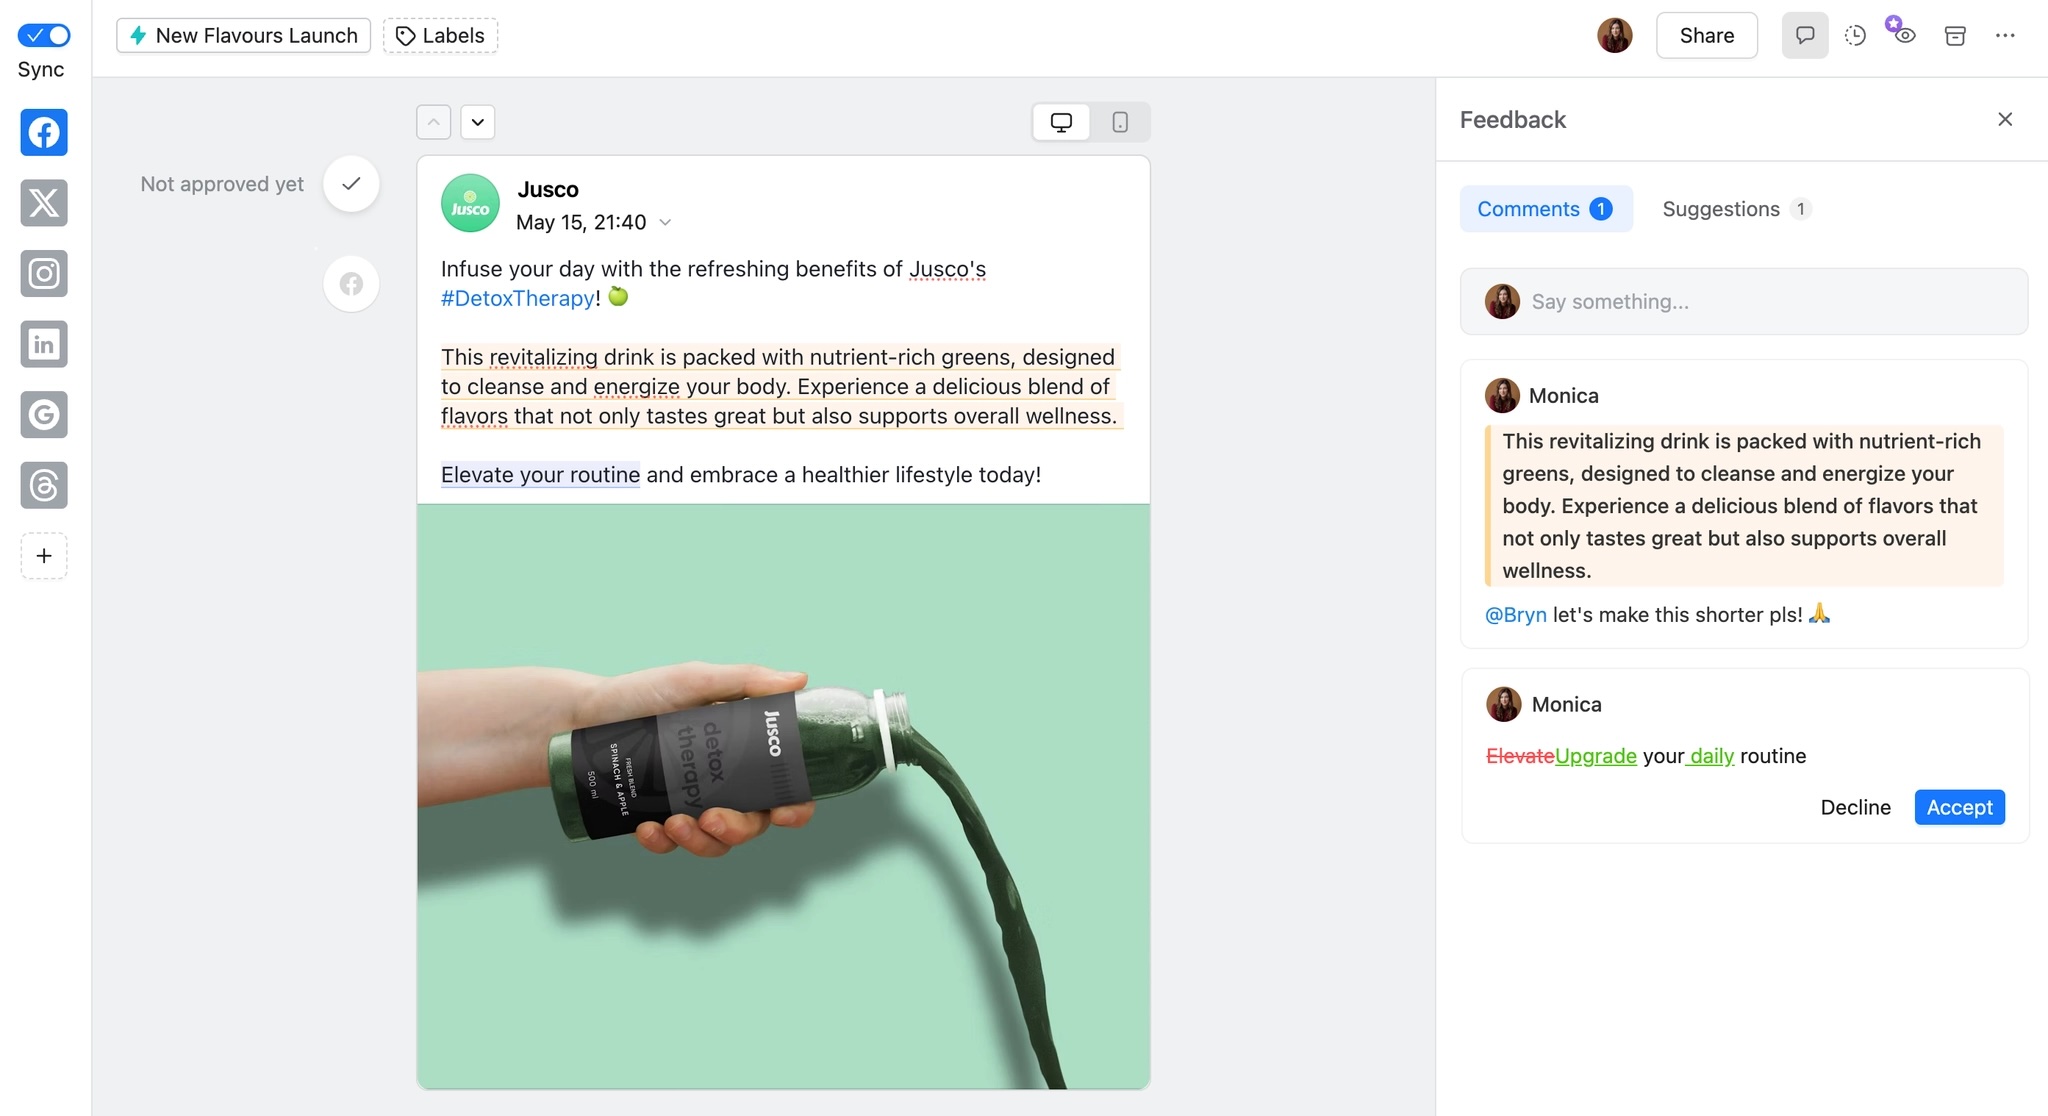
When a reviewer opens Planable and clicks Request changes, they can leave a comment with specific feedback. You can then paste that feedback into your next Claude prompt and ask it to revise:
“The reviewer left this note on the LinkedIn draft: ‘Too formal, make it more conversational and add a question at the end.’ Here’s the current draft: [paste draft]. Please revise it and update the post in Planable.”
Claude incorporates the feedback, revises, and updates the draft. The whole revision cycle stays inside Planable, visible to the whole team, no external docs needed.
Planable post review with comments and edits.
What you can build: social media agent use cases
Here are three workflows that agencies and content operations teams are already building with Planable and Claude.
Drafting a week’s worth of posts from a single brief
Agency content ops teams spend a lot of time translating one campaign brief into platform-specific posts, manually, channel by channel. The agent collapses that into a single prompt.
Hand Claude a campaign brief, goals, key message, tone, and links to assets. It writes platform-specific posts for each channel and adds them all to your Planable queue, organized by page. Your team reviews everything in one session instead of five separate drafting rounds.
A working prompt:
“Here’s the brief for [Client]’s Q3 campaign: [paste brief]. Draft posts for their LinkedIn, Instagram, and X pages. Adapt the tone and format for each channel, and add them all to the approval queue.”
Within seconds, all the drafts are in your Planable queue, sorted by platform. Your reviewer approves, requests changes, or moves them to the calendar, without opening another tool.
Turning a campaign brief into a reusable copy skill
Every feature launch comes with the same problem: a brief lives in Notion, copy gets written in five different voices, and by the time the third asset goes out, half the team has stopped reading the source doc.
The agent collapses the gap between brief and consistent output. Share your campaign brief (a Notion link, a doc, or a paste) and Claude extracts the campaign frame, product facts, persona angles, channel priorities, and hard constraints into a skill your whole team can invoke.
From that point on, anyone can generate aligned copy without re-reading the brief every time.
A working prompt:
“We’re launching [Feature] next week. Here’s the campaign brief: [link or paste]. Build a copy skill covering the campaign frame, product facts, a persona message for each ICP (pain → change → campaign line → channel), competitive positioning, channel priority table, and what we should never claim. Once it’s saved, I want to be able to say ‘write the reactivation email for the Leader angle’ and get something on-brief without having to re-explain the product.”
Once the skill is saved, any teammate can generate launch emails, social posts, in-app nudges, or sales enablement, all anchored to the same brief, and without touching the source document again.
Repurpose content that’s already earning AI visibility
Many marketing teams decide which blog posts to repurpose based on intuition or recent performance. They then rewrite the content manually for each channel, often producing generic copy that doesn’t reflect the voice of the person publishing it.
A more effective approach is to start with content that AI search engines and answer platforms are already citing. If a topic is consistently referenced by AI systems, it’s a strong signal that the content is useful, well-structured, and worth expanding into additional formats.
To automate this workflow, connect:
An SEO platform (such as SE Ranking) to identify pages receiving AI citations and visibility data.
Planable as the central workspace for creating, reviewing, and approving repurposed content.
Slack for task assignment, notifications, and team collaboration.
The agent follows a three-step workflow:
Identify high-value repurposing opportunities. Claude retrieves AI citation data from your SEO platform, identifies which topics are already being referenced across AI search experiences, scores them by factors such as citation breadth and funnel stage, and matches them to your existing content library.
Prioritize topics and assign authors. Claude publishes a prioritized topic map in Slack so editors can review recommendations and assign each topic to the appropriate author.
Generate author-aligned drafts. Once an author is assigned, Claude uses an approved writing profile built from that author’s existing public or organization-approved content to match their writing style. It drafts a platform-specific post, attaches SEO metadata and editorial notes, saves the draft to Planable, and sends the author a Slack notification when it’s ready for review.
A working prompt:
“Run repurposing research, prioritize the opportunities, and post the topic map to Slack. After I’ve assigned authors, draft topic [X] for [Author] on LinkedIn and save it to Planable for review.”
The result is a content pipeline driven by AI visibility signals instead of guesswork. Your team focuses on reviewing and refining high-priority ideas, while each draft is tailored to the intended author and enters the approval workflow ready for feedback.
Tips for keeping the agent’s output on-brand
As Aleyda Solis, international SEO consultant at Orainti, put it in Search Engine Journal:
“A personalized editorial and optimization workflow is required to ensure quality, originality, and expertise by integrating unique brand insights and first-party data [when using AI for content at scale].”
That holds for social too. Here’s what actually moves the needle.
Open a fresh conversation for each client. Claude’s context window is per-conversation. Starting fresh prevents brand voice from one account bleeding into another. Save your client-specific prompt as a template (in a doc or Claude’s Projects or Skills features) and paste it at the start of each session.
Give Claude the brand voice guide upfront. Put tone, character limits, banned phrases, and two or three sample posts directly in your first message or create a Claude Project per client with all the details. “Approachable but authoritative, no buzzwords, LinkedIn posts under 200 words, always end with a question” is infinitely more useful than “write in our brand voice.” The more specific you are, the less editing you’ll do.
Name your Planable pages clearly. Claude navigates your workspace by the page names visible in Planable. If your Instagram account is labeled “Client A – Instagram” and your LinkedIn is “Client A – LinkedIn,” Claude can target them precisely. Ambiguous names like “Main” or “Social Page 1” produce ambiguous results.
Use follow-up prompts instead of starting over. If a draft isn’t quite right, don’t re-run the whole task from scratch. Paste the draft back and say: “This is good but the opening is too formal. Rewrite just the first two sentences to sound more like the sample posts I shared.” Claude applies the feedback in place.
Test in a dedicated Planable workspace first. Set up a test workspace in Planable before connecting it to live client accounts. This lets you experiment with prompts and see exactly what Claude produces, without any risk to client content. Once you’re happy with the output, move to live workspaces.
FAQs
Do I need to know how to code?
No. The connection between Claude and Planable is set up through Claude’s Connectors settings. No code, no terminal, no API files to edit. Once you’ve added the Planable connector and authorized it with your Planable account, you interact with it through regular Claude conversations using plain language.
Can my whole team use this?
Yes, with a small caveat: each team member sets up the connector in their own Claude account, since the connection is tied to an individual’s Planable login. Each person can only access the workspaces and pages they already have permission to in Planable. If you’re on a Claude team or Enterprise plan, an admin can add the connector organization-wide, making it available to everyone without individual setup.
How does Planable work with AI tools?
Planable exposes a connector at https://mcp.planable.io/mcp using an open standard called MCP (Model Context Protocol). AI tools like Claude connect to that endpoint and get access to Planable’s full action set (creating posts, managing approvals, adding comments, and querying workspaces) without any custom integration code.
How much does it cost to run this?
Two costs to account for. Your Claude plan covers the AI side. Check Anthropic’s pricing for current rates. Your Planable plan covers the other side. The MCP connector is available on all plans, including the free trial. There are no per-connection or per-action fees on the Planable side.
How do you build an AI content pipeline for social media?
A working pipeline has four stages: a brief, URL, or prompt goes to Claude as input; Claude drafts platform-specific posts using the brand guidelines you provided; those drafts appear in Planable for human review and approval; approved posts go live through Planable’s publishing tools. With the Planable connector active, Claude handles the first three stages from a single conversation, with no additional tools required.
Is Claude better than ChatGPT for this?
Both can write social media copy. Claude’s practical advantage for this specific workflow is native MCP support. It connects to Planable and other tools directly, without a plugin layer or intermediary. ChatGPT can also connect to Planable via the Apps section in ChatGPT (search “Planable” and connect). The setup differs slightly, but both work. For the Planable-specific steps, the full MCP setup guide covers both.
Start with your first social media agent today
You’ve got a working setup that drafts, routes for approval, and publishes, without anyone copy-pasting between tabs.
For an operations lead managing multiple clients and channels, that’s a meaningful shift in how content actually gets out the door.
The next step is making it yours. If you manage multiple clients, start each session by asking Claude to list your Planable workspaces, then address each client by name in your prompts.
If you want faster reactive content, save a prompt template for your most-used formats and paste it when news breaks.
And if you want the output to get sharper over time, paste revision notes from Planable’s approval thread back into your next prompt. Claude incorporates that feedback the same way a writer would.
Not on Planable yet? Get started, the MCP connector is live on every plan.
Monica leads product marketing at Planable. She owns go-to-market for new features and shapes how Planable fits into the broader SE Ranking product family. She joined in 2023 as Planable's first product marketer, built the function from scratch, and now runs the team's competitive intelligence program. With a background in product management and Romania's startup scene (How To Web, MVP Academy), she writes about competitor analysis, product launches and marketing workflows from the builder's side. Before Planable, she spent almost five years managing Orange Fab Romania, Orange's startup acceleration program, where she supported 40 startups and helped generate over €2.2M in commercial value.







 Creation
 Scheduling
 Planning
 Social Inbox
 Collaboration
 Analytics
 Approval
 Social Listening