Social CRM is your ticket to high-quality real-time engagement with customers, on the platforms where they already hang out. You'll get solid data on behavior and sentiment with unprecedented granularity. Social CRM tools empower sales and marketing teams to deliver a...
Redesign For multi-location brands
all your locations, one content flow
For multi-brand companies
content collaboration at scale
For agencies
impress your clients and take on more
“The team loved it from the start. Planable helps us overview the entire marketing efforts.“
Whether you manage one or multiple IG accounts, scheduling posts on Instagram will save you from worrying about what to post on the go and help you focus on the most important aspects of your business. No more last-minute panic attacks trying to whip up a post, just to maintain a consistent presence on the gram.
In this article, we’ll explore different ways for scheduling Instagram posts, either directly through the app or by using a scheduling tool, and provide you with step-by-step guidance on how to do it.
Can I schedule Instagram posts?
Yes! You can schedule posts on Instagram both natively and with a third-party Instagram scheduler like Planable which allows direct publishing for posts, Reels, and Stories.
How to schedule Instagram posts natively (in-app)
If you are managing a Professional or Business Instagram account, you can easily schedule posts directly from your Instagram app.
Here are the simple steps you need to take:
Step 1. Open Instagram and tap the + icon to create a new Post.
The first steps are basically preparing the post you want to publish just like you would for any new post. So don’t worry if this sounds really familiar.
Step 2. Select your desired photo or video.
Add your desired Instagram captions, effects, and filters. Remember to keep everything on-brand, right? When you’re happy with your post, tap Next on iOS or hit the arrow button on Android.
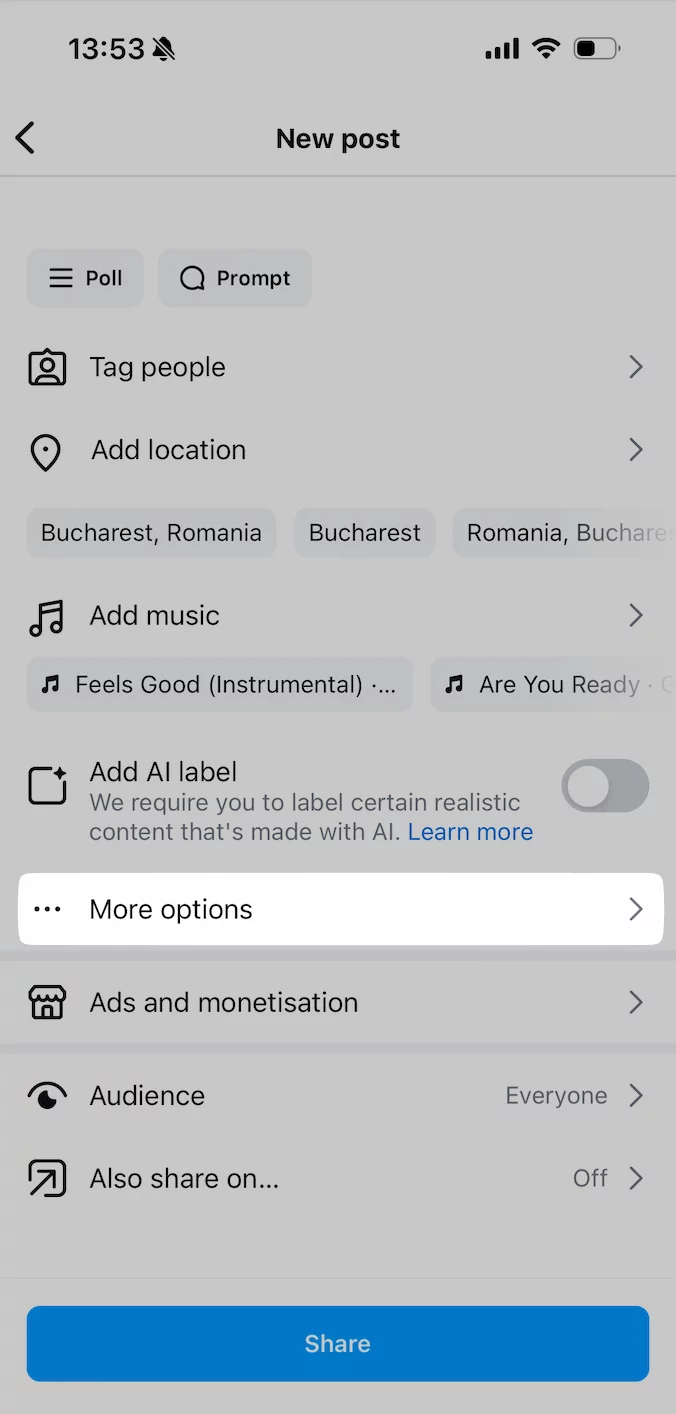
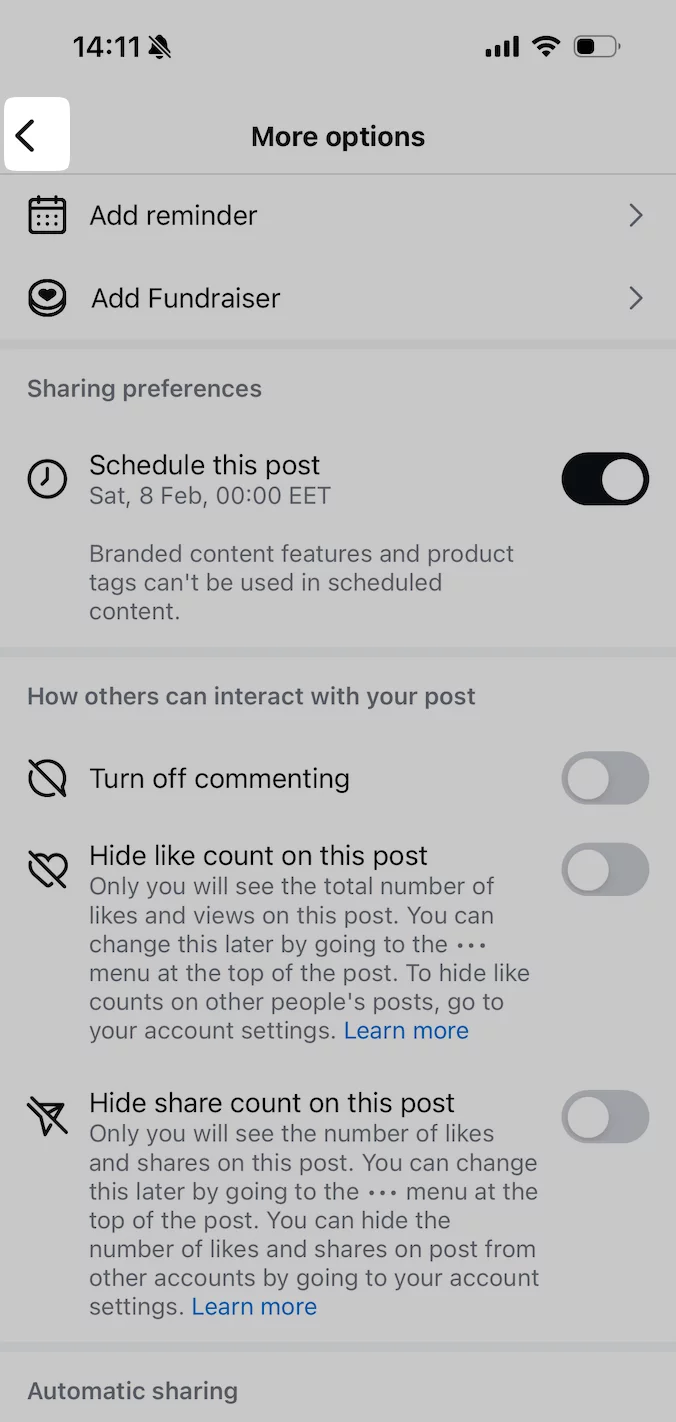
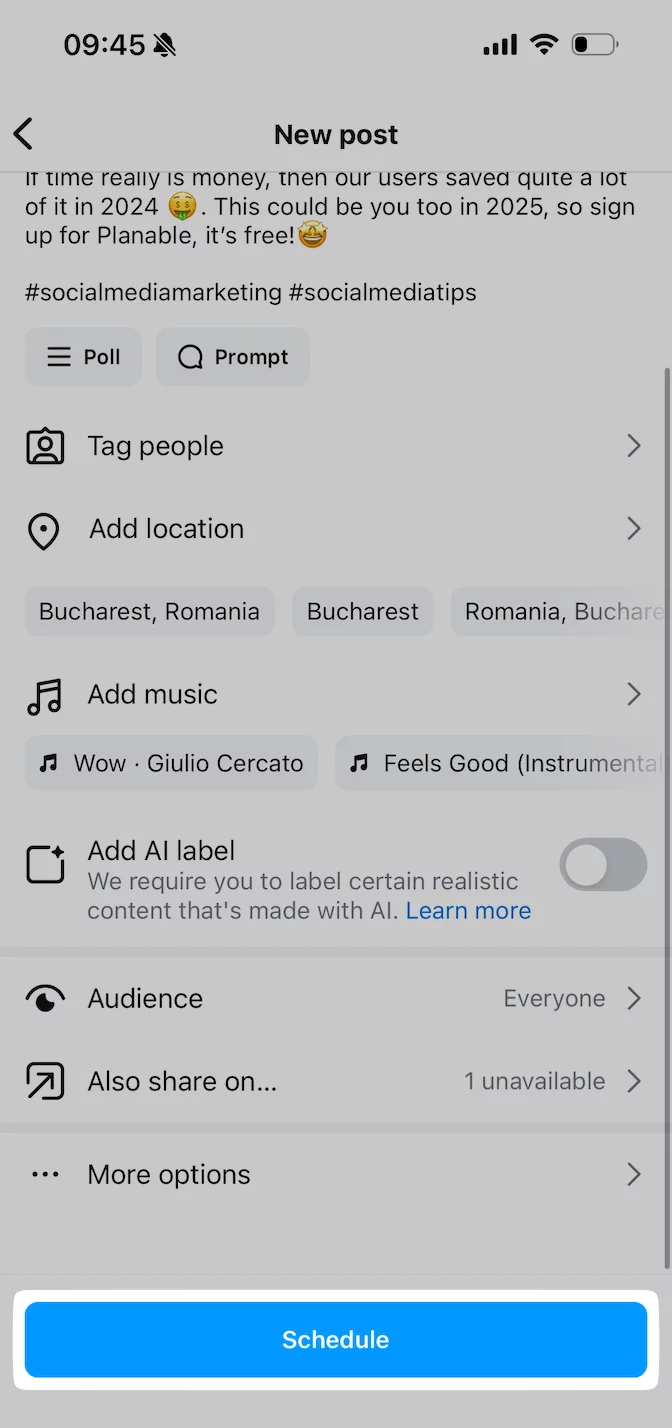
Step 3. Tap More options settings.
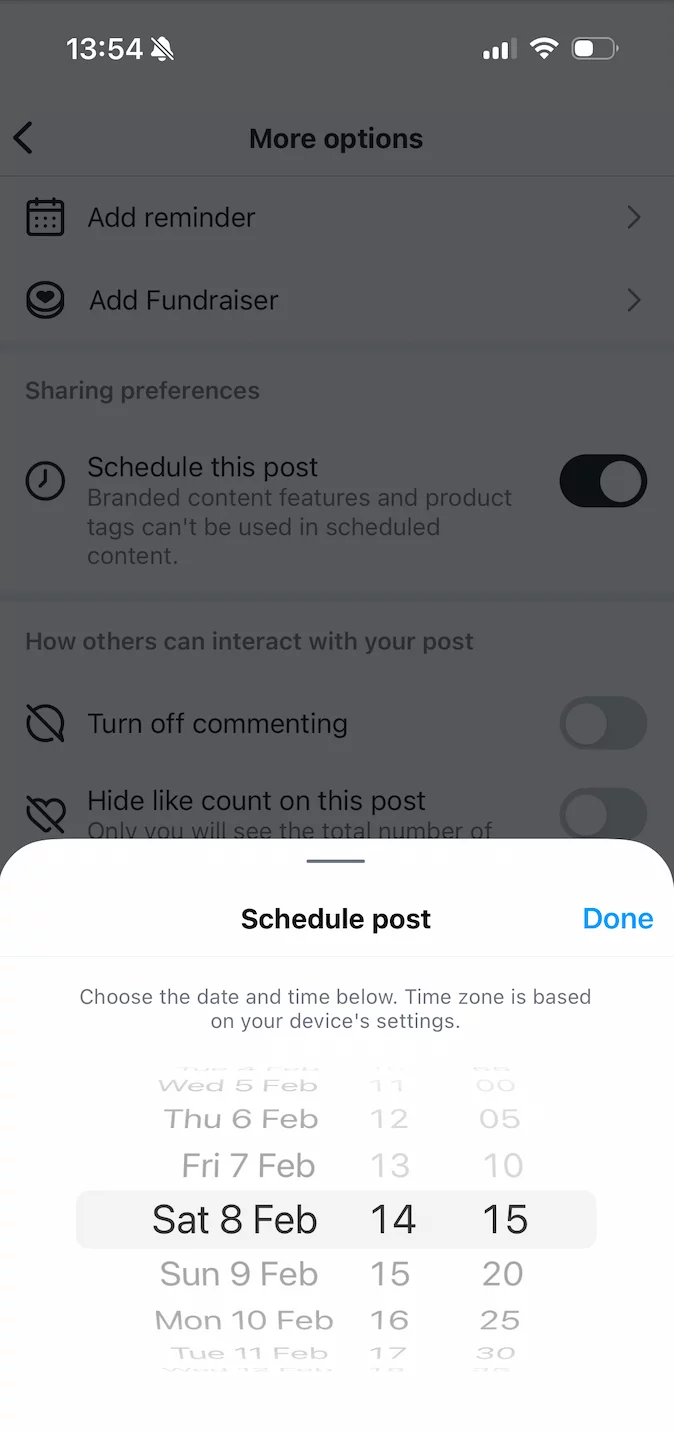
Step 4. Select your desired date and time. It can be as far as 75 days in the future. Then tap Done.
Step 5. Hit the back button to go to the main post-editing screen.
Step 6. Now, finally, tap Schedule and you’re done.
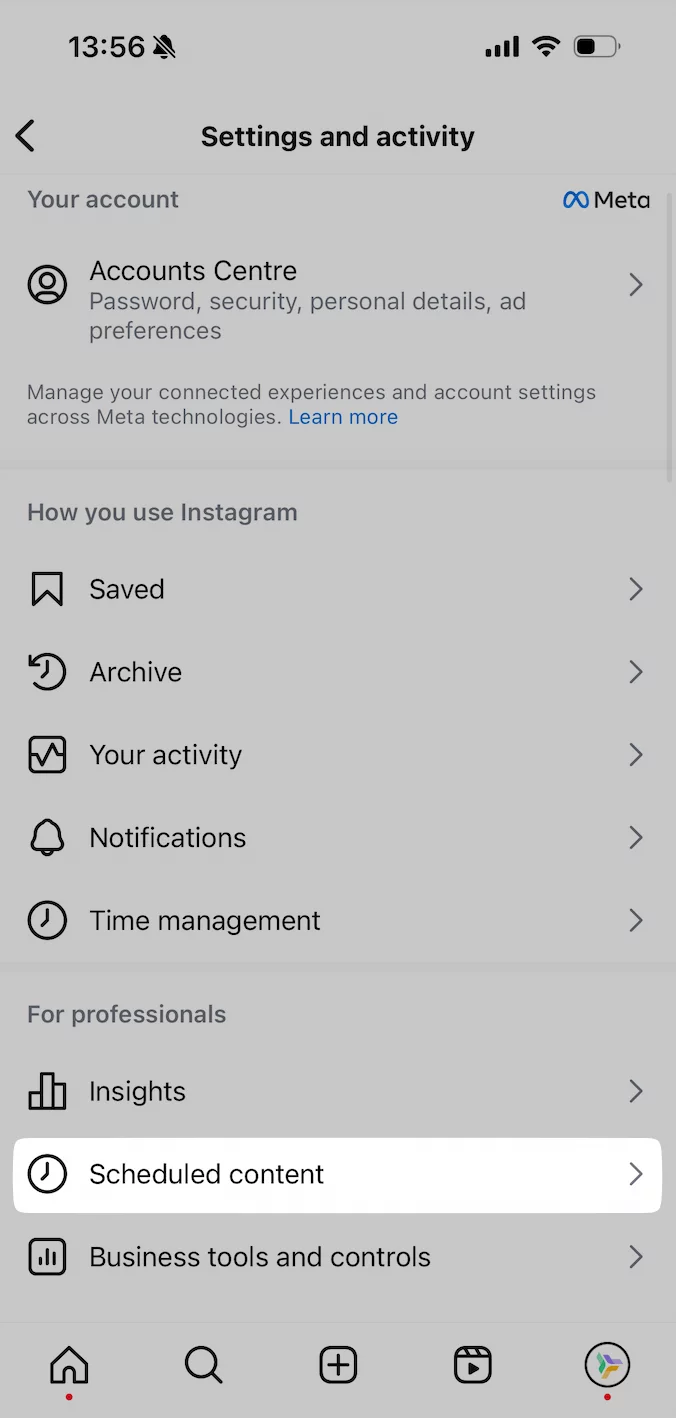
Step 7. To view all your scheduled posts, tap on the Menu icon and go to Scheduled content.
How to schedule posts using an Instagram scheduler
A social media management tool like Planable enables you to schedule Instagram posts in advance, save time, and keep your work organized (especially if you manage multiple Instagram accounts). Scheduling Instagram feed posts, carousel posts, Reels, and Stories does not have to be a cumbersome task, especially with direct publishing.
Here’s a step-by-step guide on how to schedule Instagram posts using Planable:
Step 1. Create a Planable Account
To start planning and scheduling content for 9 social media networks, including Instagram, you can signup for a free Planable account (no credit card required).
Step 2. Connect your Instagram account to Planable
In Planable, connecting your Instagram account can be done in two main ways depending on your account type. Instagram accounts fall under two types: Personal Profiles and Professional Accounts.
*Due to Instagram’s API limitations, only Professional Accounts can connect directly in Planable.
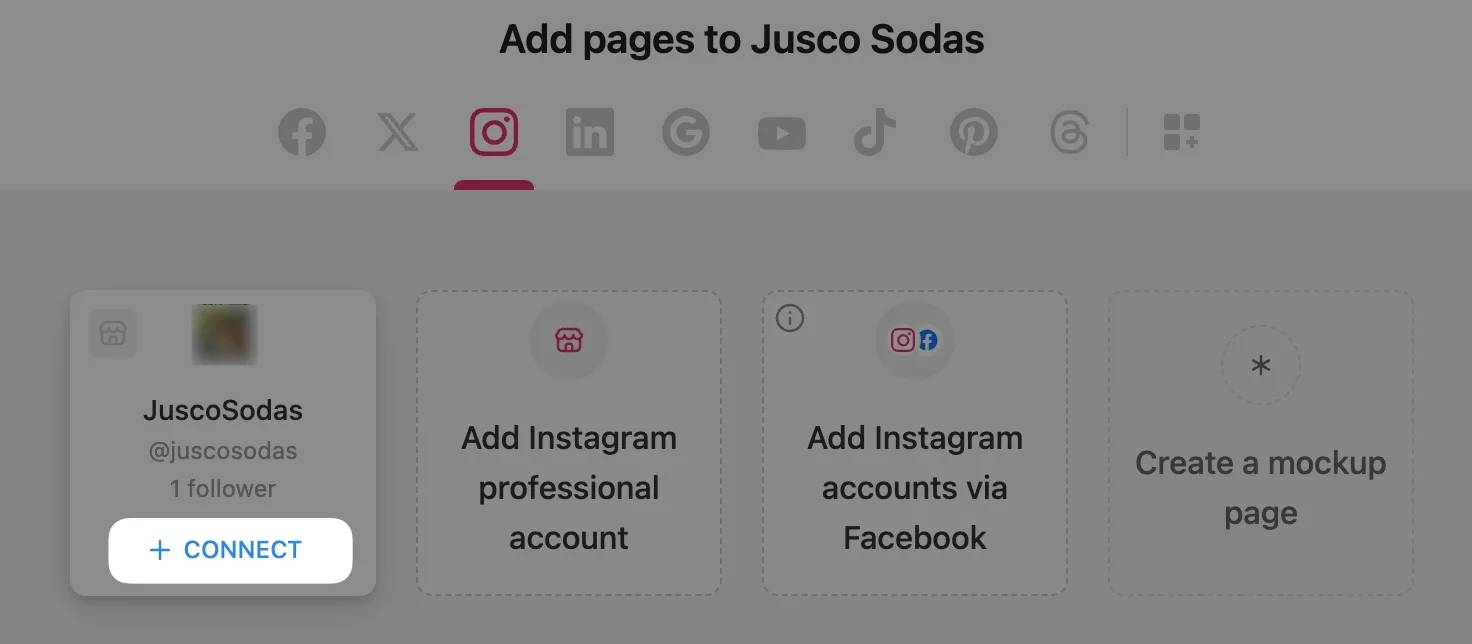
Method 1. Add Instagram Professional Accounts through Instagram
For the simplest connection, you can connect your Instagram professional account directly. Here’s how:
Ensure you are logged in to the correct Instagram account on your browser.
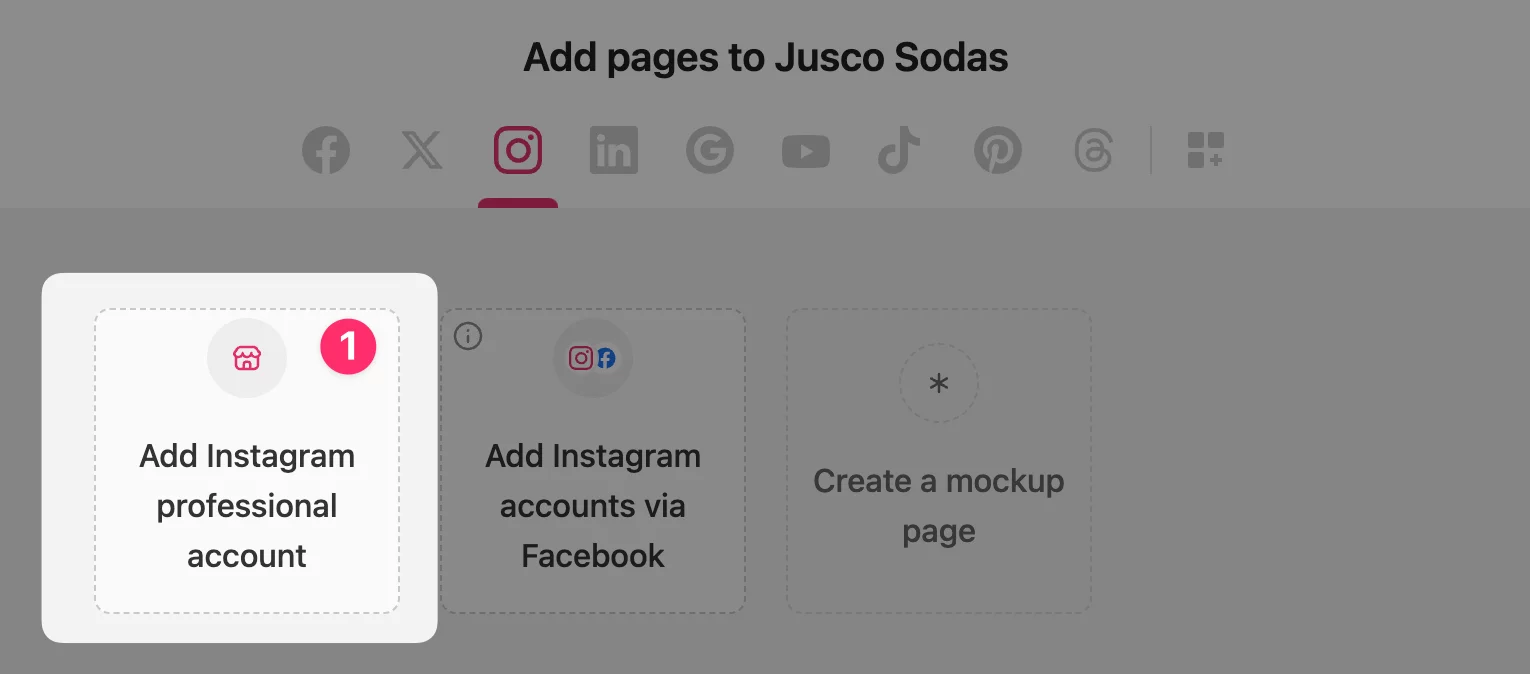
Return to Planable, navigate to Add Pages, and select Add Instagram professional account.
Follow the prompts, and on the Instagram authorization page, check all boxes to allow access and select Allow.
Click Connect in Planable to complete the linking process.
If you need to add multiple accounts, be sure to log in to each account separately before connecting.
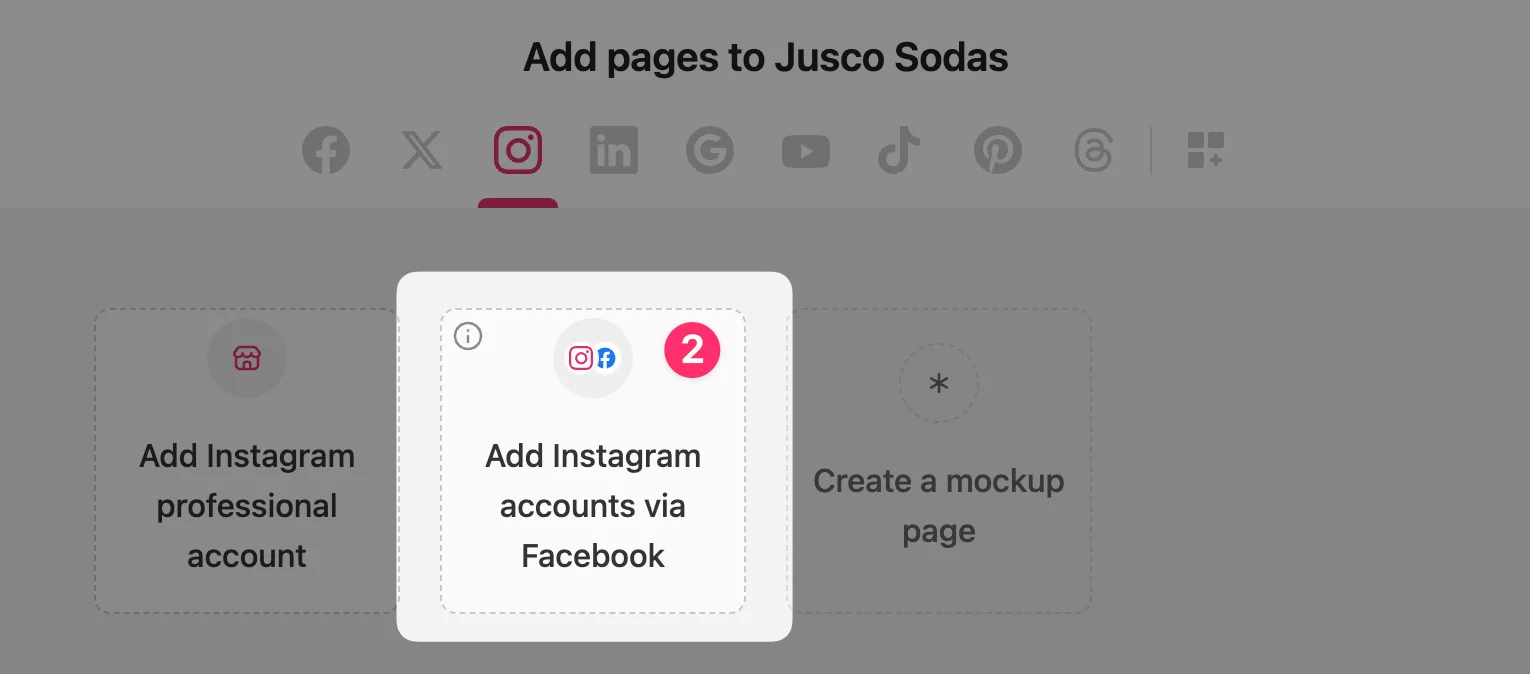
Method 2. Add Instagram Professional Accounts through Facebook
For enhanced features like analytics, connect your Instagram account via Facebook. This method requires that your Instagram professional account be linked to a Facebook Business Page.
In Planable, go to Add Pages and select Add Instagram accounts via Facebook.
You’ll be redirected to Facebook to continue with the personal profile that manages your Facebook pages.
✨ Once linked, your professional Instagram account will be fully integrated with Planable, allowing access to analytics, tagging, and collaborator options.
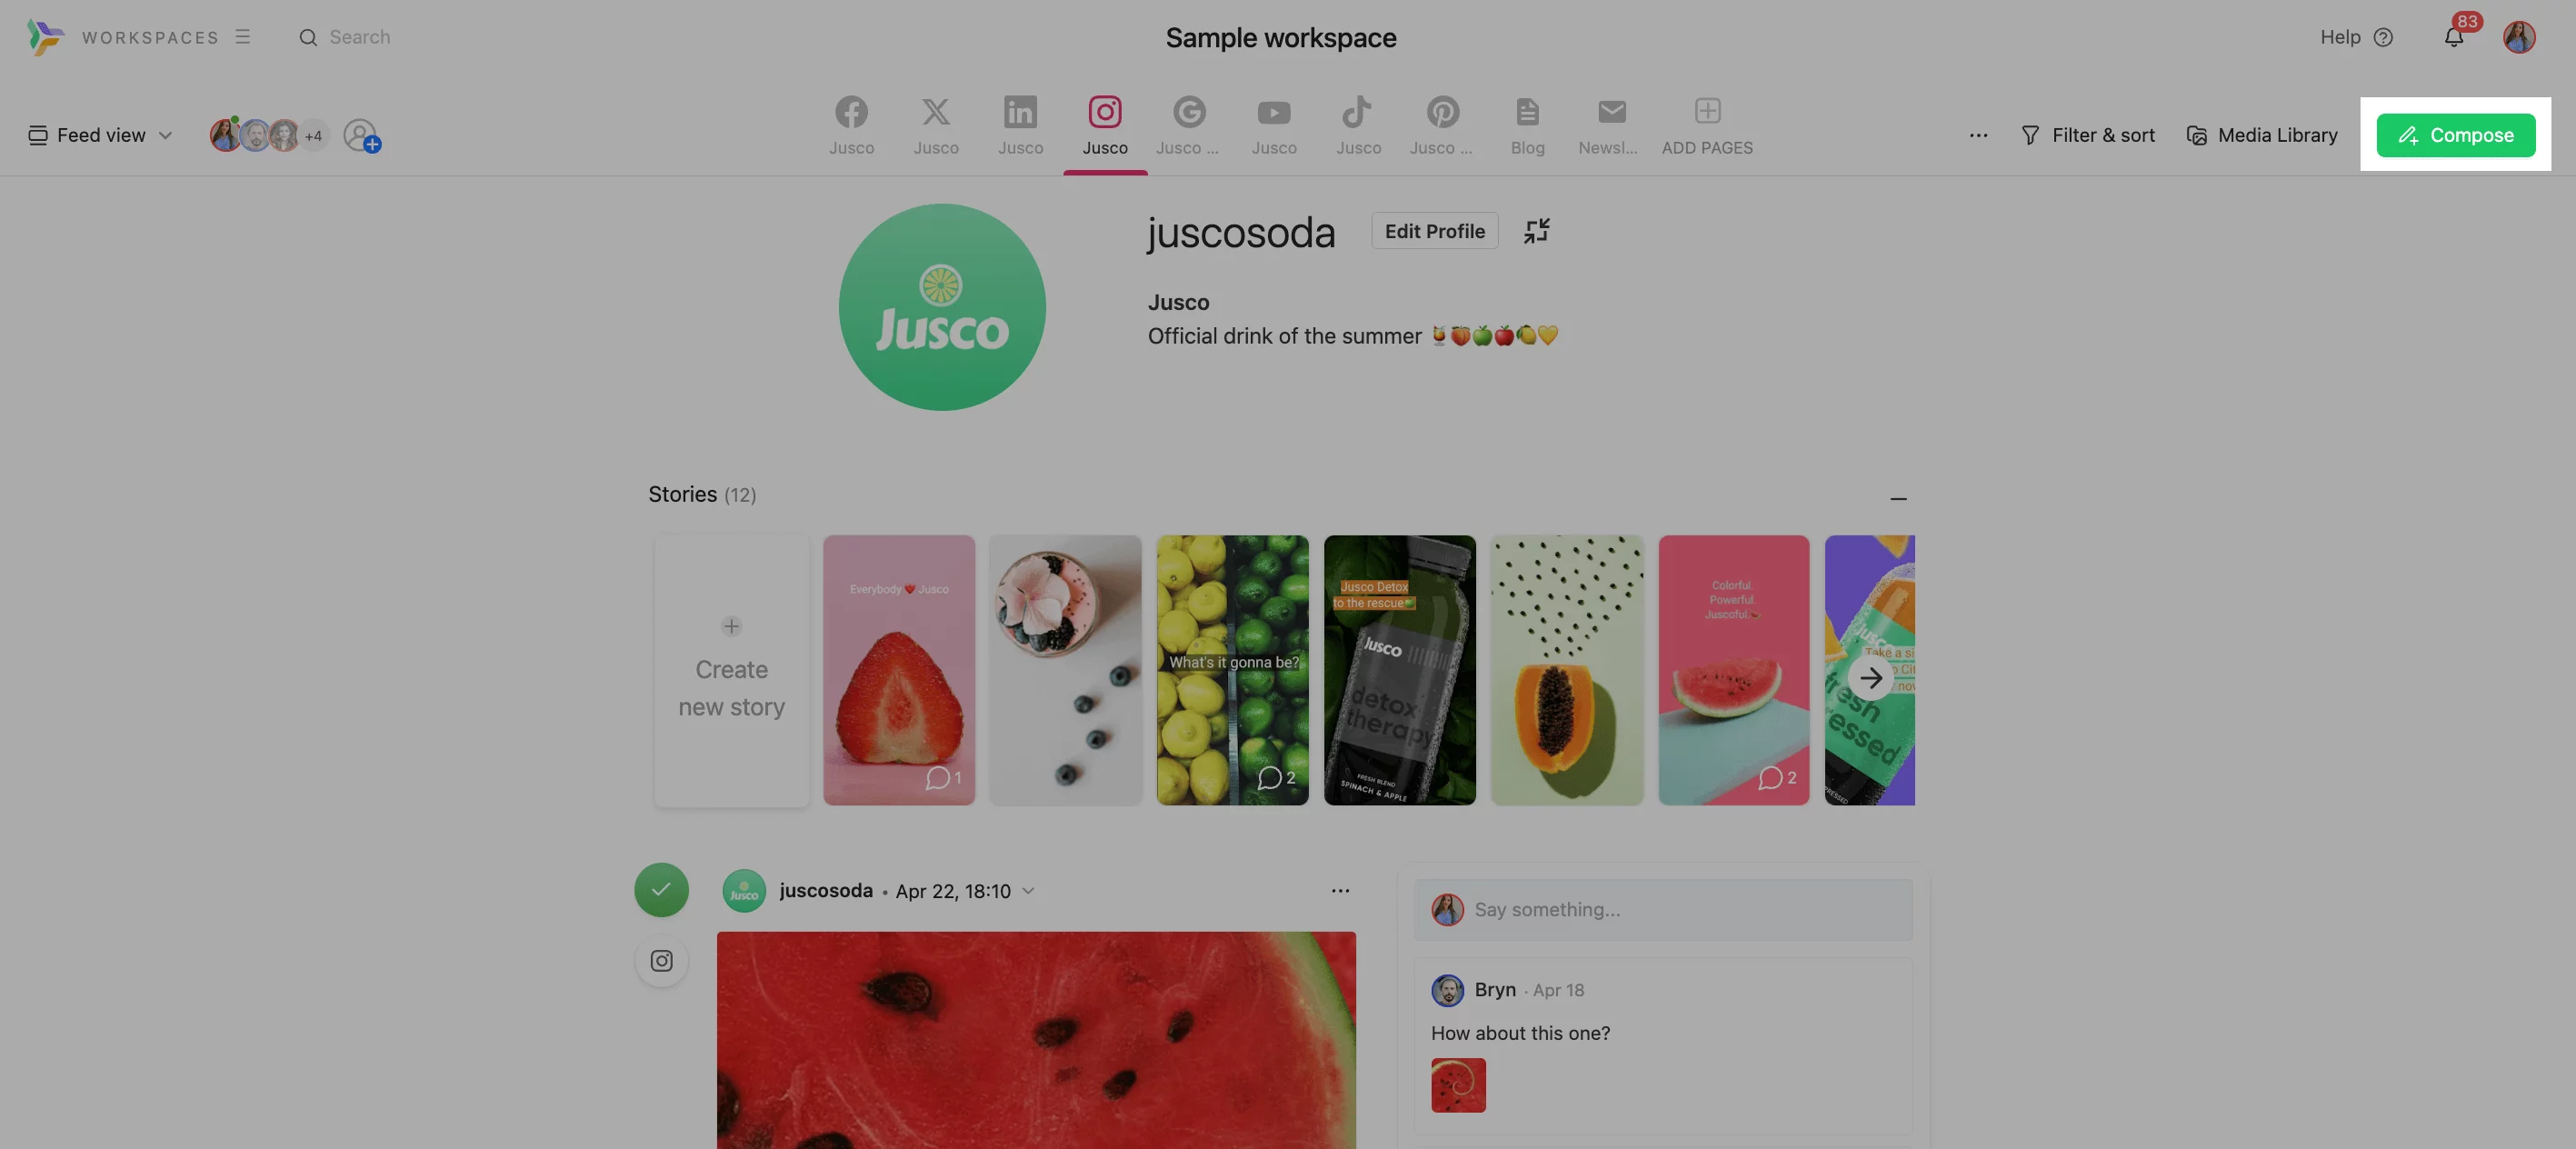
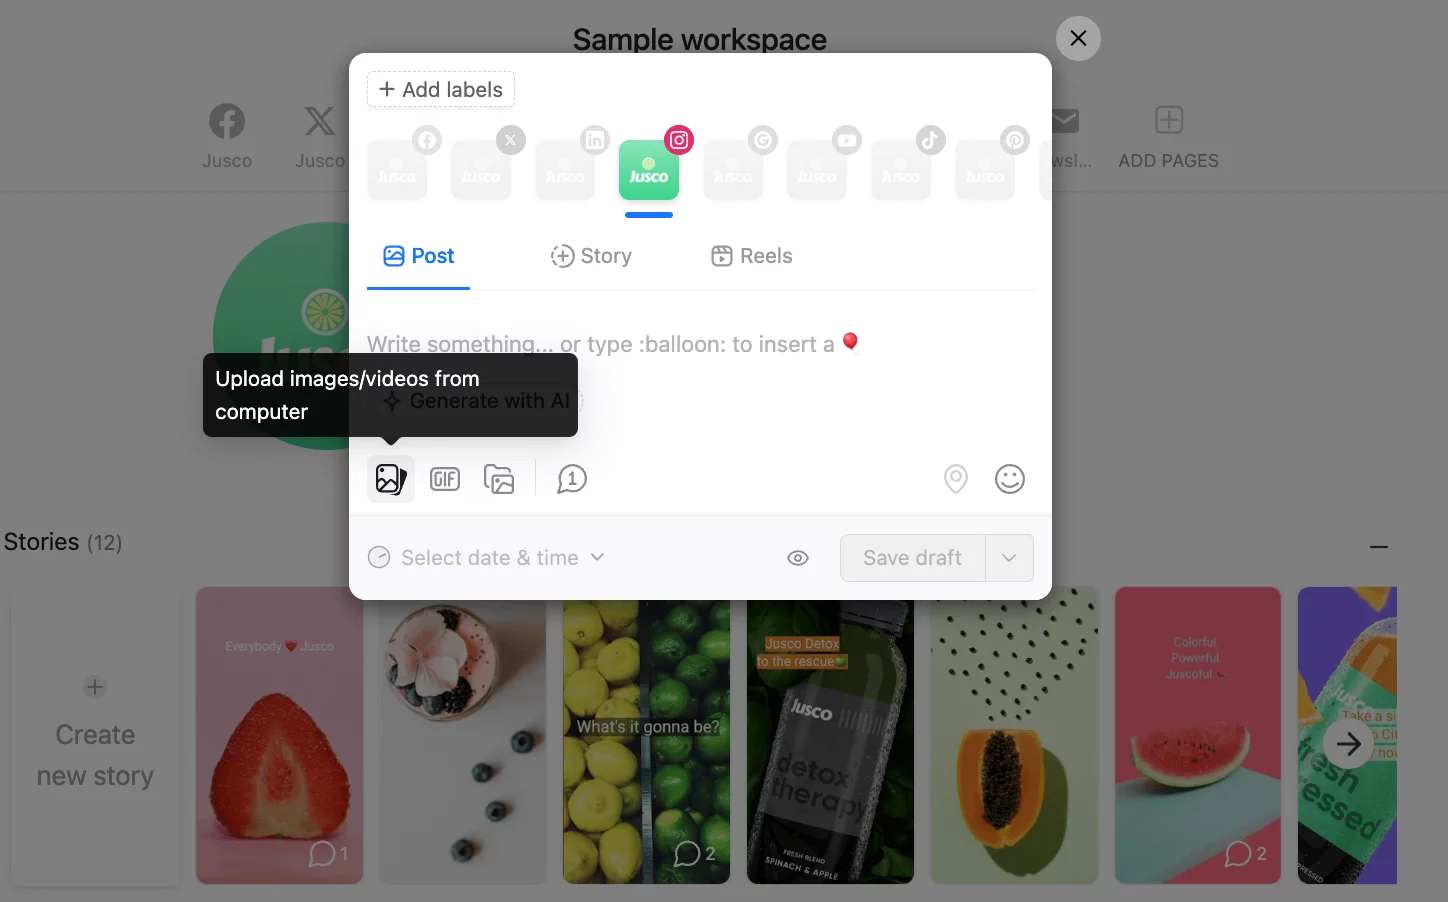
Step 3. Compose your Instagram post, story, or reel
This is where the magic begins. Here are the steps to follow:
1. Click the Compose button at the right corner of the page.
‘Compose’ button in Planable to start creating IG posts
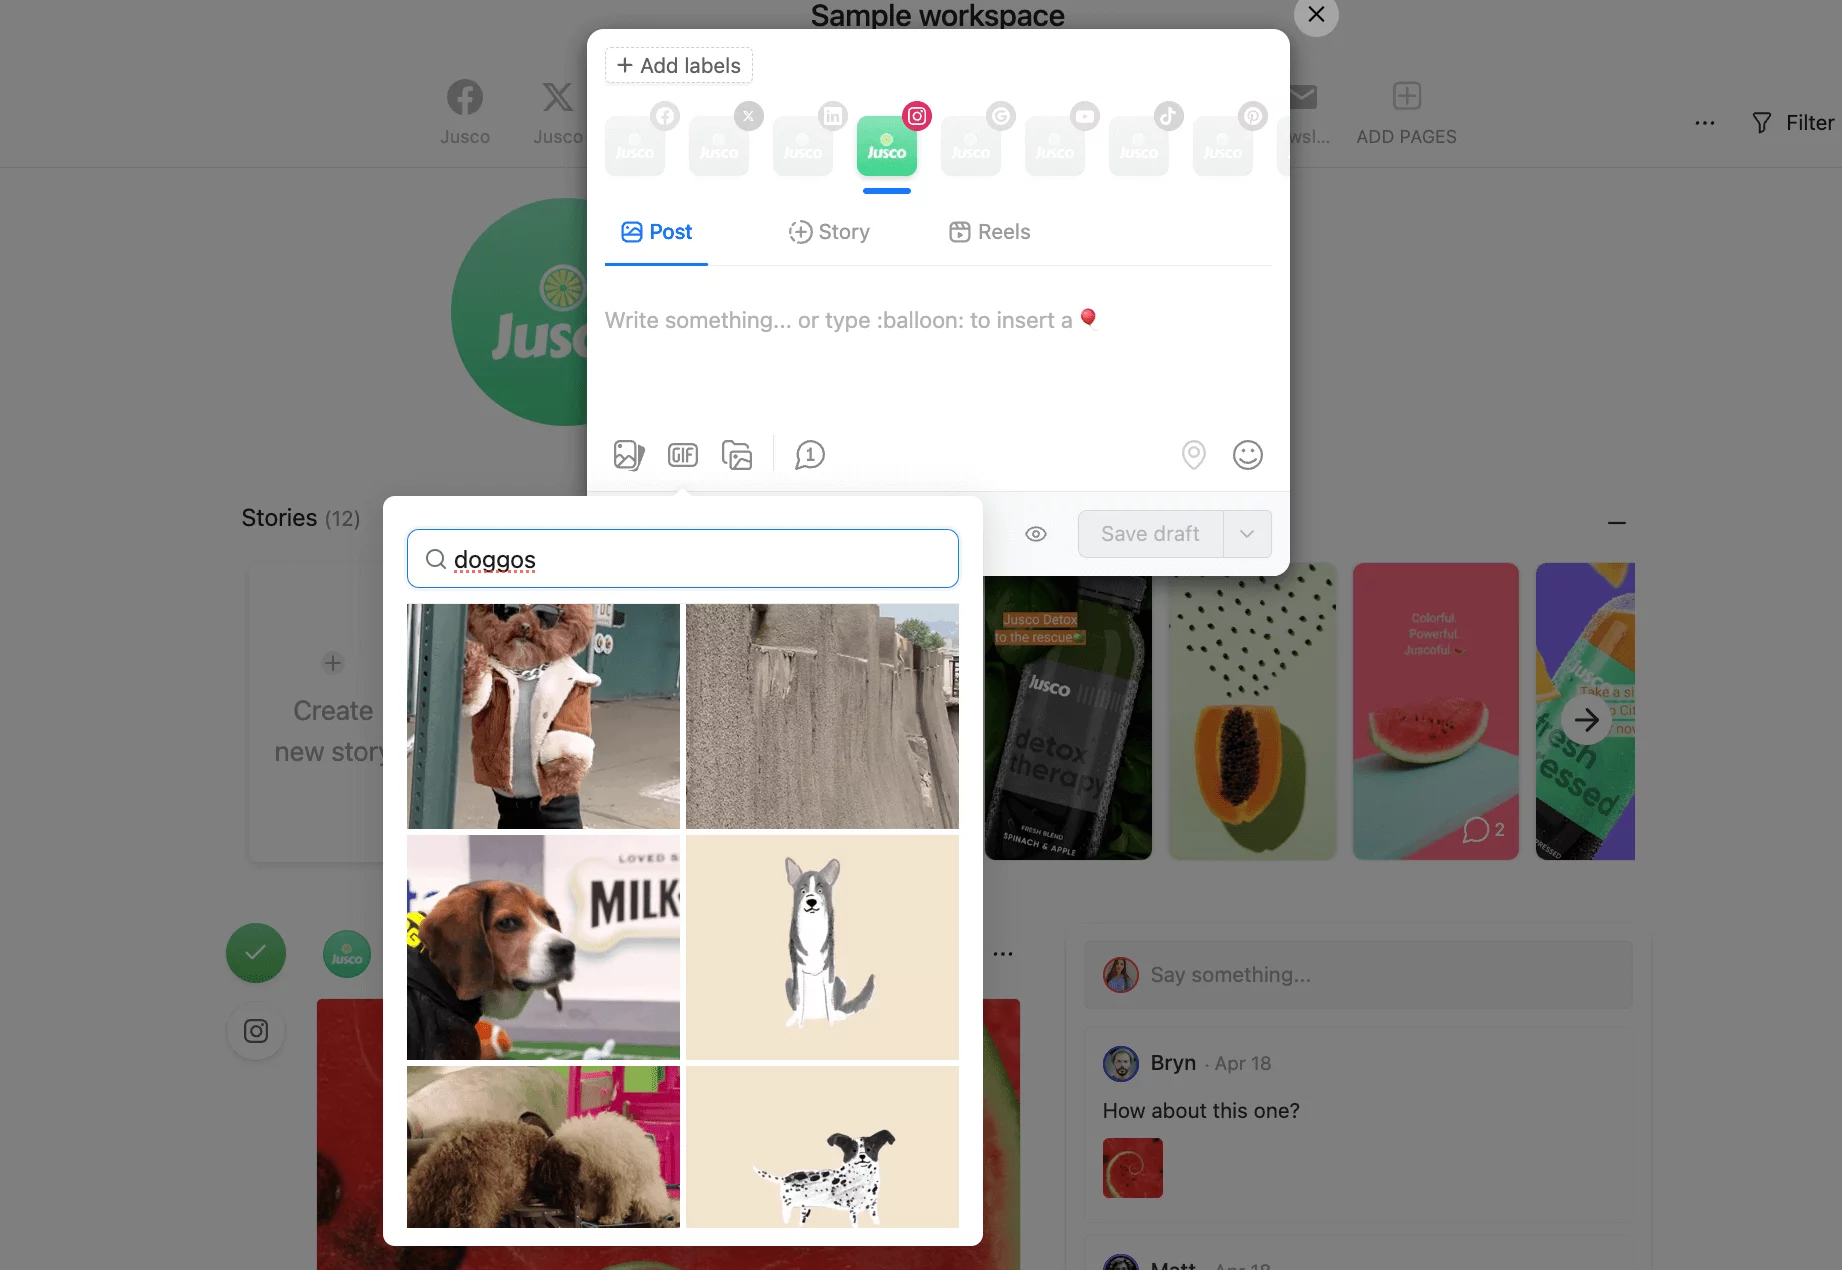
2. Add an image/video by uploading from your computer or via the media library.
3. (Optional) You can add a GIF by clicking this button in the composer.
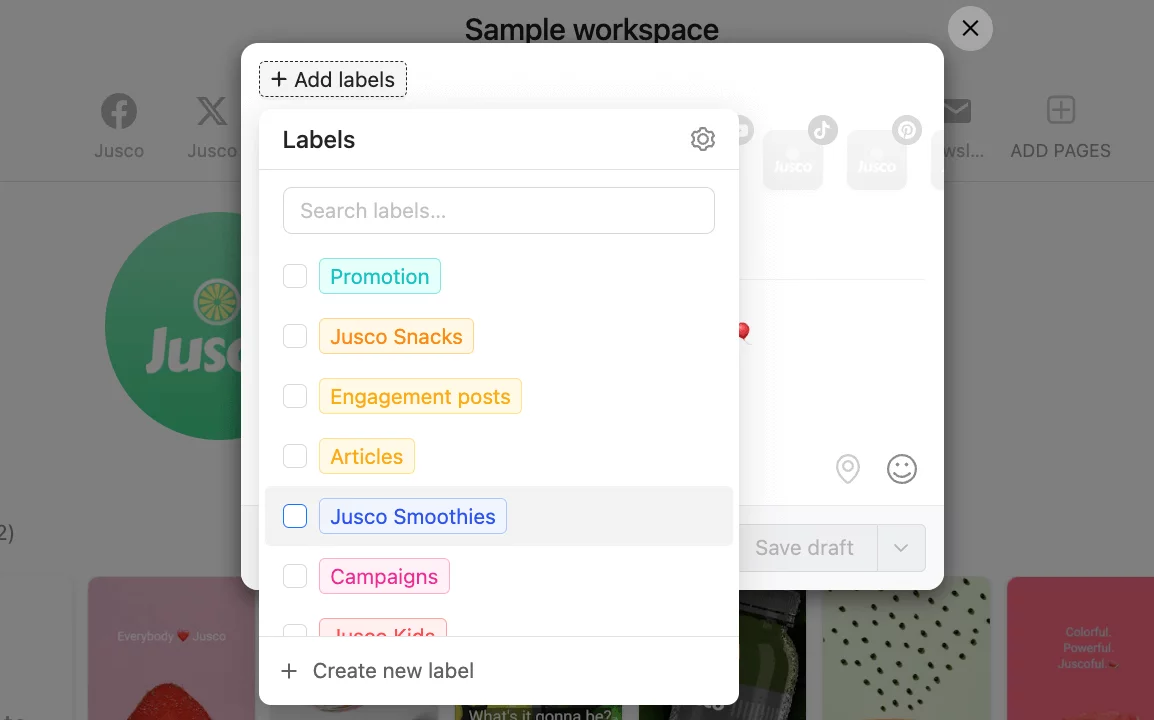
4. Add labels from the top left corner button to easily organize your posts.
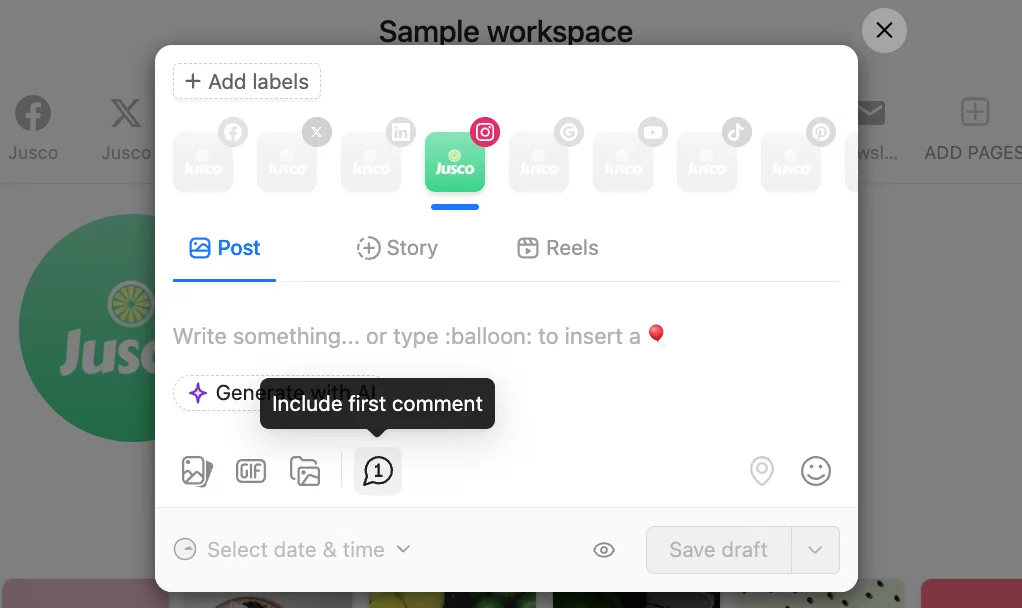
5. Schedule the 1st comment using the comment icon.
*If this is the first time you post a comment, you must first re-authorize your account to enable Planable to manage comments. To do so, select all the pages you manage in all the workspaces. Then choose Yes for managing comments for Instagram.
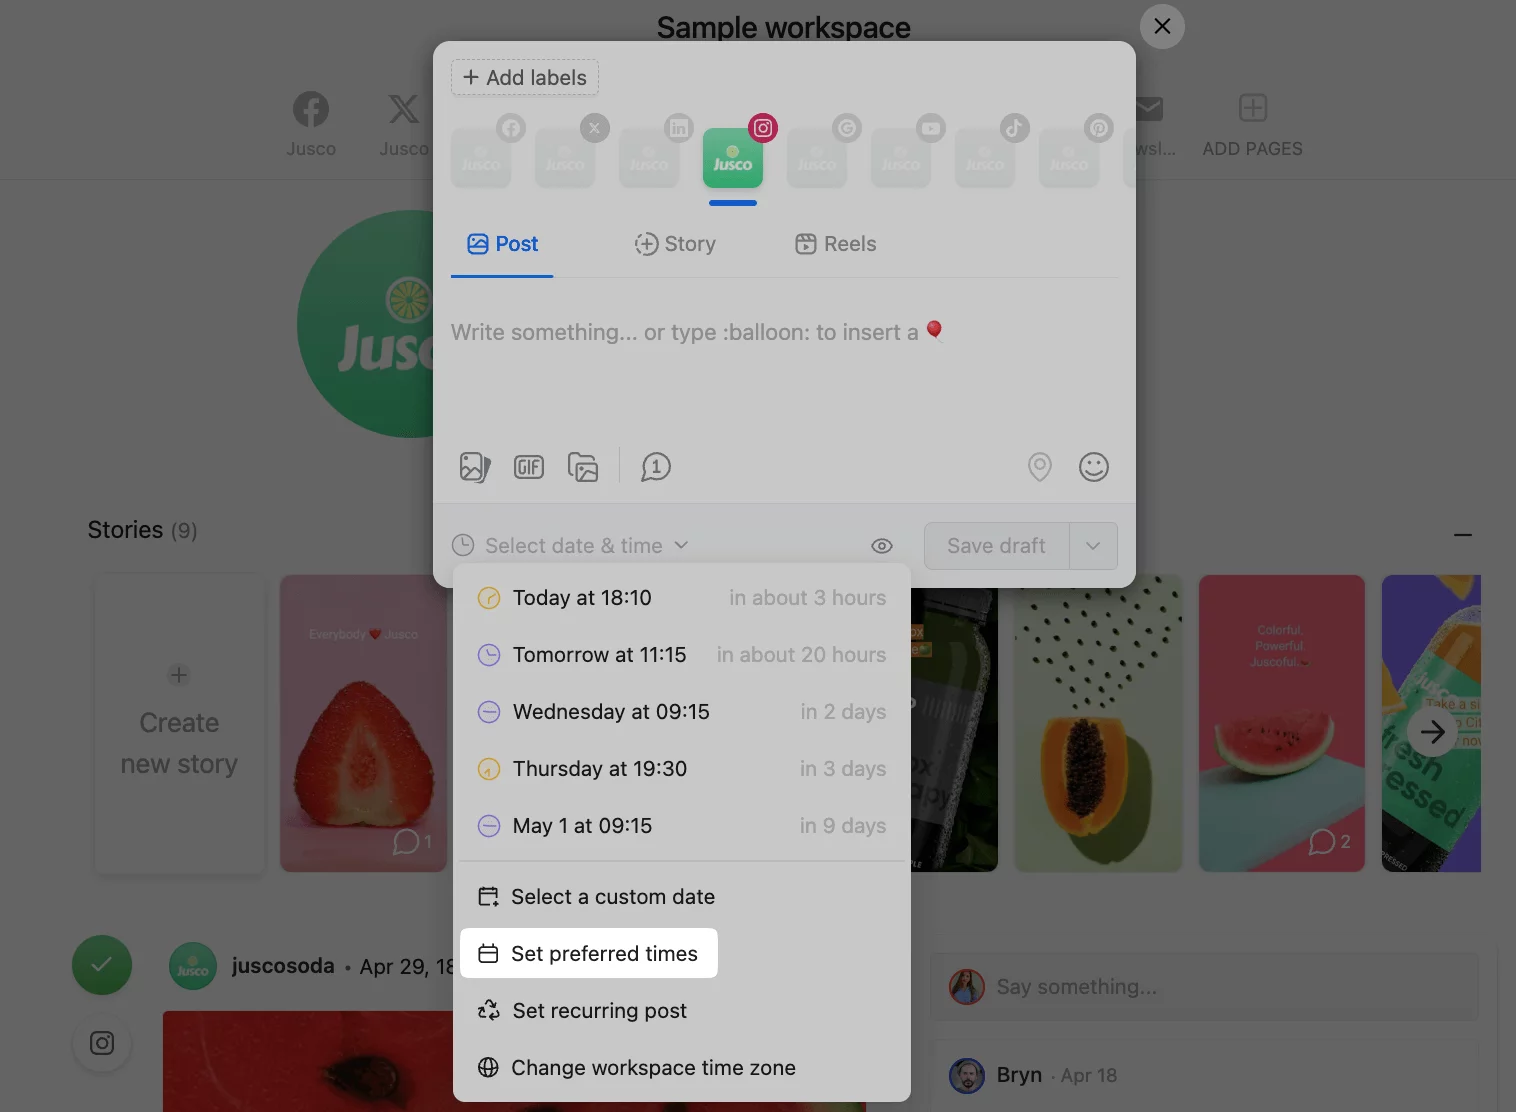
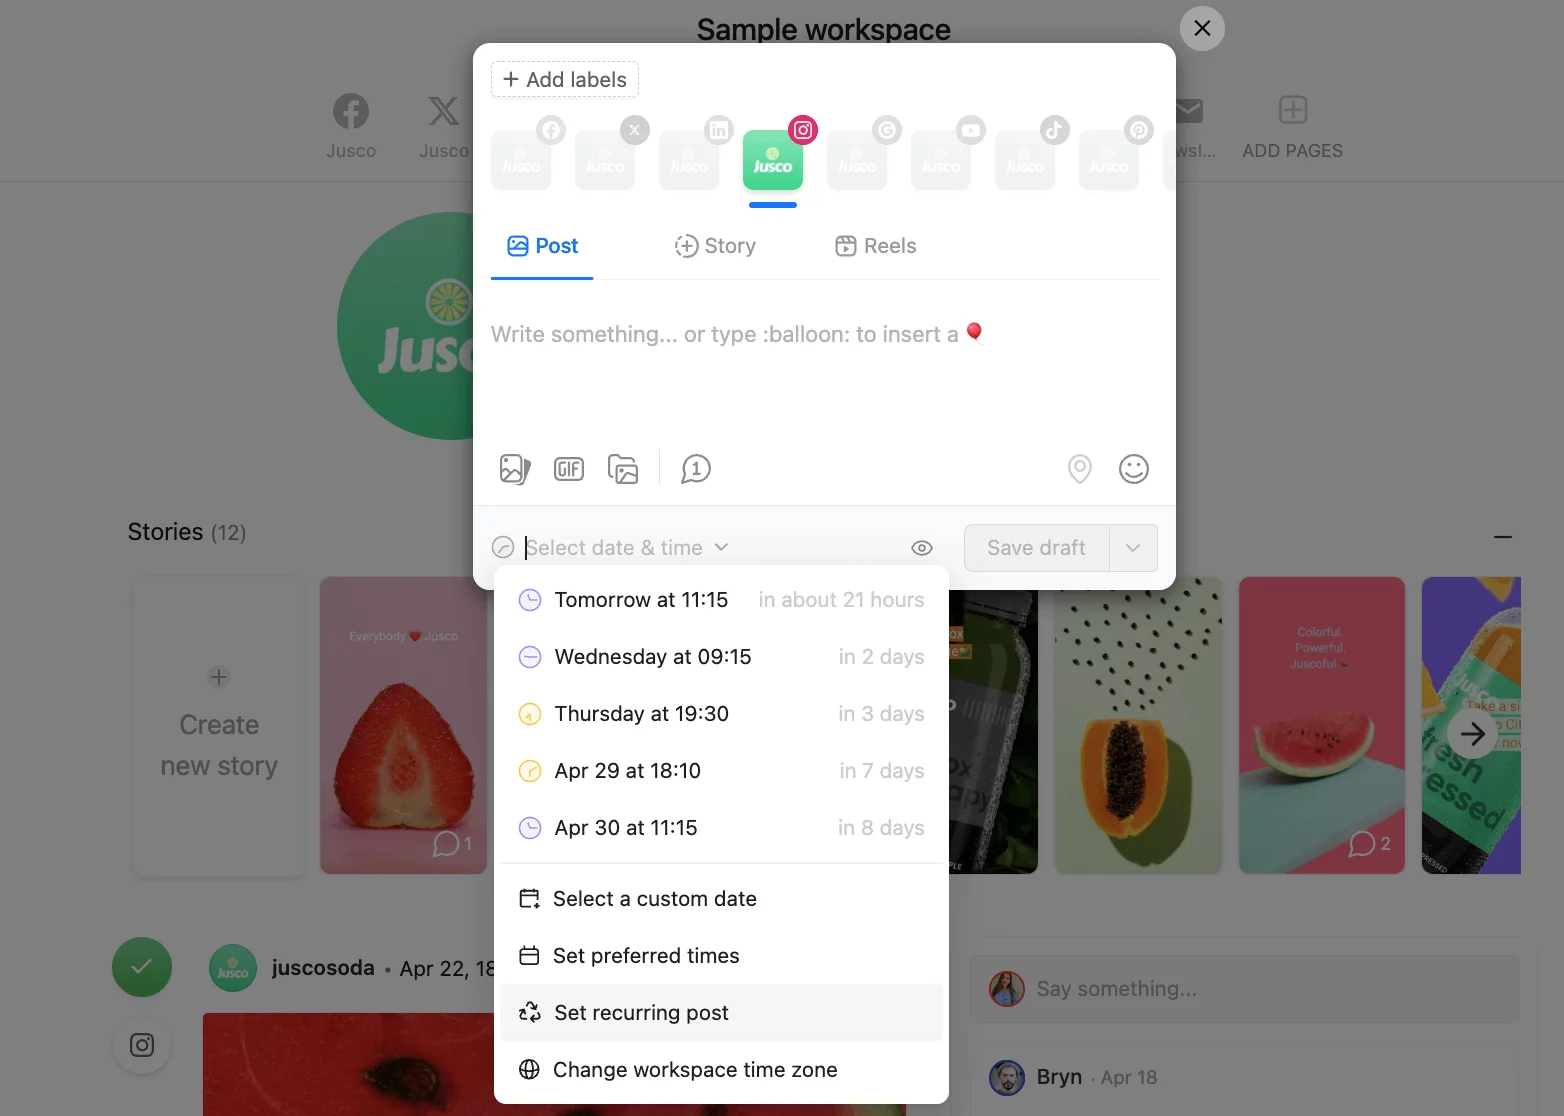
6. If you want to schedule posts on Instagram several times, you can use the recycling feature on Planable. Click on the time selector and select Set recurring post.
Choose when to publish the post and how often you’d like to repost it.
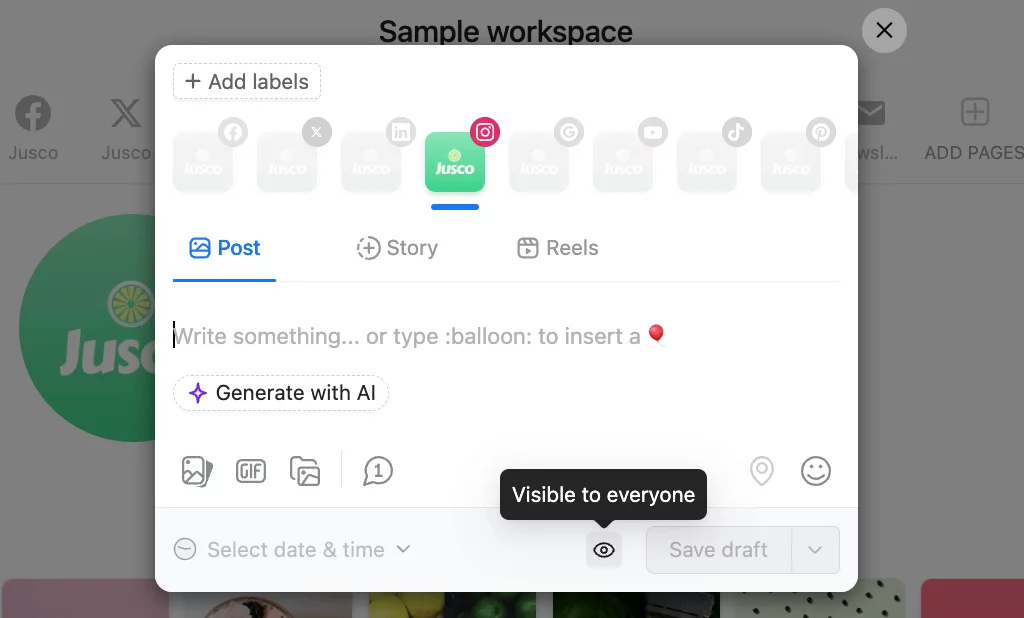
Step 4. Schedule your Instagram post
1. Click Select date & time at the bottom, and from Select a custom date, select the date and time you’d like your post to go live.
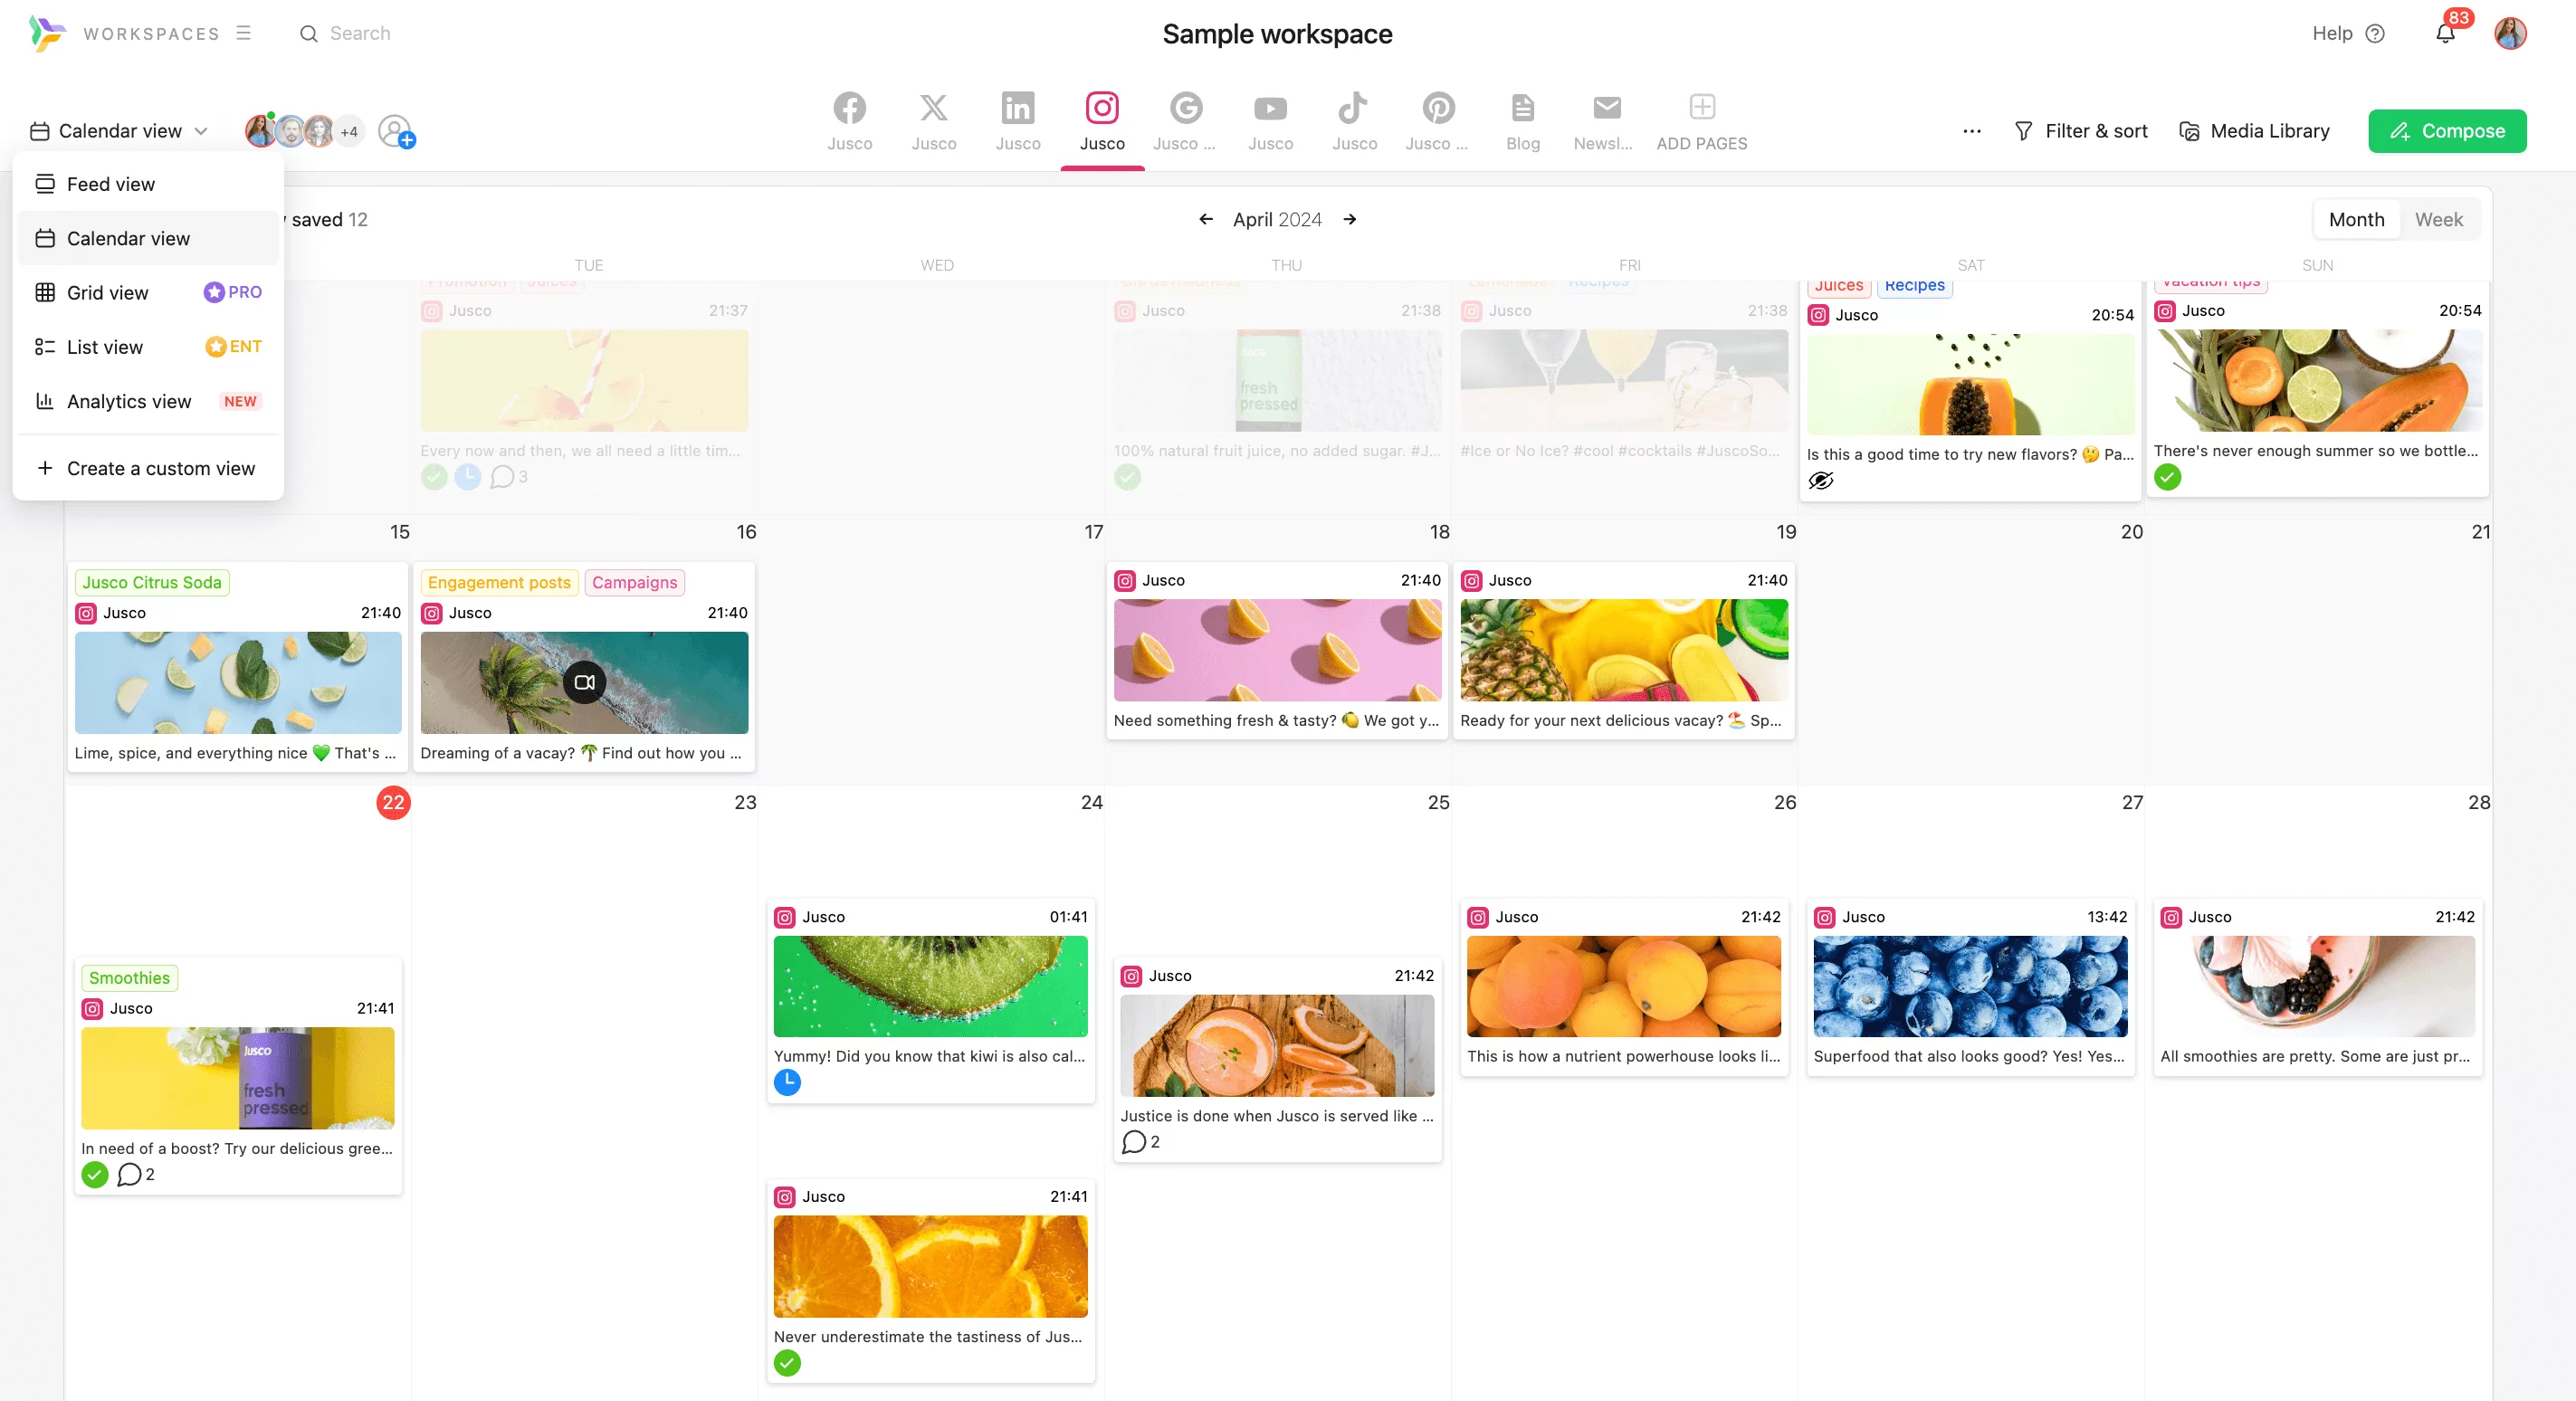
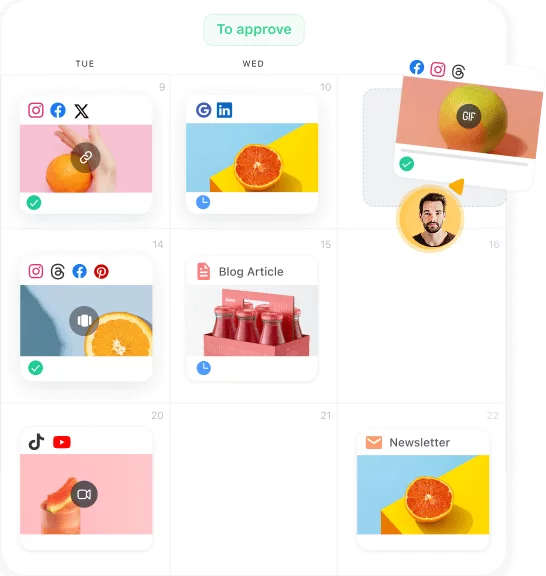
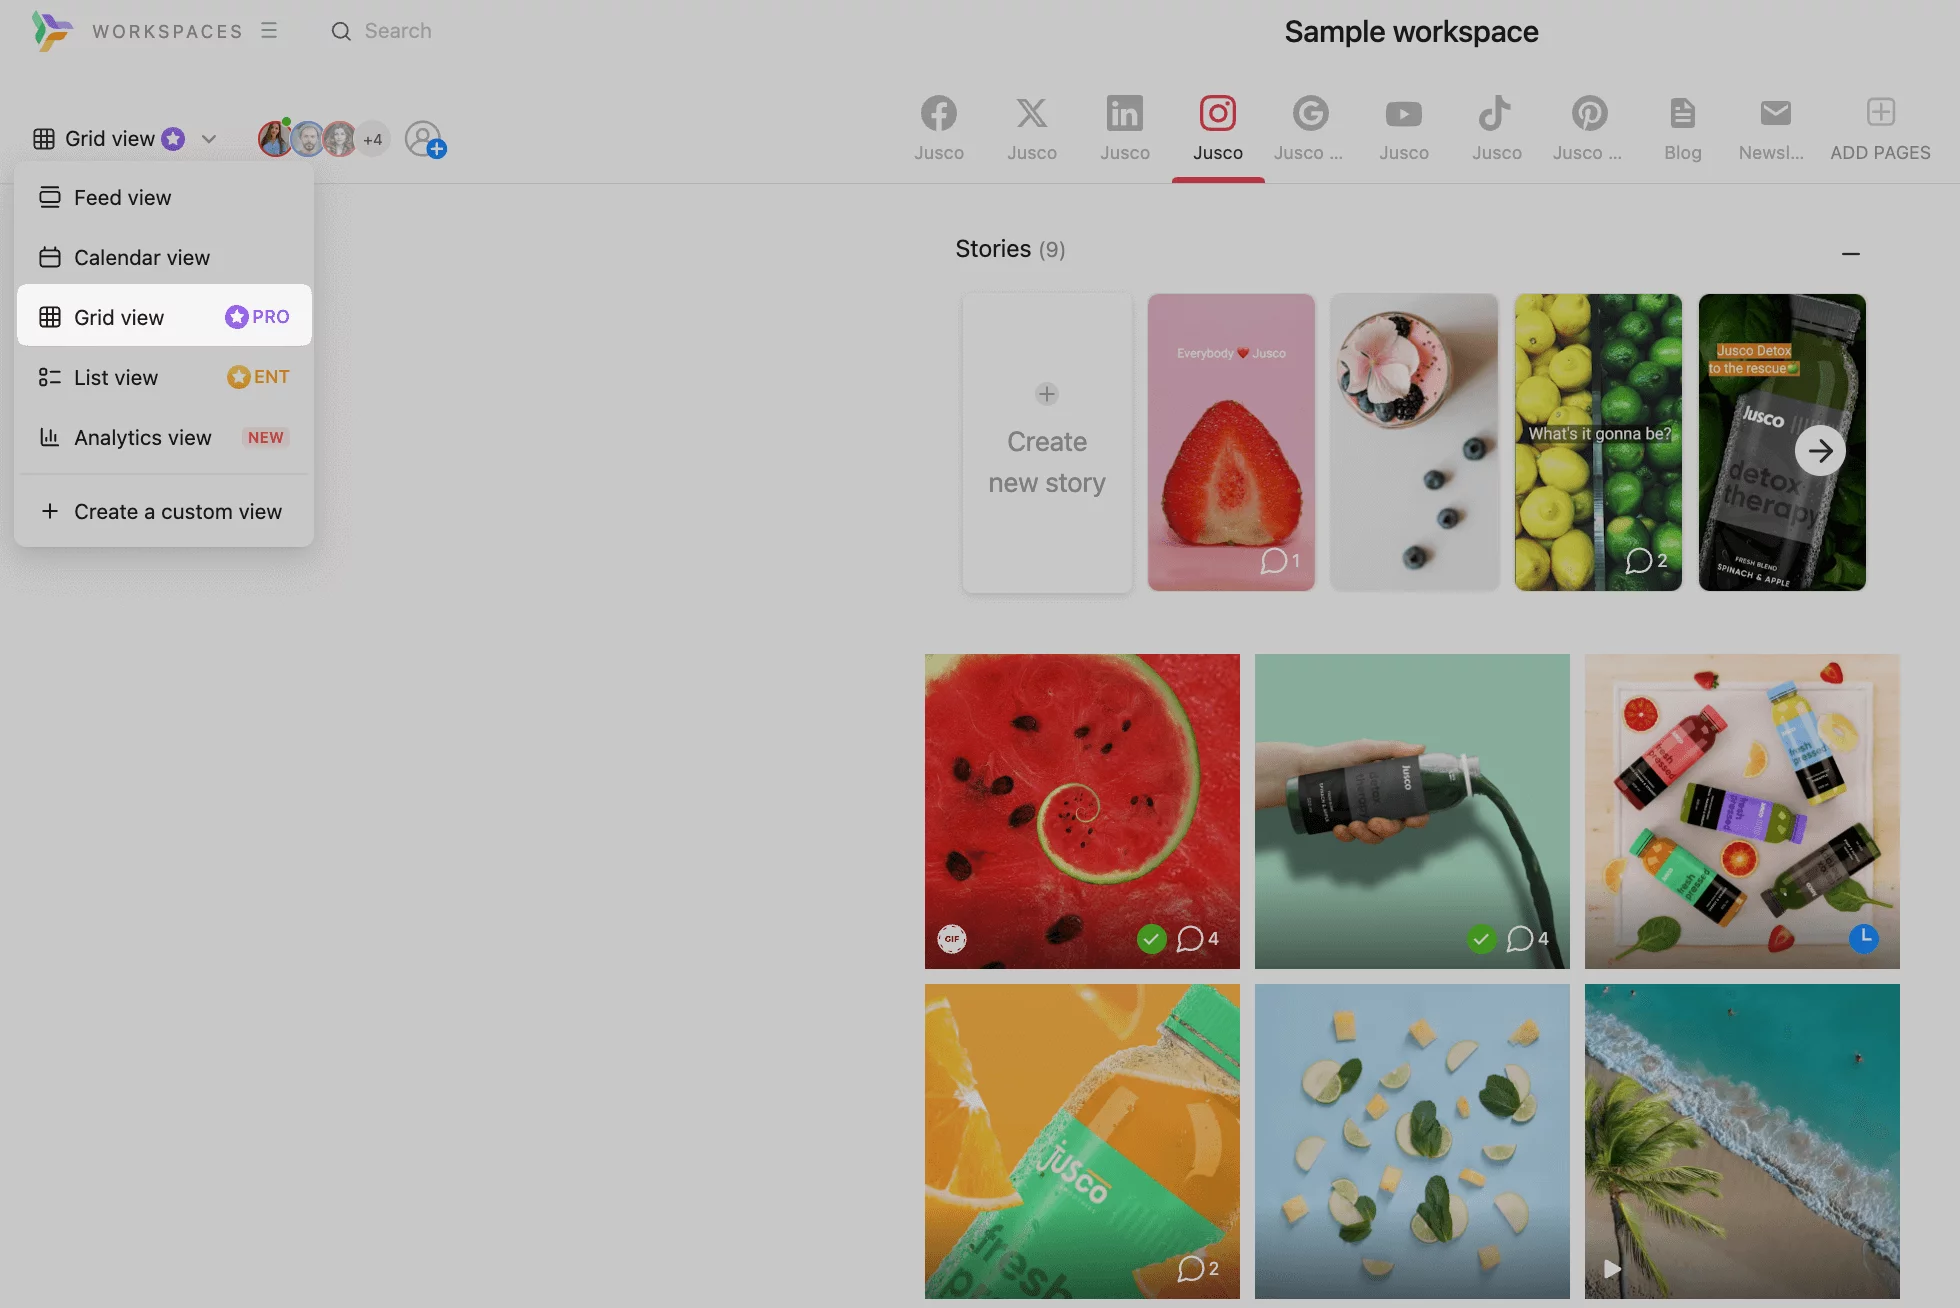
2. After scheduling your Instagram posts, you can view the posts’ timetable using the Grid view.
Do this by changing the viewing mode of your Planable workspace on the top left corner next to your ID icon.
3. You can schedule your post to be Only visible to team members initially, and then set it to be Visible to everyone by clicking on the eye icon next to the Save button.
This feature is particularly useful for facilitating easy collaboration with clients and teams.
4. Your posts will proceed to the approval stage before automatic scheduling. Without further edits, your post will be scheduled for publishing.
Now that you’ve followed all the steps using Planable, you’ll have a clear understanding of how to schedule a post on Instagram with ease and efficiency, whether for a single post or as part of a larger content strategy.
Why schedule Instagram posts with Planable?
If you are a Social Media Manager, scheduling Instagram posts in advance with an scheduler like Planable provides several benefits:
Create content efficiently with AI and post templates
Planable’s unlimited AI assistant helps you create effortlessly copy. And post templates allow you to save text formulas, repeating hashtags lists, or first comments.
Schedule recurring posts
Planable allows you to recycle posts when needed. Ensure you post consistently and have the same posts published many times in a row on a schedule of your choice – be it daily, weekly, or monthly.
4 viewing modes
Planable offers four viewing modes: Feed view, Calendar view, List view, and Grid view.
Automatic Scheduling
While using Planable, you can save time by simply enabling the automatic scheduling of approved posts. An Instagram post with a set date and time will automatically be published once approved.
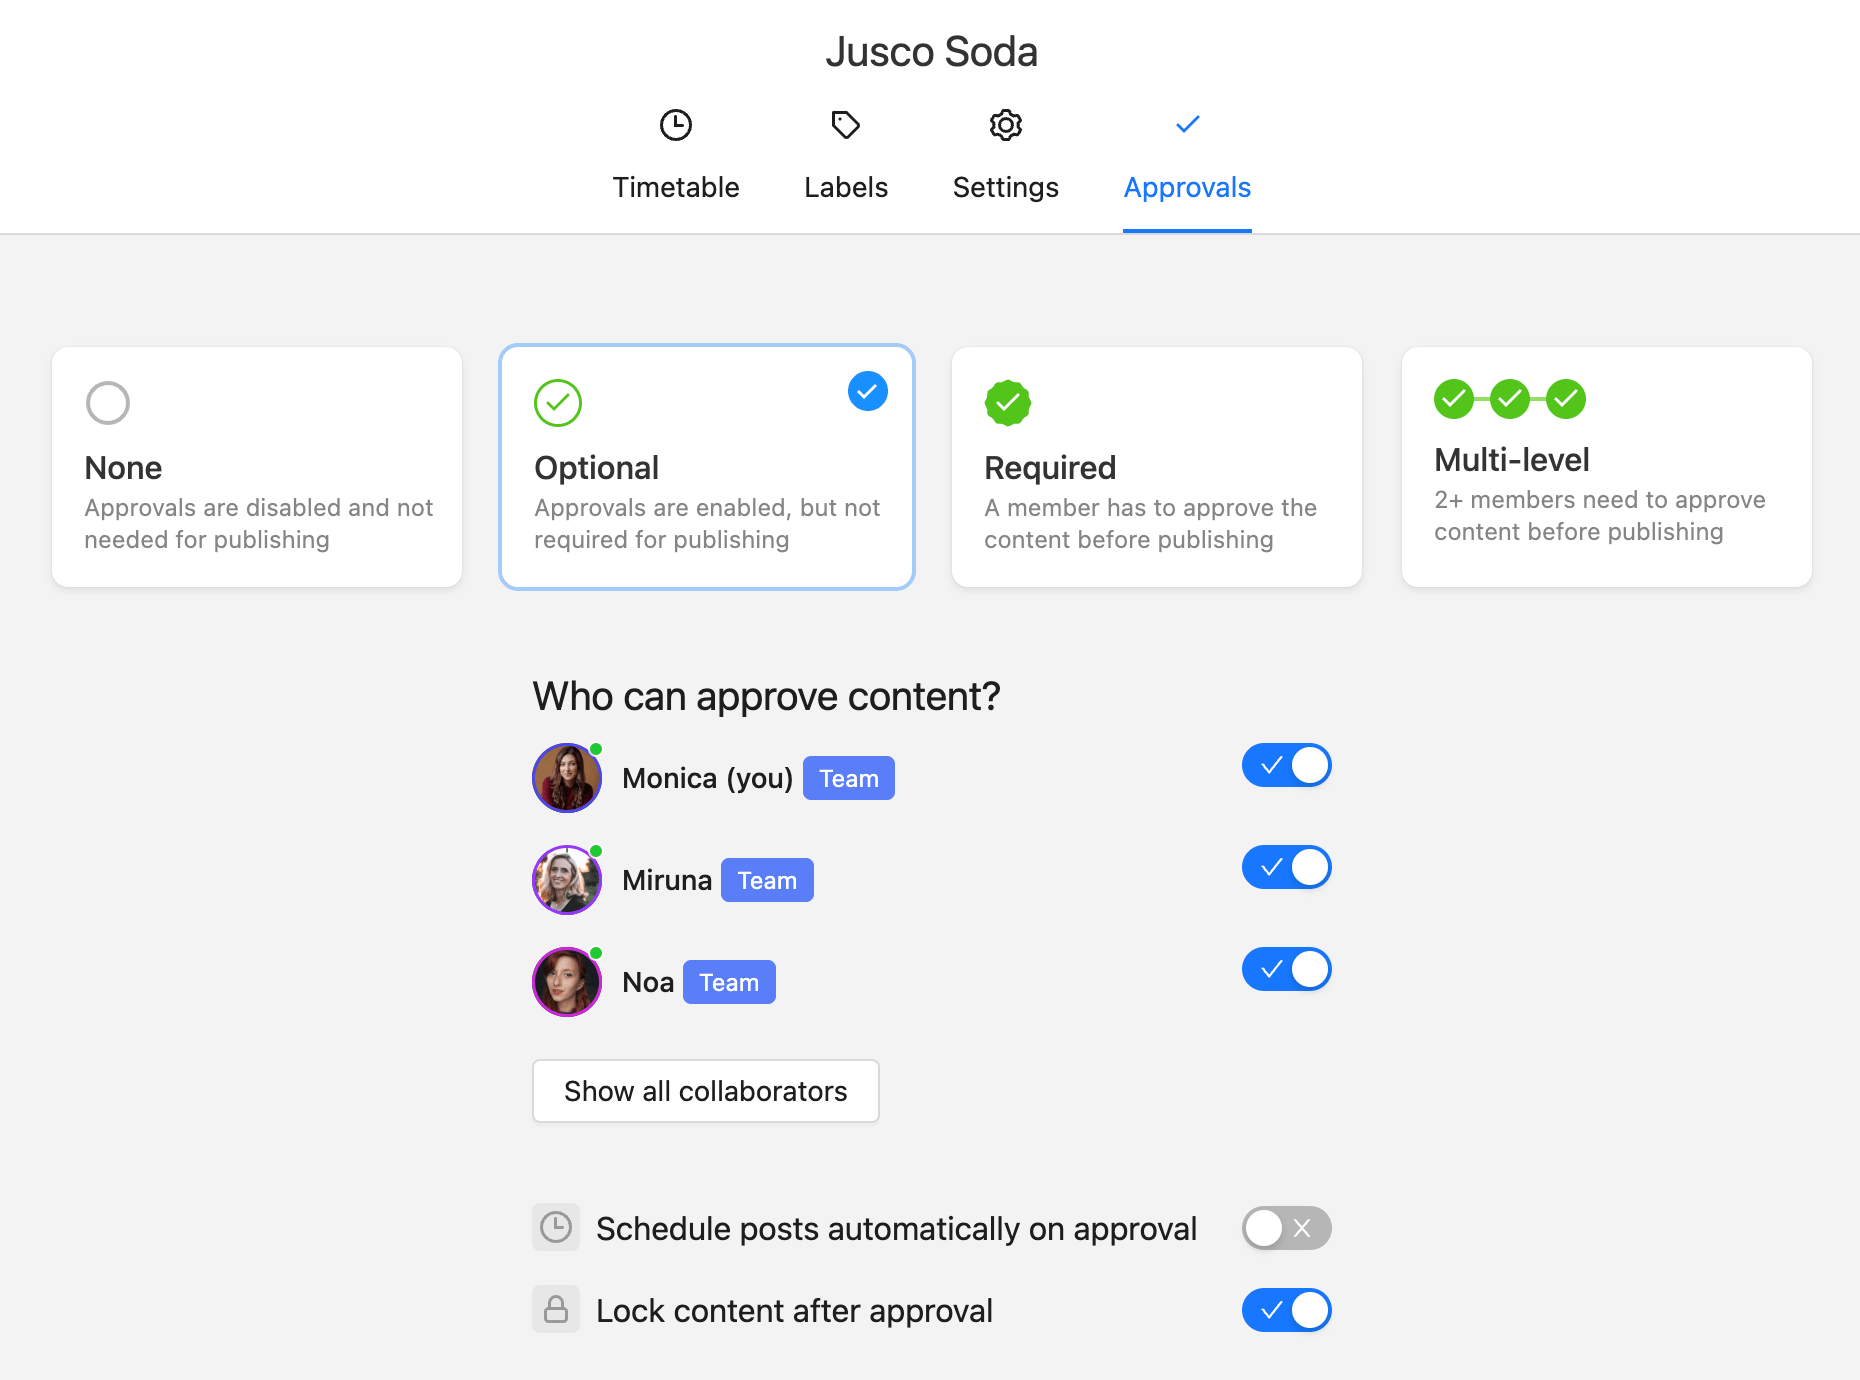
Collaboration and approval options
Planable provides four types of approval workflows: none, optional, required, and multi-level approval. These workflows ensure that teams can collaborate effectively to create, approve and schedule social media posts.
Flexibility for your team
You can invite any team member to your workspace and give them access to comment, approve, or manage it.
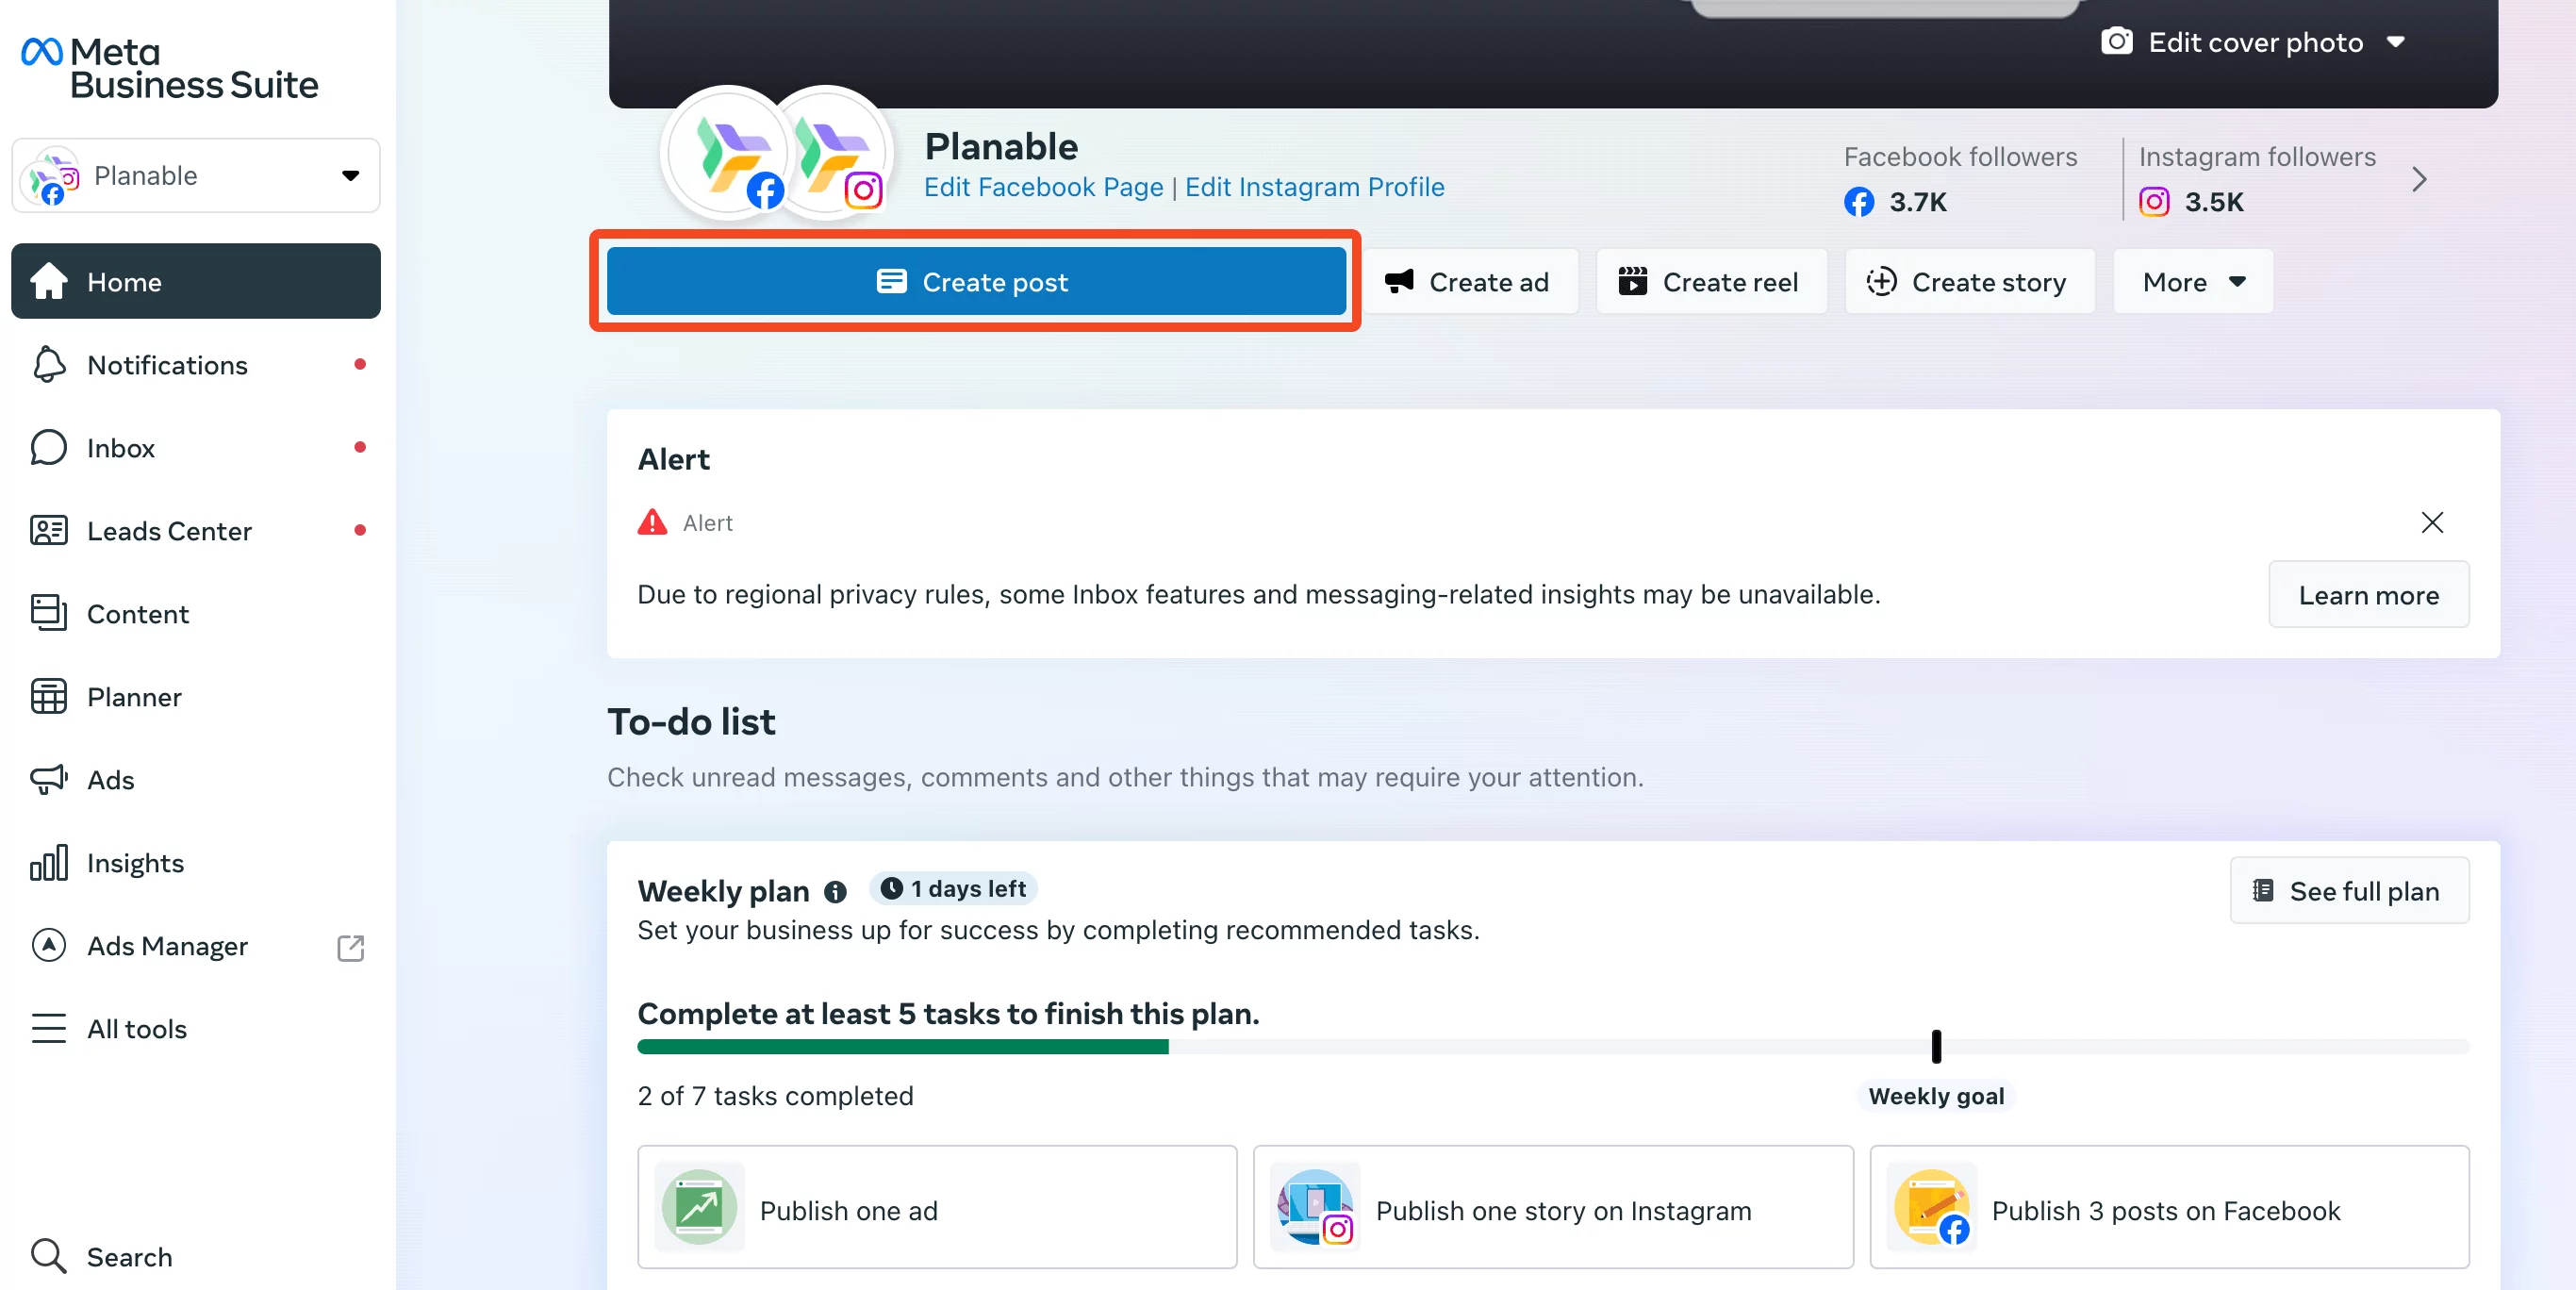
How to schedule Instagram posts using Facebook (Meta Business Suite)
If you don’t want to rely on social media scheduling tools, you can use Meta Business Suite to schedule your Instagram posts by following the steps below:
Step 1. Navigate to your Facebook Page and click on Meta Business Suite from the menu on the left side.
Step 2. From Home, click on Create post. You can also do that from Content or Planner.
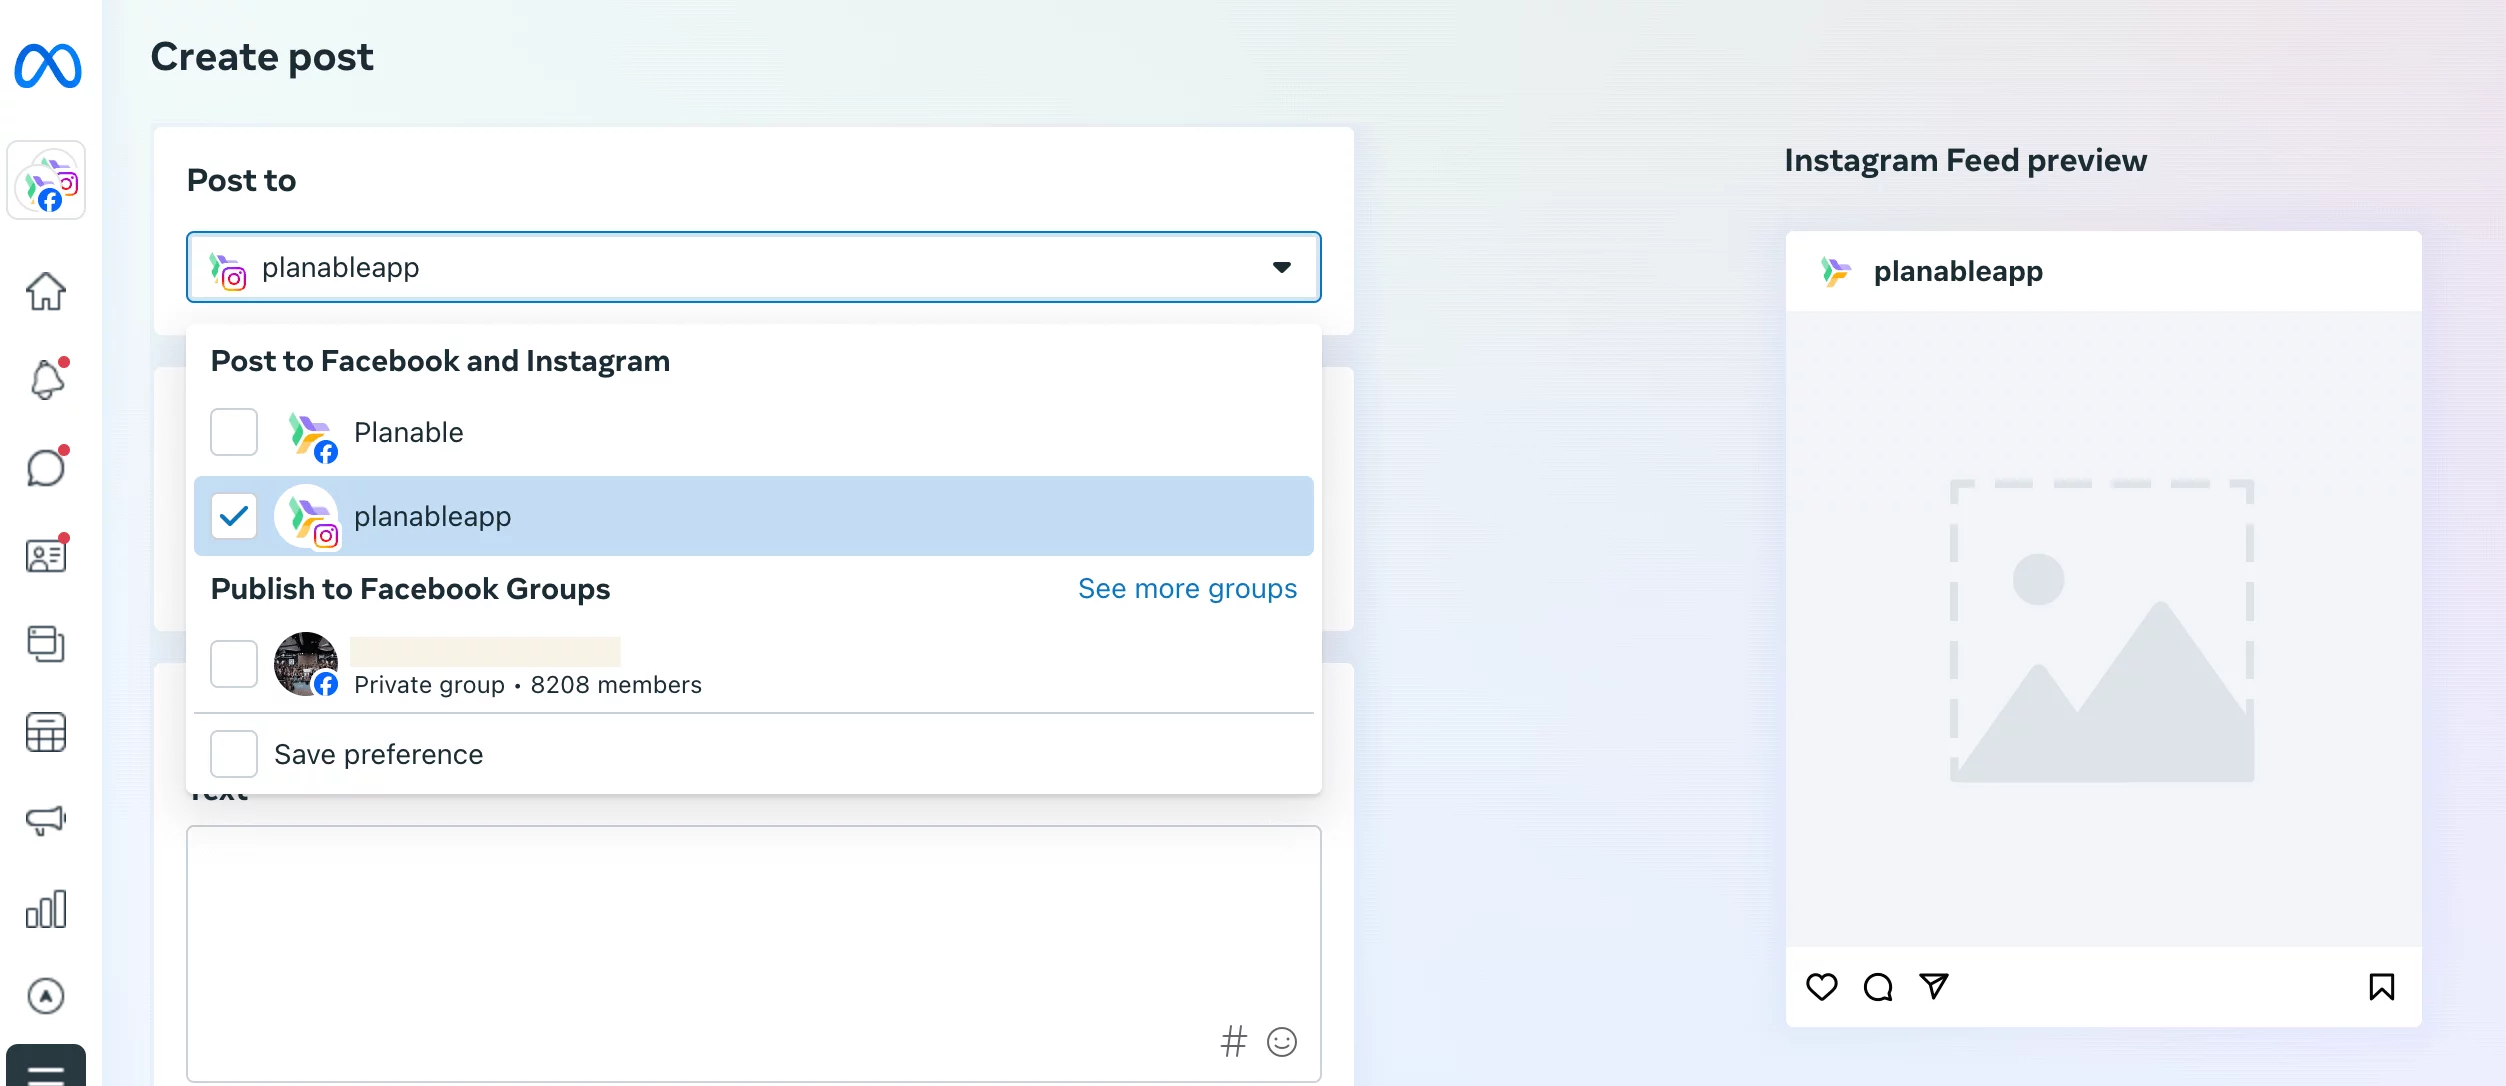
Step 3. From Post to, select your Instagram page. If you would like the post to also appear on Facebook, make sure to select it as well.
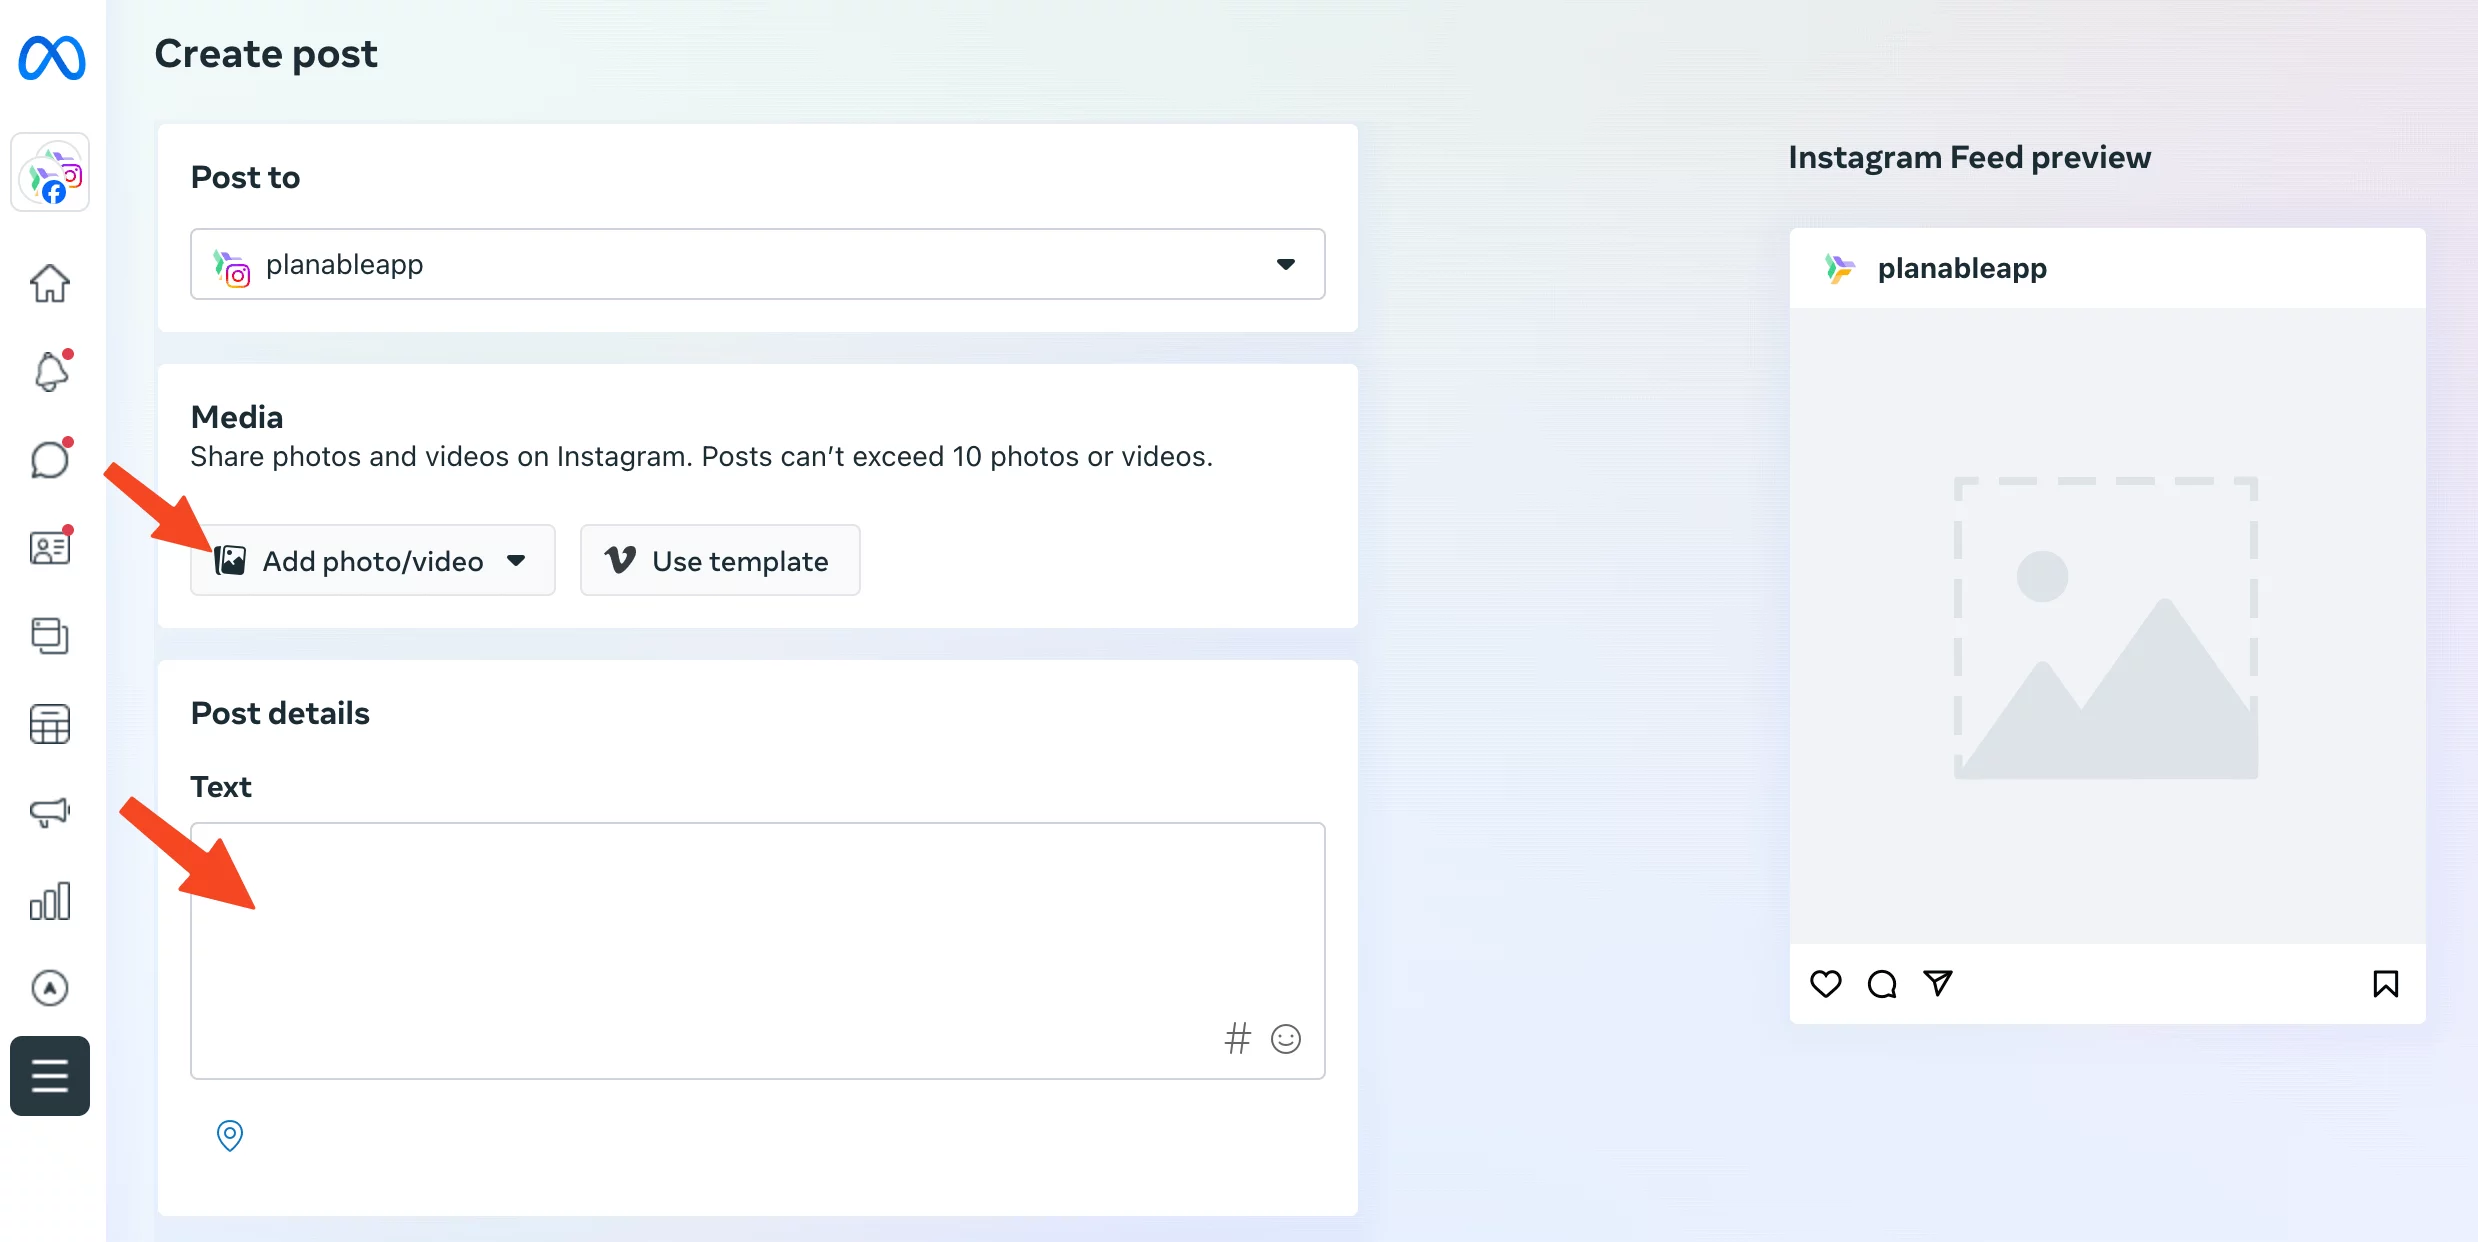
Step 4. Create your IG post by completing the Media and Post details fields, with images, caption, mentions, and hashtags.
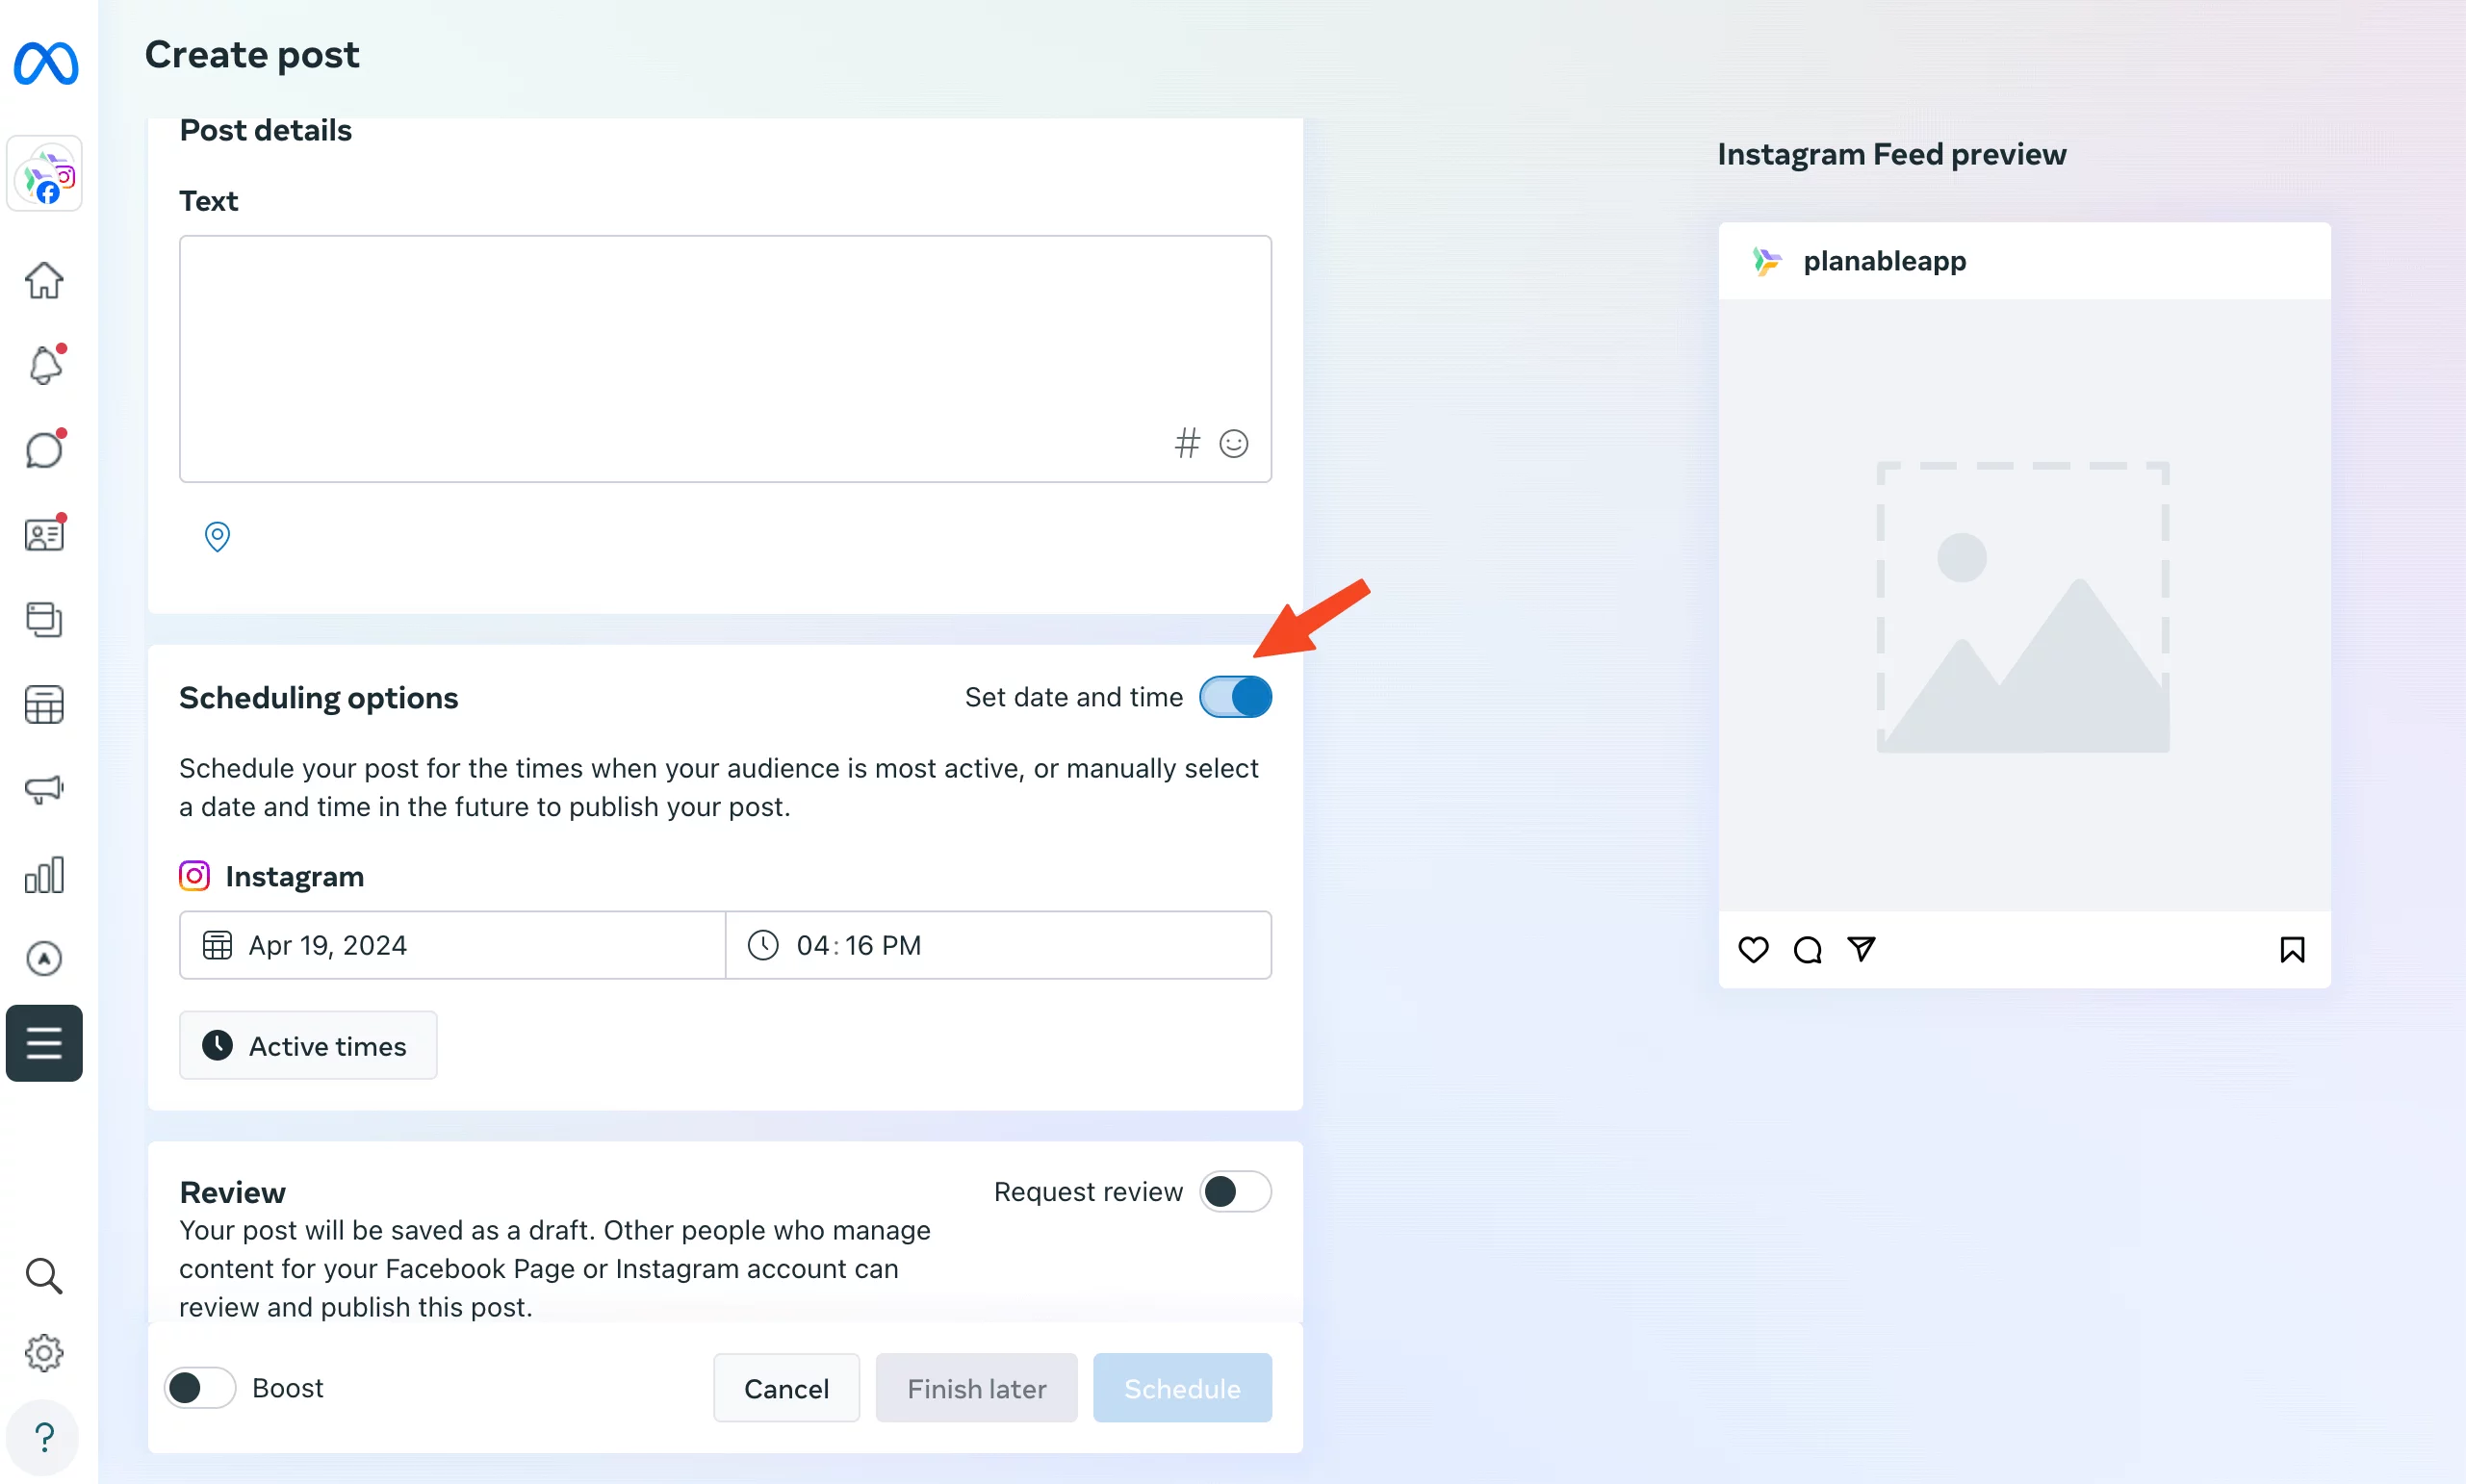
Step 5. To schedule your IG post, enable Set date and time and choose your specific timing.
Step 6. Click the Schedule button.
Ta-daa. You can now find your scheduled Instagram posts under Content in Posts and reels in the left sidebar.
And there you have it — the in-app method to set up an Instagram schedule post. While it’s a helpful start, it can be limiting if you’re managing multiple accounts, collaborating with a team, or looking for more flexibility. That’s why using an Instagram scheduler could be a brilliant idea. So let’s dive in and explore how a dedicated Instagram scheduler can make your content strategy more efficient and stress-free!
1. Planable – best Instagram scheduling tool for content planning and perfect previews
Content planning, approvals, scheduling, media library & collaboration features in Planable
Planable is a social media management platform that really excels as an Instagram post scheduler – helping you to maintain a consistent posting schedule. You can schedule and automatically publish all your Instagram posts (plus the first comment), Instagram Stories, and Reels directly from the platform.
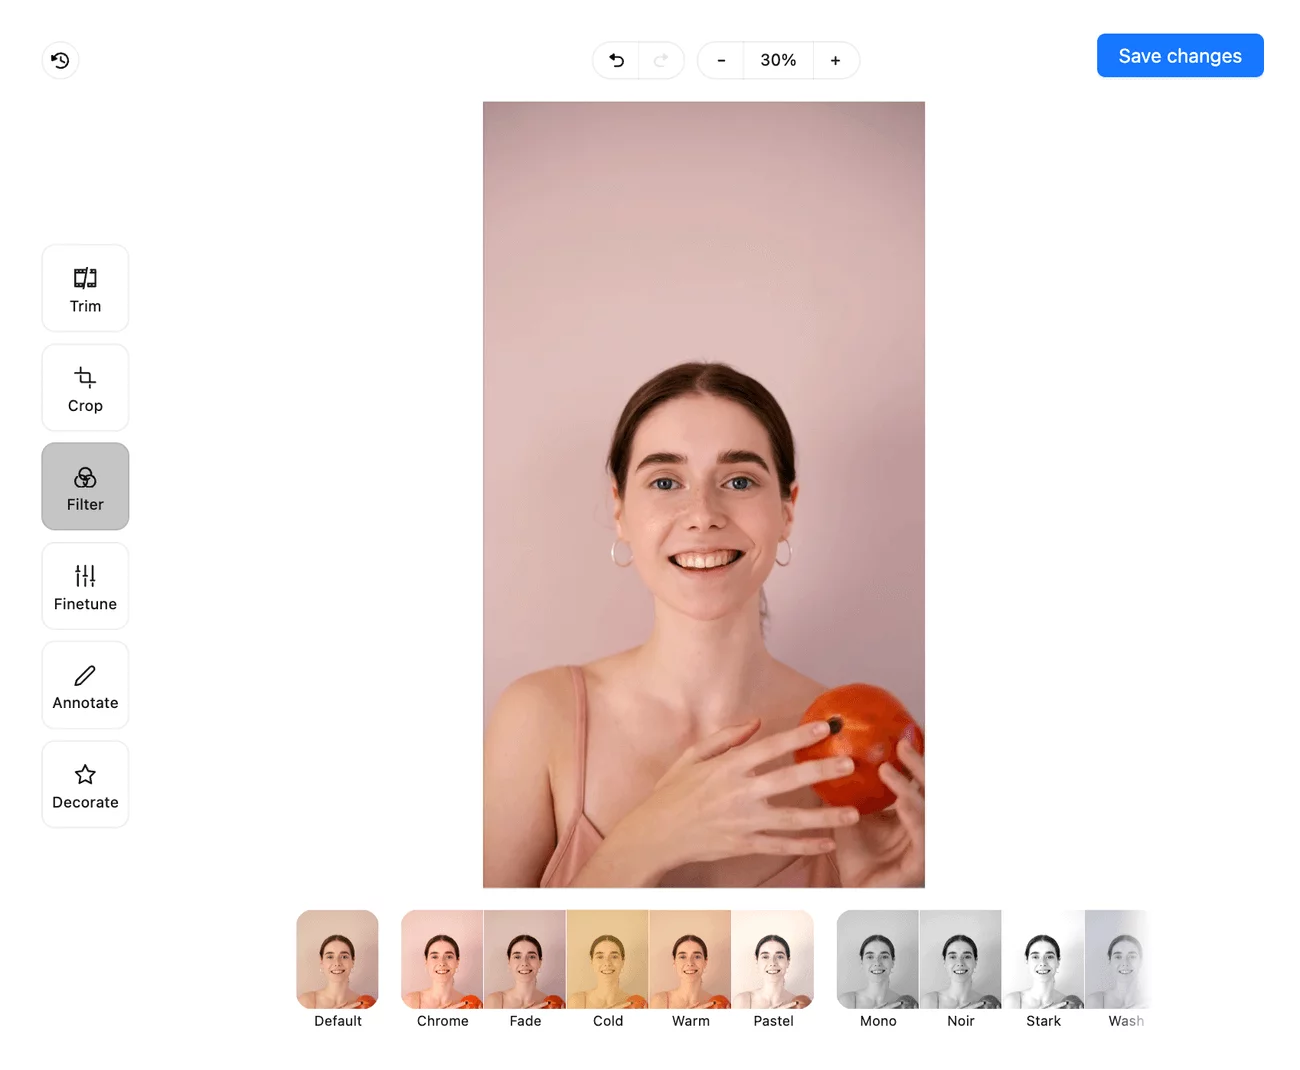
I love how easy it is to create and collaborate on new content in Planable. You can upload images and videos to the media library, then fine-tune them so they look just right thanks to the built-in editor. And if you’re ever stuck for Instagram captions, Planable AI is there to help with instant caption generation.
Editing a vertical video in Planable
The calendar view is great when you want to visualize your Instagram content strategy and you can add color-coded labels to differentiate between types of content or campaigns.
There’s also a feed view that lets you see pixel-perfect previews of your posts before they go live, and an Instagram grid view to help you piece together the aesthetic of your profile.
Key features:
Schedule Instagram posts, carousel posts, and the first comment
Schedule Instagram Stories and Reels
Plan out your content with the calendar view
Drag and drop posts to easily reschedule them
Preview exactly how your posts will look before they go live with Feed view
Create a cohesive Instagram aesthetic on your profile with Grid view
Real-time collaboration features for feedback and approvals
Increase discoverability with location and account tagging
Track and measure content performance with Instagram analytics
Install on mobile devices as a powerful Instagram scheduling app
Pricing:Planable offers a trial of the full feature set for your first 50 posts. Paid plans start at $33/month per workspace with unlimited users.
Takeaway: Planable is a top choice for content creators, marketing teams, and agencies looking for an Instagram scheduler.
Scheduling Instagram posts is easy as pie using an Hootsuite alternative like Planable.
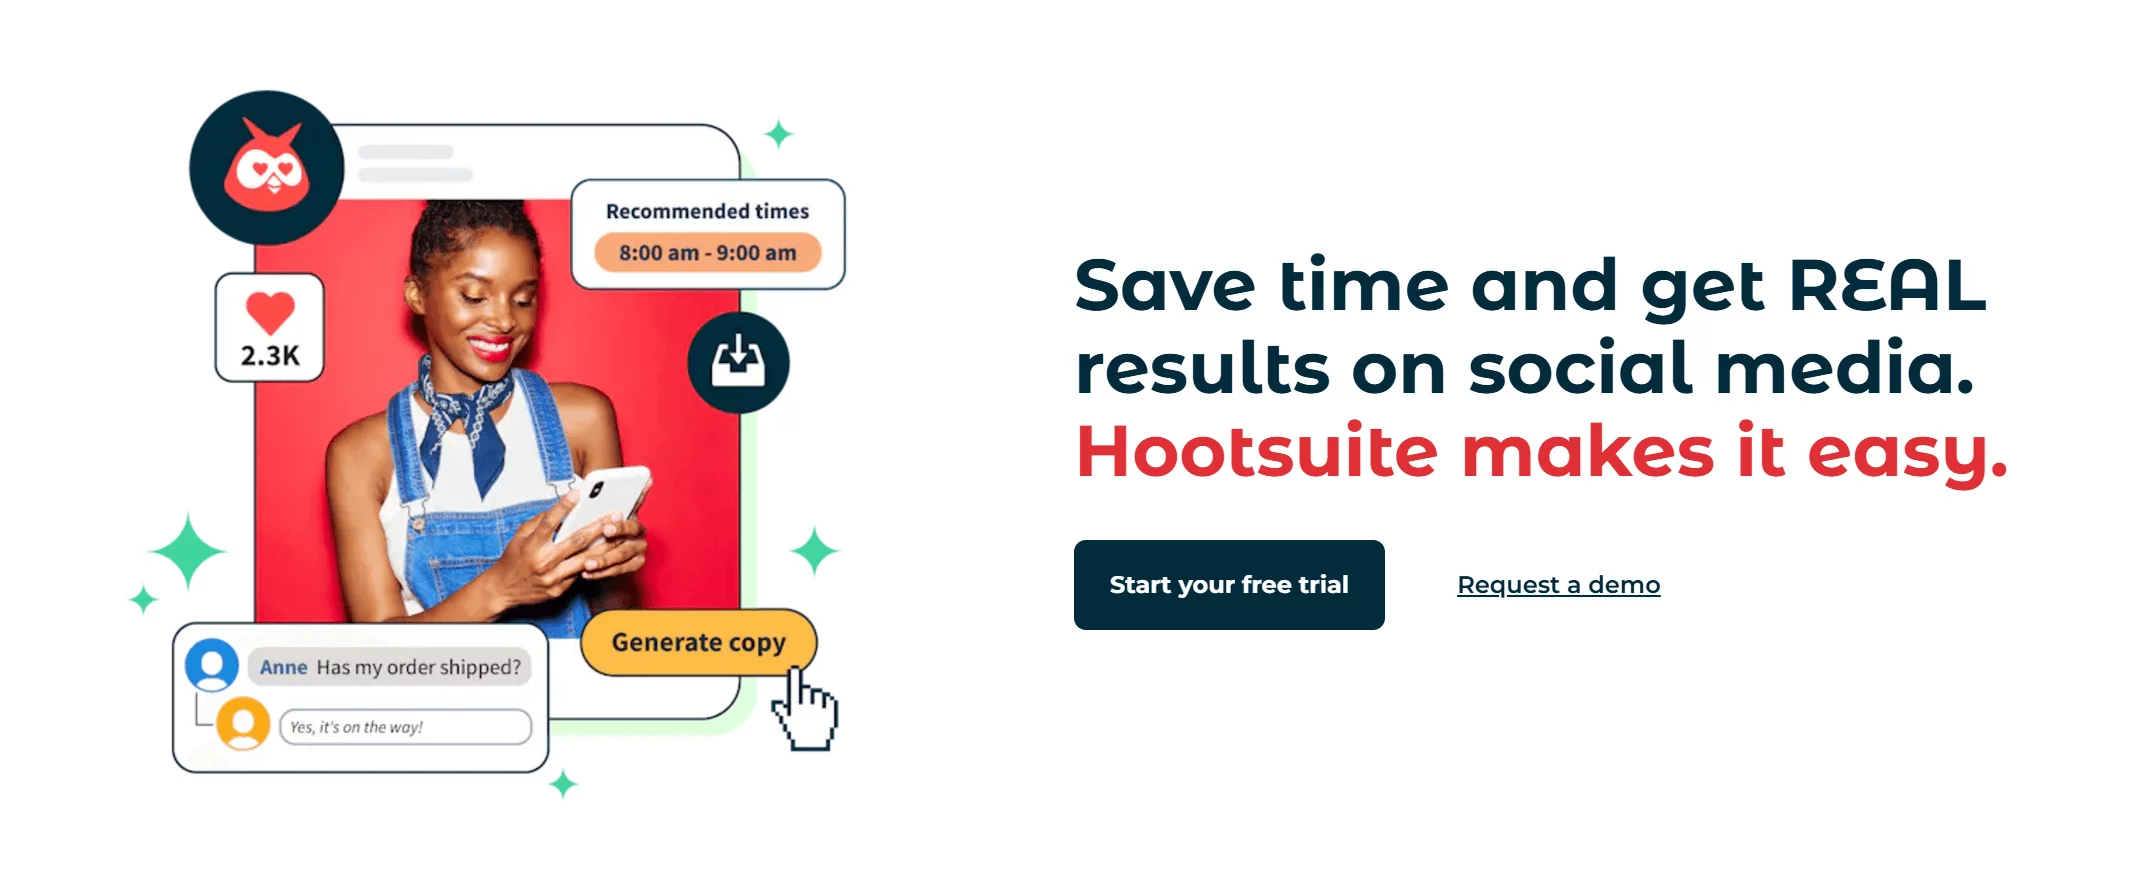
2. Hootsuite – Instagram scheduler for managing a single social inbox
Hootsuite is a classic social media management tool that helps you manage your Instagram activity, as well as all of the other major social networks. The platform’s best feature is a centralized social inbox that brings all of your comments and messages from social networks into one channel.
Key features:
Content calendar and the ability to schedule Instagram posts
In-depth analytics and the ability to create custom reports
Social inbox to manage Instagram comments and messages from the platform
OwlyWriter AI to help you write captions and hashtags for your Instagram posts
Pricing: Hootsuite offers a 30-day free trial. Paid plans start at $99/month (when billed annually) for one user to manage 10 social accounts.
Takeaway: Hootsuite falls on the more expensive end of the spectrum for an Instagram post scheduler, but may be worth it for large teams that receive a lot of customer service messages and value advanced analytics.
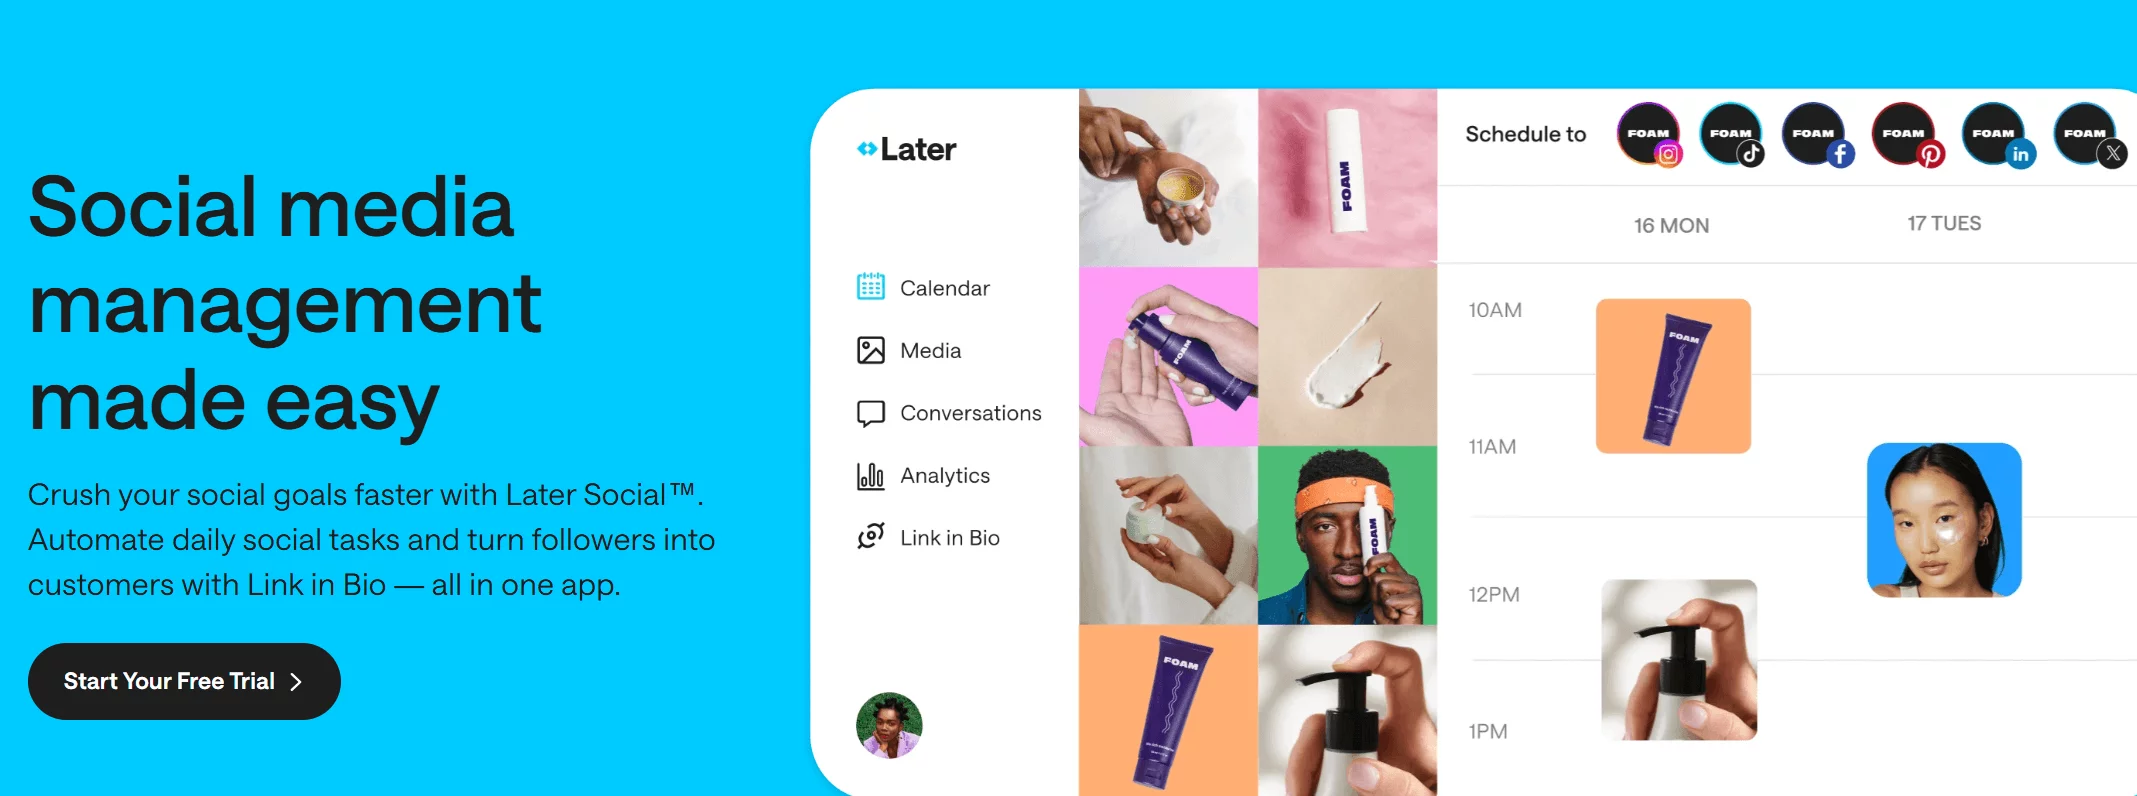
3. Later – Instagram scheduling tool for creating a link in bio page
Later is a social media tool that supports direct publishing for Instagram Stories, Reels, and posts. You can schedule Instagram content in advance, use a drag-and-drop calendar to plan out your strategy, and curate the look of your Instagram profile with the platform’s visual grid planner.
Key features:
Drag and drop calendar and Instagram content scheduling
Media library to store photos and videos
Link in Bio features to drive traffic to your website
Visual planner to help design your Instagram grid
Pricing: Later offers a 14-day free trial. Paid plans start at $16.67/month (when billed annually) for one user to manage one set of social accounts. It’s worth noting that two of Later’s paid plans include a limit on the number of posts per profile.
Takeaway: Later comes in at a competitive price point and provides a great option as an Instagram scheduler for individual creators or small teams with a social media presence focused on visual platforms like Instagram and TikTok.
Why should you schedule Instagram posts ahead of time?
Scheduling your Instagram posts in advance has numerous benefits:
Saves time
Schedule posts and gain more time to work on your social media and content creation strategy. Plus, you’ll never again need to whip up last-minute Instagram posts. If you’re looking to create eye-catching design for your feed, try using an Instagram Post Maker to design high-quality posts easily.
Improves consistency
With a clear posting schedule, you’ll be able to maintain consistent quality and presence on your Instagram account.
Increase productivity
When you batch-post, plan, and schedule feed posts ahead of time, you’re not racing against a deadline, so you can afford to be more strategic with your IG content.
Get approval in time
Instagram scheduling allows you to get the necessary approval before the posts go out. Doesn’t it feel good to be ahead of deadlines?
Scheduling Instagram posts in Planable’s social media calendar
Instagram posts scheduling best practices
Scheduling Instagram content in advance will help maintain consistency in the messaging and theme of your posts. It ensures you don’t miss out on anything, and you can preview your posts before they go live.
Here are some tips to make the most of scheduling future posts for later:
1. Choose the right time to post for your audience
Timing is everything in terms of reaching the intended audience. Posting Instagram content when most of your audience is online can boost engagement.
You can set preferred times in Planable to ensure that your posts go out at the optimum time of the day for your particular audience. Choose your preferred times by analyzing the engagement trends data and patterns from your Instagram account.
Make planning Instagram posts in advance even easier when you generate AI captions for Instagram with our free tool. Bye-bye writer’s block!
2. Curate relevant posts
Instagram growth comes from creating maximum value for your audience. Scaling involves finding, selecting, and cross-posting relevant content. It’s not about sharing just any content. You should curate content that interests and engages your audience: blog posts, user-generated content, or testimonials.
Instagram SEO is essential in this process, as optimizing posts with relevant keywords, hashtags, and engaging content boosts visibility and helps reach your target audience organically.
3. Plan ahead
Scheduling posts ahead of time is a good starting point for a consistent Instagram presence and intentional relationship-building with your audience. When you plan your Instagram content calendar ahead of time, you can create a more comprehensive strategy, valuable content, and schedules that align with your optimum engagement times. Buh-bye “What to post on Instagram tomorrow?” questions.
4. Identify gaps in your calendar
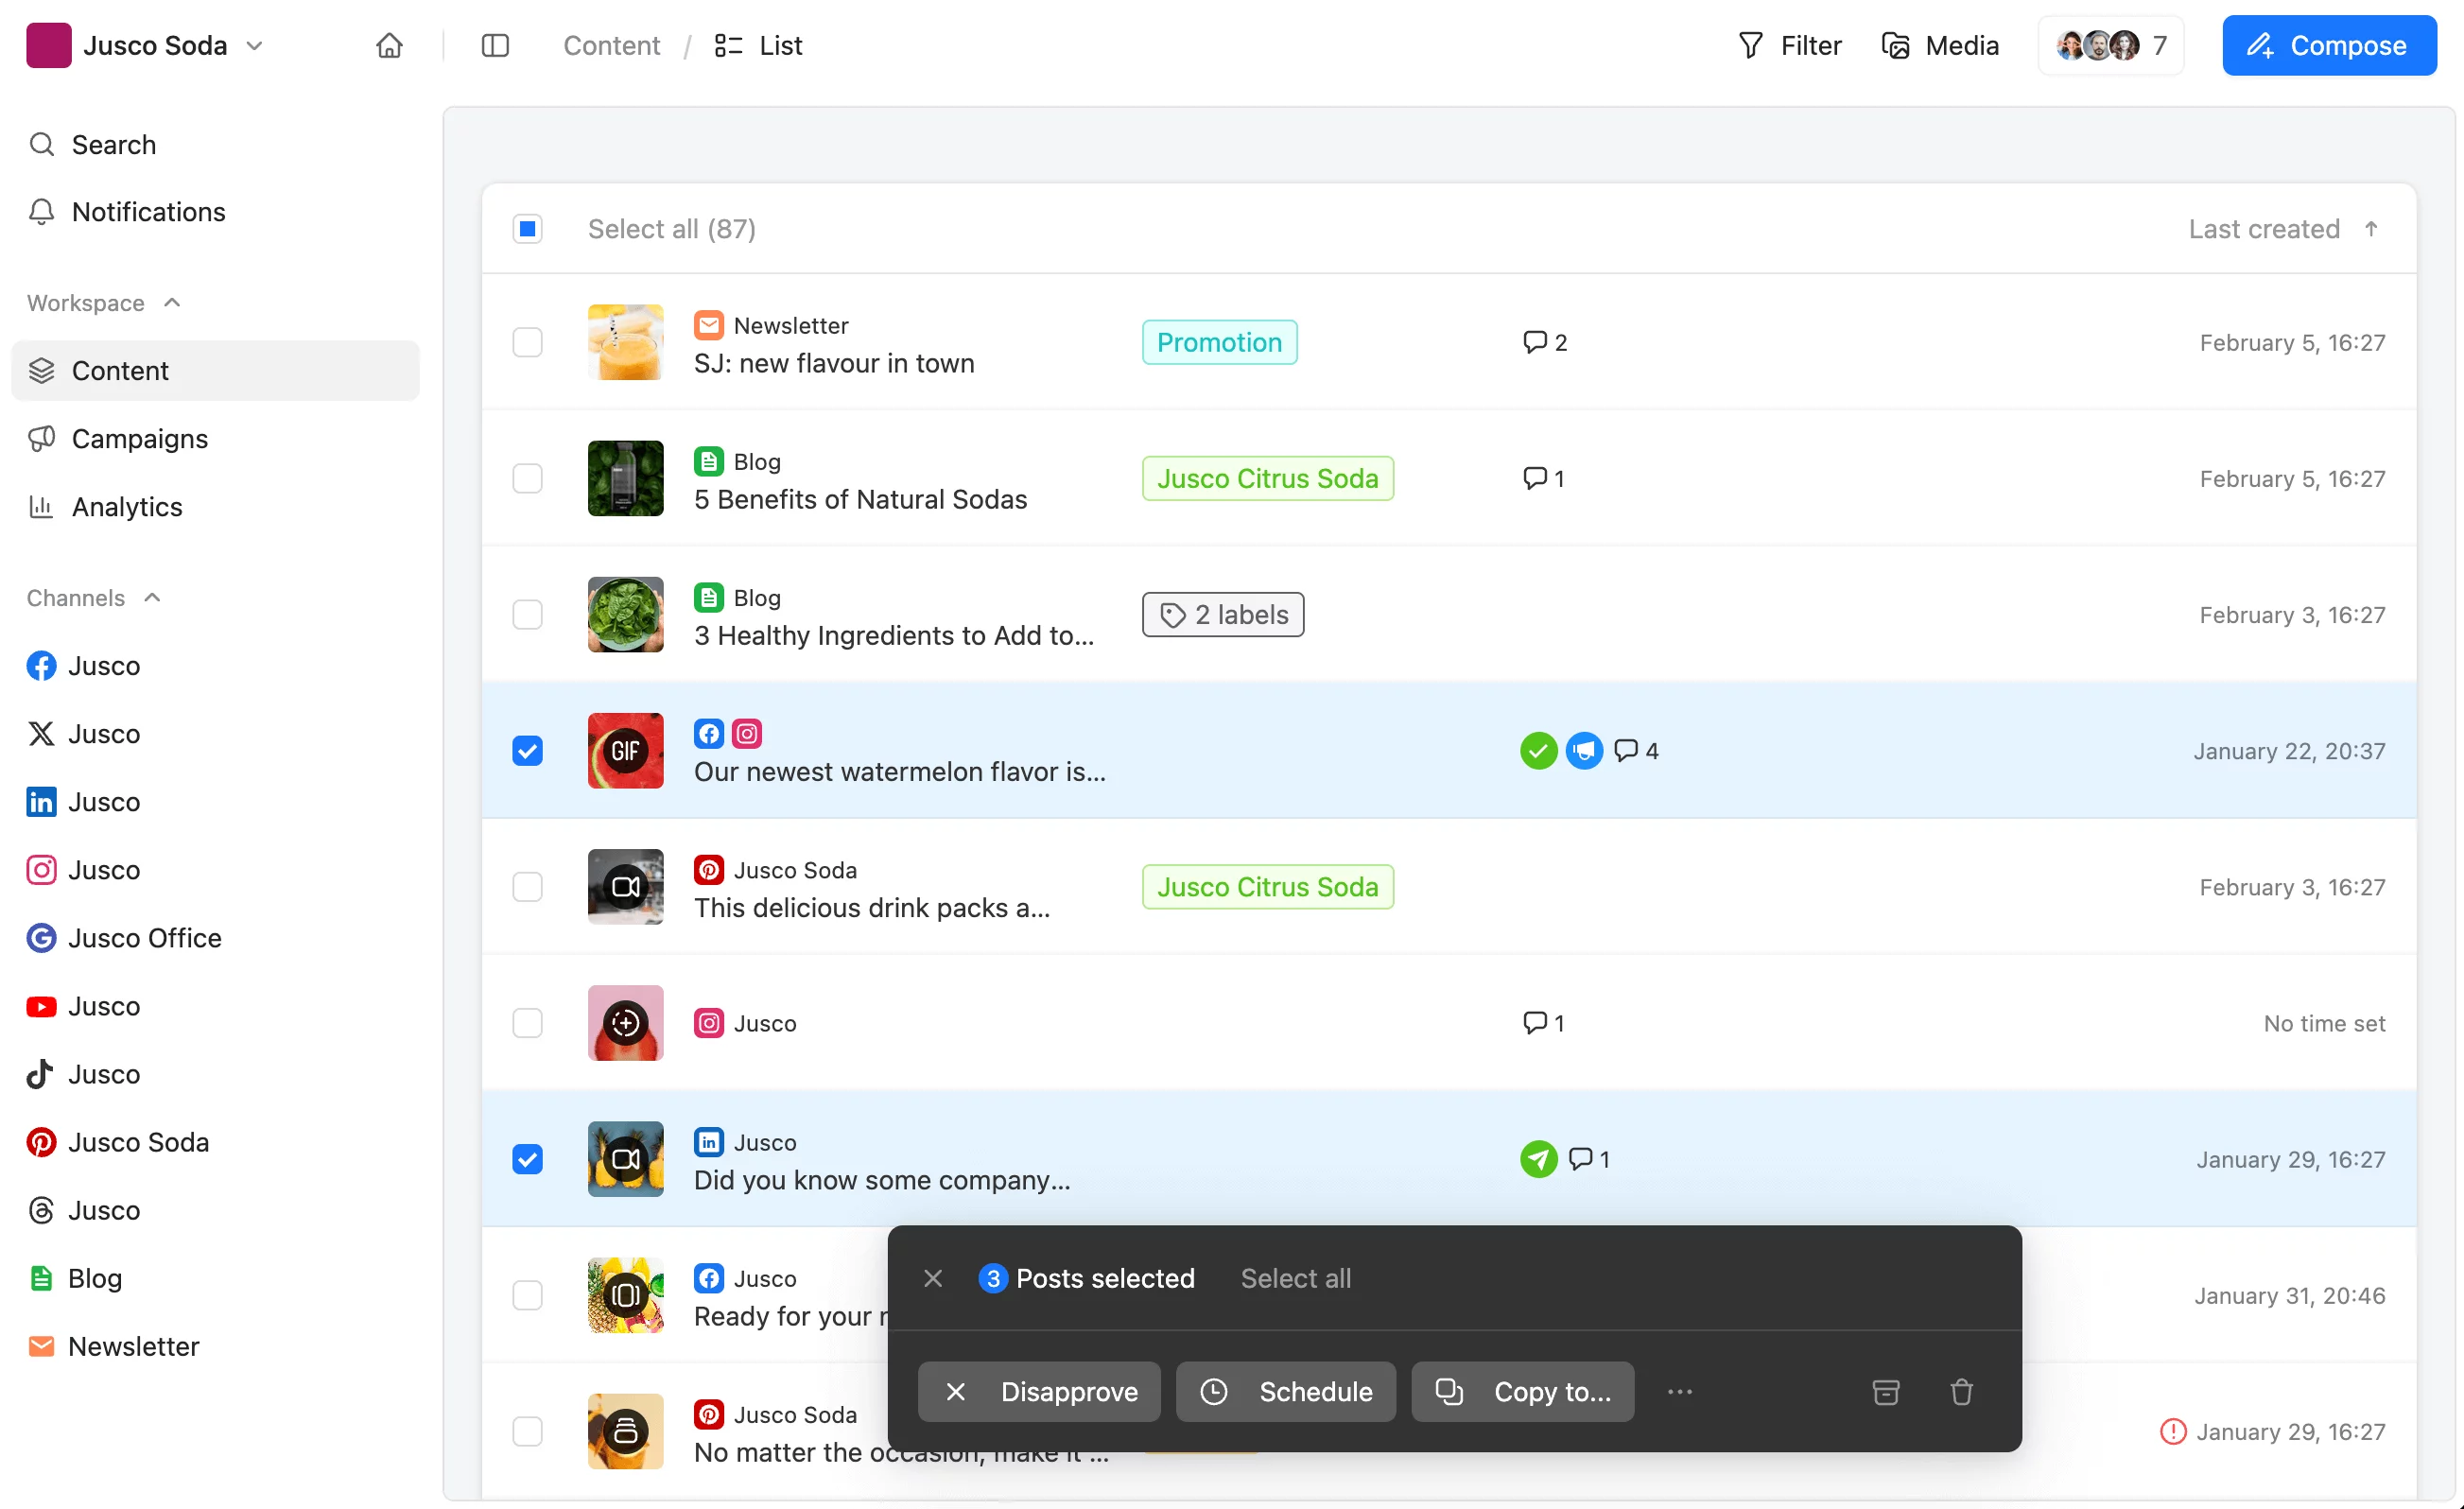
Calendar View in Planable
Planable’s social media content calendar helps you identify gaps at a glance. You want to strike a balance between under-posting and over-posting. Filling gaps in your content calendar ensures that your Instagram audience sees your content frequently enough to keep you in the back of their heads. And, it’s simpler than you think with an IG content planner.
5. Analyze your results and double-down on what works
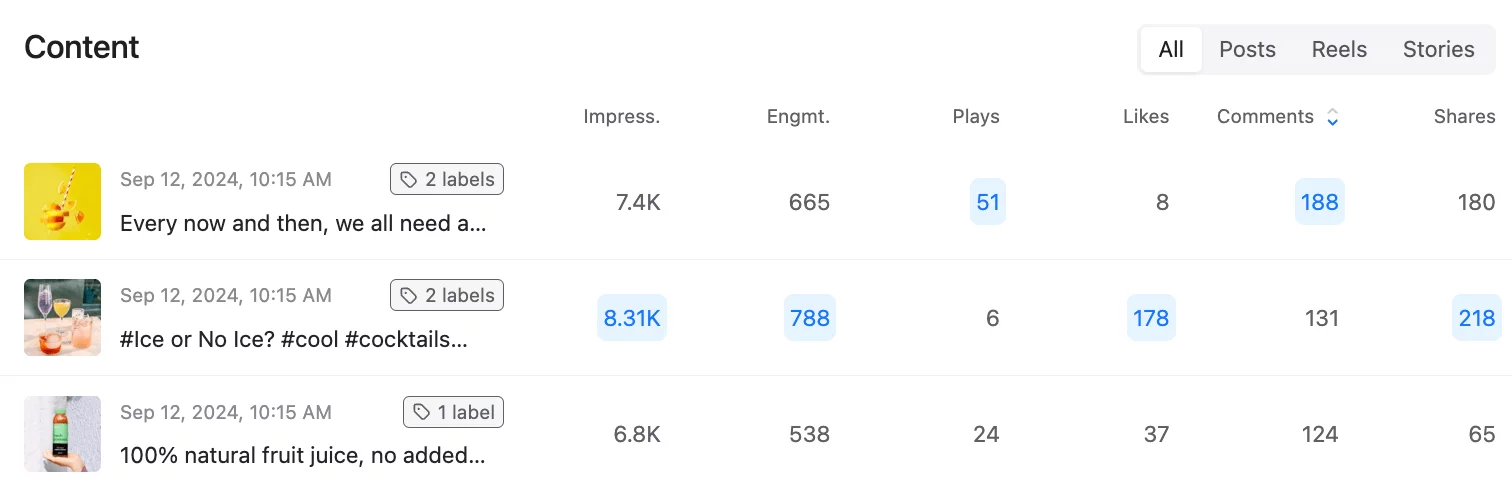
Top performing Instagram posts in Planable Analytics
Your audience’s reaction is the ultimate measure of success. So make sure to follow results and focus on scheduling Instagram posts that strike the right cord with your followers. Dedicated Instagram analytics tools allow you to visualize how your IG content performs based on the metrics that matter to you — like impressions, engagements, or comments. See what works and schedule more Instagram posts just like that.
FAQs about scheduling Instagram posts
Why can’t I schedule posts on Instagram?
Your account type determines how you plan to schedule your posts on Instagram. Only Instagram business accounts have the ability to schedule posts, not personal accounts.
Instagram offers three account types: Personal, Creator, and Business. When you sign up, you get a Personal Instagram account. You can choose to change it to a Professional Account (Business or Creator account) at any time.
The main difference between Professional and Personal Instagram Accounts is that a Personal Account latter has no Instagram analytics or API access. You can’t schedule posts in advance, get third-party access to analytics or use Meta Business Suite to manage your account.
However, with Instagram Business, you can easily schedule posts in advance to auto-publish. If you’re still developing your Instagram marketing strategy, you should consider creating a business account even if you’re still growing your following.
Ready to start scheduling Instagram posts?
Start planning engaging Instagram posts ahead of time and better organize your content calendar.
Now that you know how to schedule Instagram posts with the app itself, via Meta Business Suite, or using Instagram scheduling tools like Planable, you can choose the best way that works for you.
Now it’s time to schedule those Instagram posts. You can try Planable for free today!
Relentless advocate and practitioner of putting users before Google algorithms since 2016. Geeks out over everything tech SEO. Dabbles in photography and is a natural-born reader.


 Step 3. From Post to, select your Instagram page. If you would like the post to also appear on Facebook, make sure to select it as well.