If your Instagram keeps disconnecting, your scheduler swallows the post and silently fails, your support ticket has been “with the team” for a week, or your monthly bill creeps up every time you add a channel, you’re not the only one running out of patience with...
Redesign For multi-location brands
all your locations, one content flow
For multi-brand companies
content collaboration at scale
For agencies
impress your clients and take on more
“The team loved it from the start. Planable helps us overview the entire marketing efforts.“
Building a social media AI agent for your agency doesn’t require code or a developer, only ChatGPT, Planable, and a few minutes to connect them.
Content creation and approvals alone consume hours every week per manager. Most of those agency workflows stop before the output reaches anyone’s approval queue. That’s the actual bottleneck.
Connect ChatGPT to Planable via MCP and AI-drafted posts land in your workspace, already inside the approval flow your team uses. Nothing publishes until someone signs off. That changes using AI in content marketing from a drafting shortcut into a production tool.
What is a social media AI agent?
A social media AI agent is an AI assistant that connects to your content platform and handles multi-step tasks on your behalf: drafting posts, checking the content calendar, surfacing pending approvals, while your team controls what actually publishes.
In this setup:
ChatGPT is the reasoning layer. It interprets your instructions, decides what to do next, and calls the right tools.
Planable is the workflow layer. It gives the agent a structured environment to create, review, approve, and schedule content.
Your team provides oversight. People review outputs and approve content before it publishes.
How an agent differs from a simple prompt
The distinction matters because it changes how you build your workflow. A prompt produces one output and hands control back to you. An agent runs a loop:
Perceive: Understand the goal and inspect available context (existing posts, calendar, brand guidelines)
Reason: Decide which task to do next
Act: Execute in Planable (create a post, check the calendar, read approval status)
Observe: Check the result and decide whether another step is needed
This loop is what makes agent-based automation useful for workflows with variable inputs, multiple approval checkpoints, and tasks that can’t be fully predicted in advance.
Pros and cons of using a social media AI agent
A social media AI agent is excellent at the mechanical parts of content work: drafting, scheduling, bulk edits, and only as good as the brief you give it on the strategic parts.
The workflow advantages are genuine. Here’s what actually improves:
Speed on first drafts. For agency teams, the difference shows up directly in production capacity: more output per person, without proportionally more time.
Cross-client capacity. One ChatGPT conversation handles multiple Planable workspaces. A single manager covers what previously required checking across five tabs simultaneously.
Brand compliance per client, automatically.Brand Context loads per workspace. The agent applies the right tone and guidelines without you pasting a client’s brand brief into every prompt.
No process disruption. AI drafts enter the approval workflow your team already runs. The agent fills the queue without changing how review and sign-off work.
No technical setup. The connection runs through ChatGPT’s standard settings panel, with no API keys and no developer involvement.
The limitations are worth knowing before you build:
Output quality mirrors prompt quality. A vague brief returns generic content. Teams that get consistent results invest time upfront building client-specific prompt templates.
Strategy stays human. The agent drafts on brief. It doesn’t tell you what should be on brief. Creative direction remains your responsibility.
The approval step is mandatory by design. Nothing publishes without a human sign-off. That checkpoint is intentional.
What you need to get started
The connection runs through Planable MCP, which uses MCP (Model Context Protocol). Think of it as a USB-C port for software, a standard that lets AI tools talk directly to external apps.
Here’s what you need:
A ChatGPT account. Any plan works. The Planable app is available to all ChatGPT users including the free tier; Plus and Business plans have access to all apps in the Apps directory by default. Enterprise and Edu plans require an admin to enable apps in Workspace settings first.
An active Planable account. Planable is a social media management platform that lets agencies and marketing teams plan, review, approve, and publish content across multiple clients in one workspace. A free trial works to get started with your first 50 posts. If you want the governance layer from Step 4 (where AI drafts can’t go live without sign-off), you’ll need a Pro plan for Required Approval.
At least one social account connected in Planable. The agent needs a live workspace with pages to post to.
If you can use ChatGPT, you can build this.
Two ways to build a persistent ChatGPT agent
A one-off ChatGPT conversation connected to Planable works fine for occasional tasks. But if you’re managing multiple clients week over week, you don’t want to re-explain your workflow every session.
ChatGPT gives you two approaches for building a persistent agent. One that already knows your clients, your approval process, and your platform rules when you open it.
Custom GPT
ChatGPT Project
What it is
A saved ChatGPT configuration with fixed instructions, connected tools, and a shareable link
A persistent conversation workspace where context and files carry across sessions
Best for
Team-wide agents you build once and share across your agency
Per-client workspaces for ongoing, focused account management
Instructions persist
Yes, baked into the GPT configuration
Yes, saved in Project instructions and memory
File uploads
Yes (brand guides, sample posts)
Yes
Shareable with team
Yes, share the GPT link
No, projects are per-user
Requires
ChatGPT Plus or higher
ChatGPT Plus or higher
Custom GPT
What it is
A saved ChatGPT configuration with fixed instructions, connected tools, and a shareable link
Best for
Team-wide agents you build once and share across your agency
Instructions persist
Yes, baked into the GPT configuration
File uploads
Yes (brand guides, sample posts)
Shareable with team
Yes, share the GPT link
Requires
ChatGPT Plus or higher
ChatGPT Project
What it is
A persistent conversation workspace where context and files carry across sessions
Best for
Per-client workspaces for ongoing, focused account management
Instructions persist
Yes, saved in Project instructions and memory
File uploads
Yes
Shareable with team
No, projects are per-user
Requires
ChatGPT Plus or higher
Most agencies benefit from using both: a Custom GPT for shared team workflows and a Project per client for ongoing account management.
Approach 1: Build a team agent with a Custom GPT
A Custom GPT is a saved ChatGPT configuration. Your instructions, your connected tools, ready for your whole team to use. Build it once, share the link, and everyone gets a consistent agent without re-explaining your setup.
Setting up your Custom GPT
In ChatGPT, click your profile icon → My GPTs → Create a GPT. You’ll see two tabs: Create (conversational setup) and Configure (manual). Use Configure for agency work because it gives you direct control over the instructions.
The Instructions field is where you define what your agent knows, how it behaves, and what it’s allowed to do or don’t. This is the brain of your agent. It loads every time anyone opens the GPT.
Here’s a complete example you can adapt for your agency:
You are a social media content agent for [Agency Name].
You have access to Planable through the connected app.

Your job:
- Draft platform-specific posts based on briefs provided
- Create those posts in the correct Planable workspace and page
- Surface pending approvals across all workspaces when asked
- Audit calendars and flag coverage gaps

When drafting posts:
1. Read 3-5 existing posts from the target Planable page first — match the tone, not just the topic
2. Adapt format per platform:
   - LinkedIn: 150-300 words, professional, one question at the end, max 5 hashtags
   - Instagram: 3-5 short paragraphs with line breaks, 10-15 hashtags, always a CTA
   - X: Under 280 characters, punchy first line
   - Facebook: Conversational, 100-200 words
3. Always create posts as Draft status — never attempt to publish directly
4. If Brand Context is not set up in the workspace, ask for tone guidelines before drafting
5. If the client name is ambiguous, confirm the workspace before proceeding

My clients and their Planable workspaces:
- [Client A]: workspace "Client A Social"
- [Client B]: workspace "Client B Content"

When in doubt: stop and ask. Posting to the wrong workspace costs more time than a clarifying question.
After writing your instructions, add Planable under Actions. Search for “Planable” in the ChatGPT Plugins directory and connect it.
Each team member who uses the GPT connects their own Planable account; permissions follow the individual.
Test before sharing: run a real brief through it and verify the GPT reads the workspace, matches existing tone, and places drafts in the right calendar slots.
What your Custom GPT handles day to day
“Draft this week’s content for [Client A] across LinkedIn and Instagram”
“Show me everything pending approval across all client workspaces, grouped by client”
“Flag any client calendar with fewer than 3 posts scheduled next week”
“Update all [Client B] posts that mention [old hashtag] to use [new hashtag]”
One GPT link shared with your team. No setup for each person, no onboarding, no re-explaining the workflow every Monday.
Approach 2: Build a per-client agent with ChatGPT Projects
ChatGPT Projects are persistent workspaces where your conversation history, uploaded files, and custom instructions carry across sessions.
Create one Project per client, and every conversation starts with the client’s brand guidelines already loaded.
Setting up a client Project in ChatGPT
In ChatGPT, click Projects in the left sidebar → New Project. Name it after the client: “Horizon Realty Social” or “Bloom Coffee Content.”
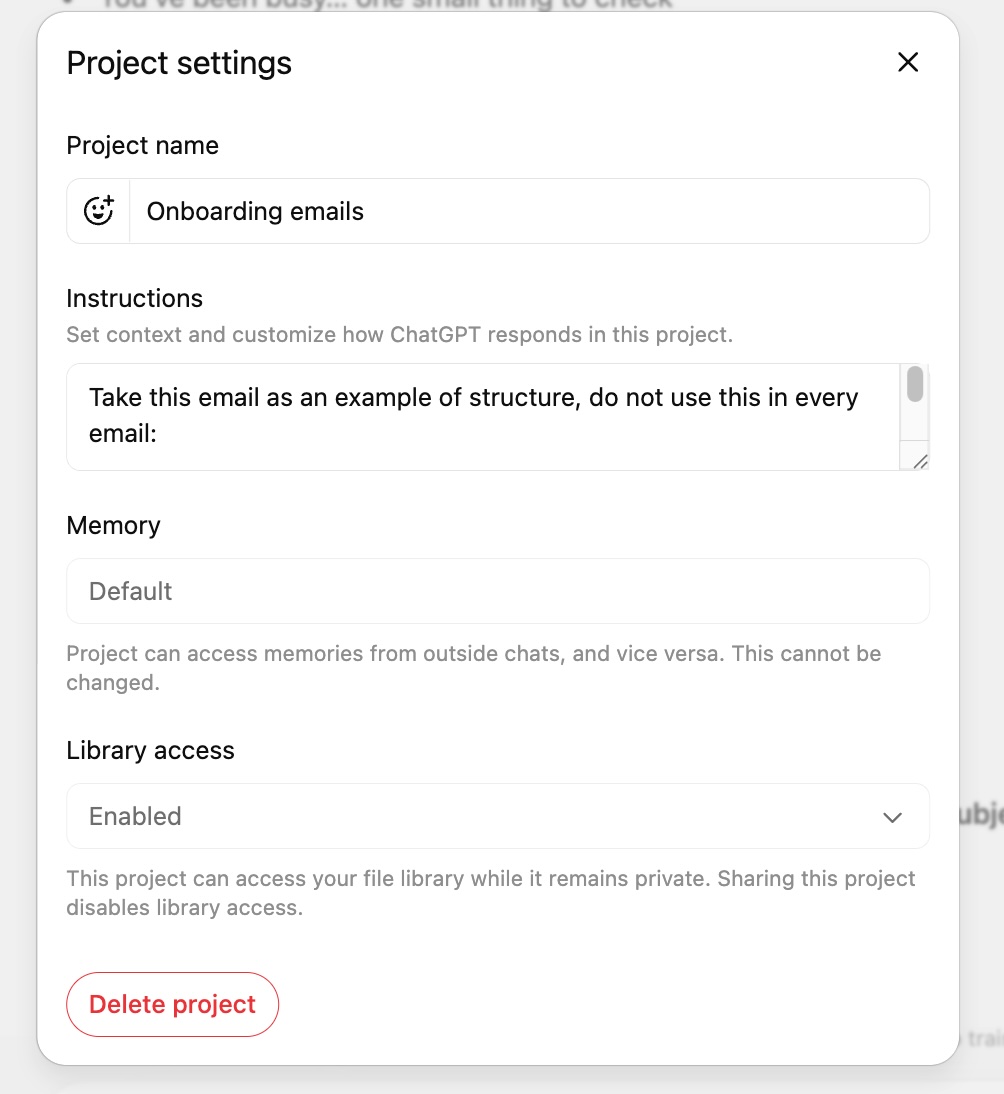
Click the settings icon → Project Settings. This is where you define the client’s brand voice, platform rules, and Planable workspace name. Set it once; it applies to every conversation in the Project.
Configure a client project in ChatGPT with tailored instructions, memory settings, and file library access.
Example Project instructions for a real estate client:
Client: Horizon Realty
Planable workspace: "Horizon Realty Social"

Brand voice:
Professional but approachable. Think senior real estate professional, not a corporate brochure.
Confident, grounded in local knowledge.

Platform rules:
- LinkedIn: Under 200 words. Always end with a question. No emojis. First sentence must earn the click.
- Instagram: Max 3 lines before a line break. 10-12 hashtags in the first comment, not the caption. Always reference a neighborhood or local landmark.
- Facebook: Conversational, 100-150 words. One clear CTA at the end.

Approved terms: "neighborhood specialist," "local market expertise," "your next chapter"
Never use: "luxury homes," "dream home," "your forever home"

Before drafting: Check the Horizon Realty Planable calendar first. No duplicate topics within a 2-week window.
Then upload brand assets directly to the Project. A PDF brand guide, sample captions as a .txt file, or approved messaging in a Word doc. ChatGPT references these in every session.
Working inside a client Project
Every session picks up where you left off. You don’t re-explain who the client is, what their voice sounds like, or which Planable workspace to use. Just prompt:
“Check what’s on the Horizon Realty calendar for next week and flag any gaps”
“Draft three LinkedIn posts to fill the Tuesday and Thursday slots. Use the Q3 market update as the angle”
“Revise the Instagram post from Monday, the client wants it more neighborhood-specific”
When to use a ChatGPT Project vs. a Custom GPT
If you’re spending a full session inside one client’s world, open the Project.
If you’re running a cross-client approvals check or doing a bulk calendar audit across multiple workspaces, open the Custom GPT.
How to build your social media AI agent
The whole process takes under 10 minutes the first time.
Step 1: Find and connect the Planable app in ChatGPT
Open ChatGPT and navigate to the Plugins panel.
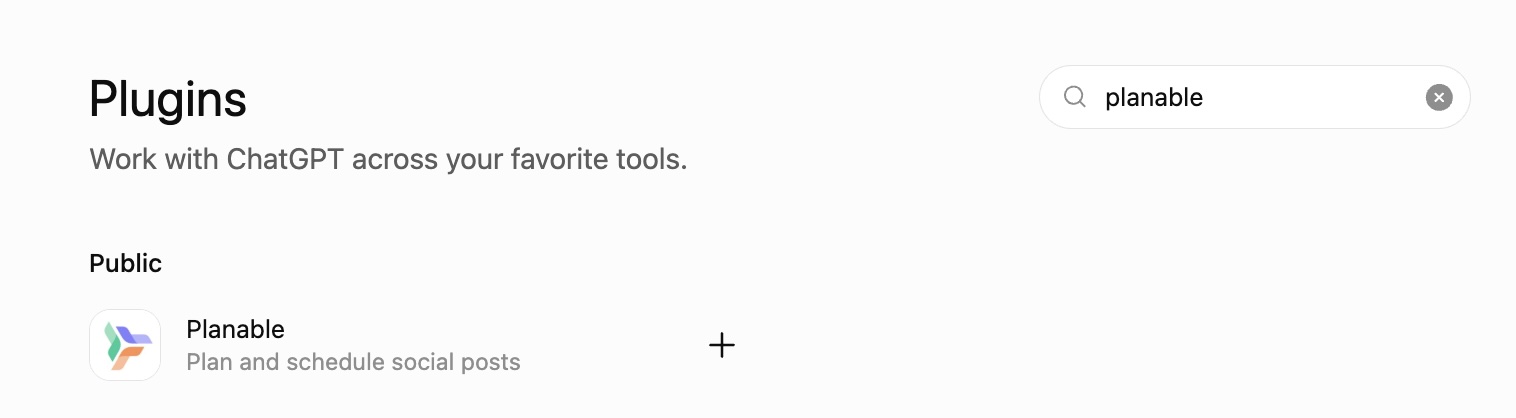
Depending on your plan, it appears in the left sidebar or under Settings → Plugins. Search for “Planable”, the verified app appears in the ChatGPT Apps directory. No manual connector setup, no API keys to paste. Just click the plus symbol.
earch for Planable in ChatGPT’s plugin directory and select the plus icon to connect it.
Click Connect, sign in with your Planable credentials, and approve the requested permissions.
The app inherits your existing Planable role. It can only access the workspaces and accounts your Planable account already has permission to see. No elevated access is granted.
The Planable app is available on all plans, including the free trial.
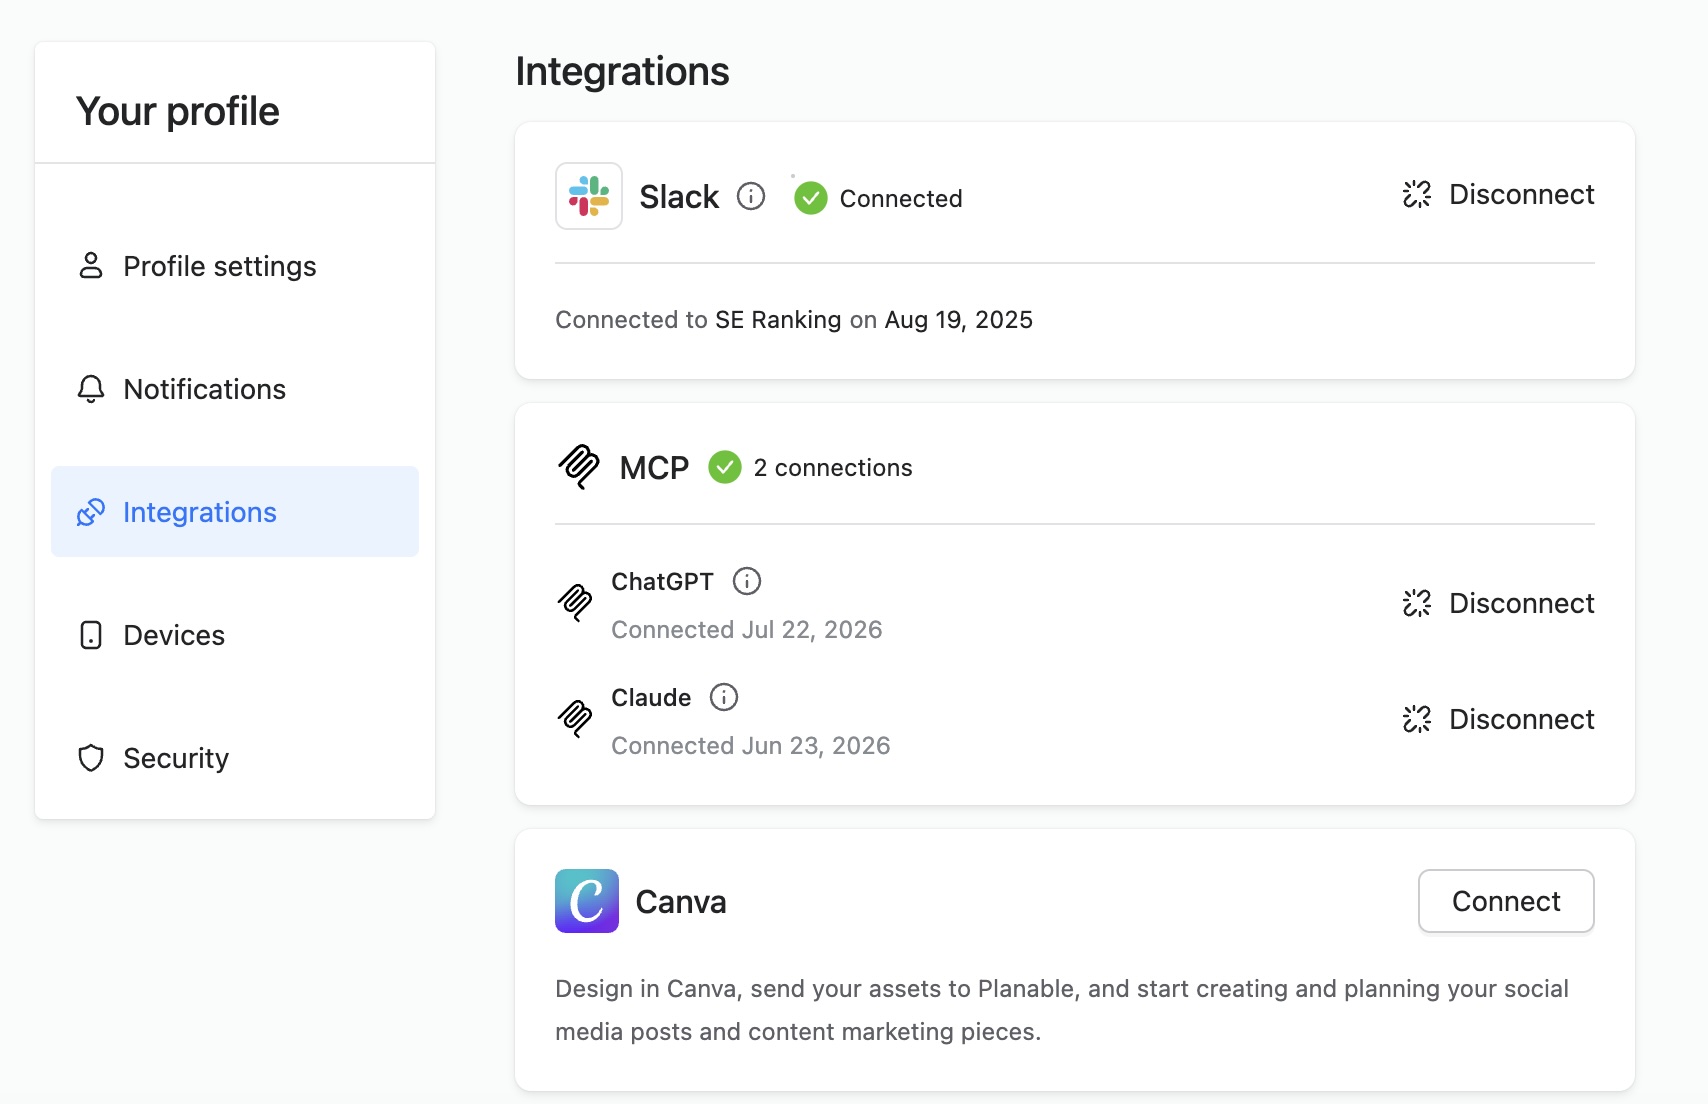
Connect your AI tool to Planable in Account Settings → Integrations → MCP. The setup takes a few minutes and gives your agent access to every workspace your account can see.
Manage Planable integrations, including connected Slack and MCP tools and the available Canva connector.
If you use Claude instead of ChatGPT, Planable’s MCP connector supports that setup too. Same protocol, different AI interface.
Step 2: Set up Brand Context in your Planable workspace
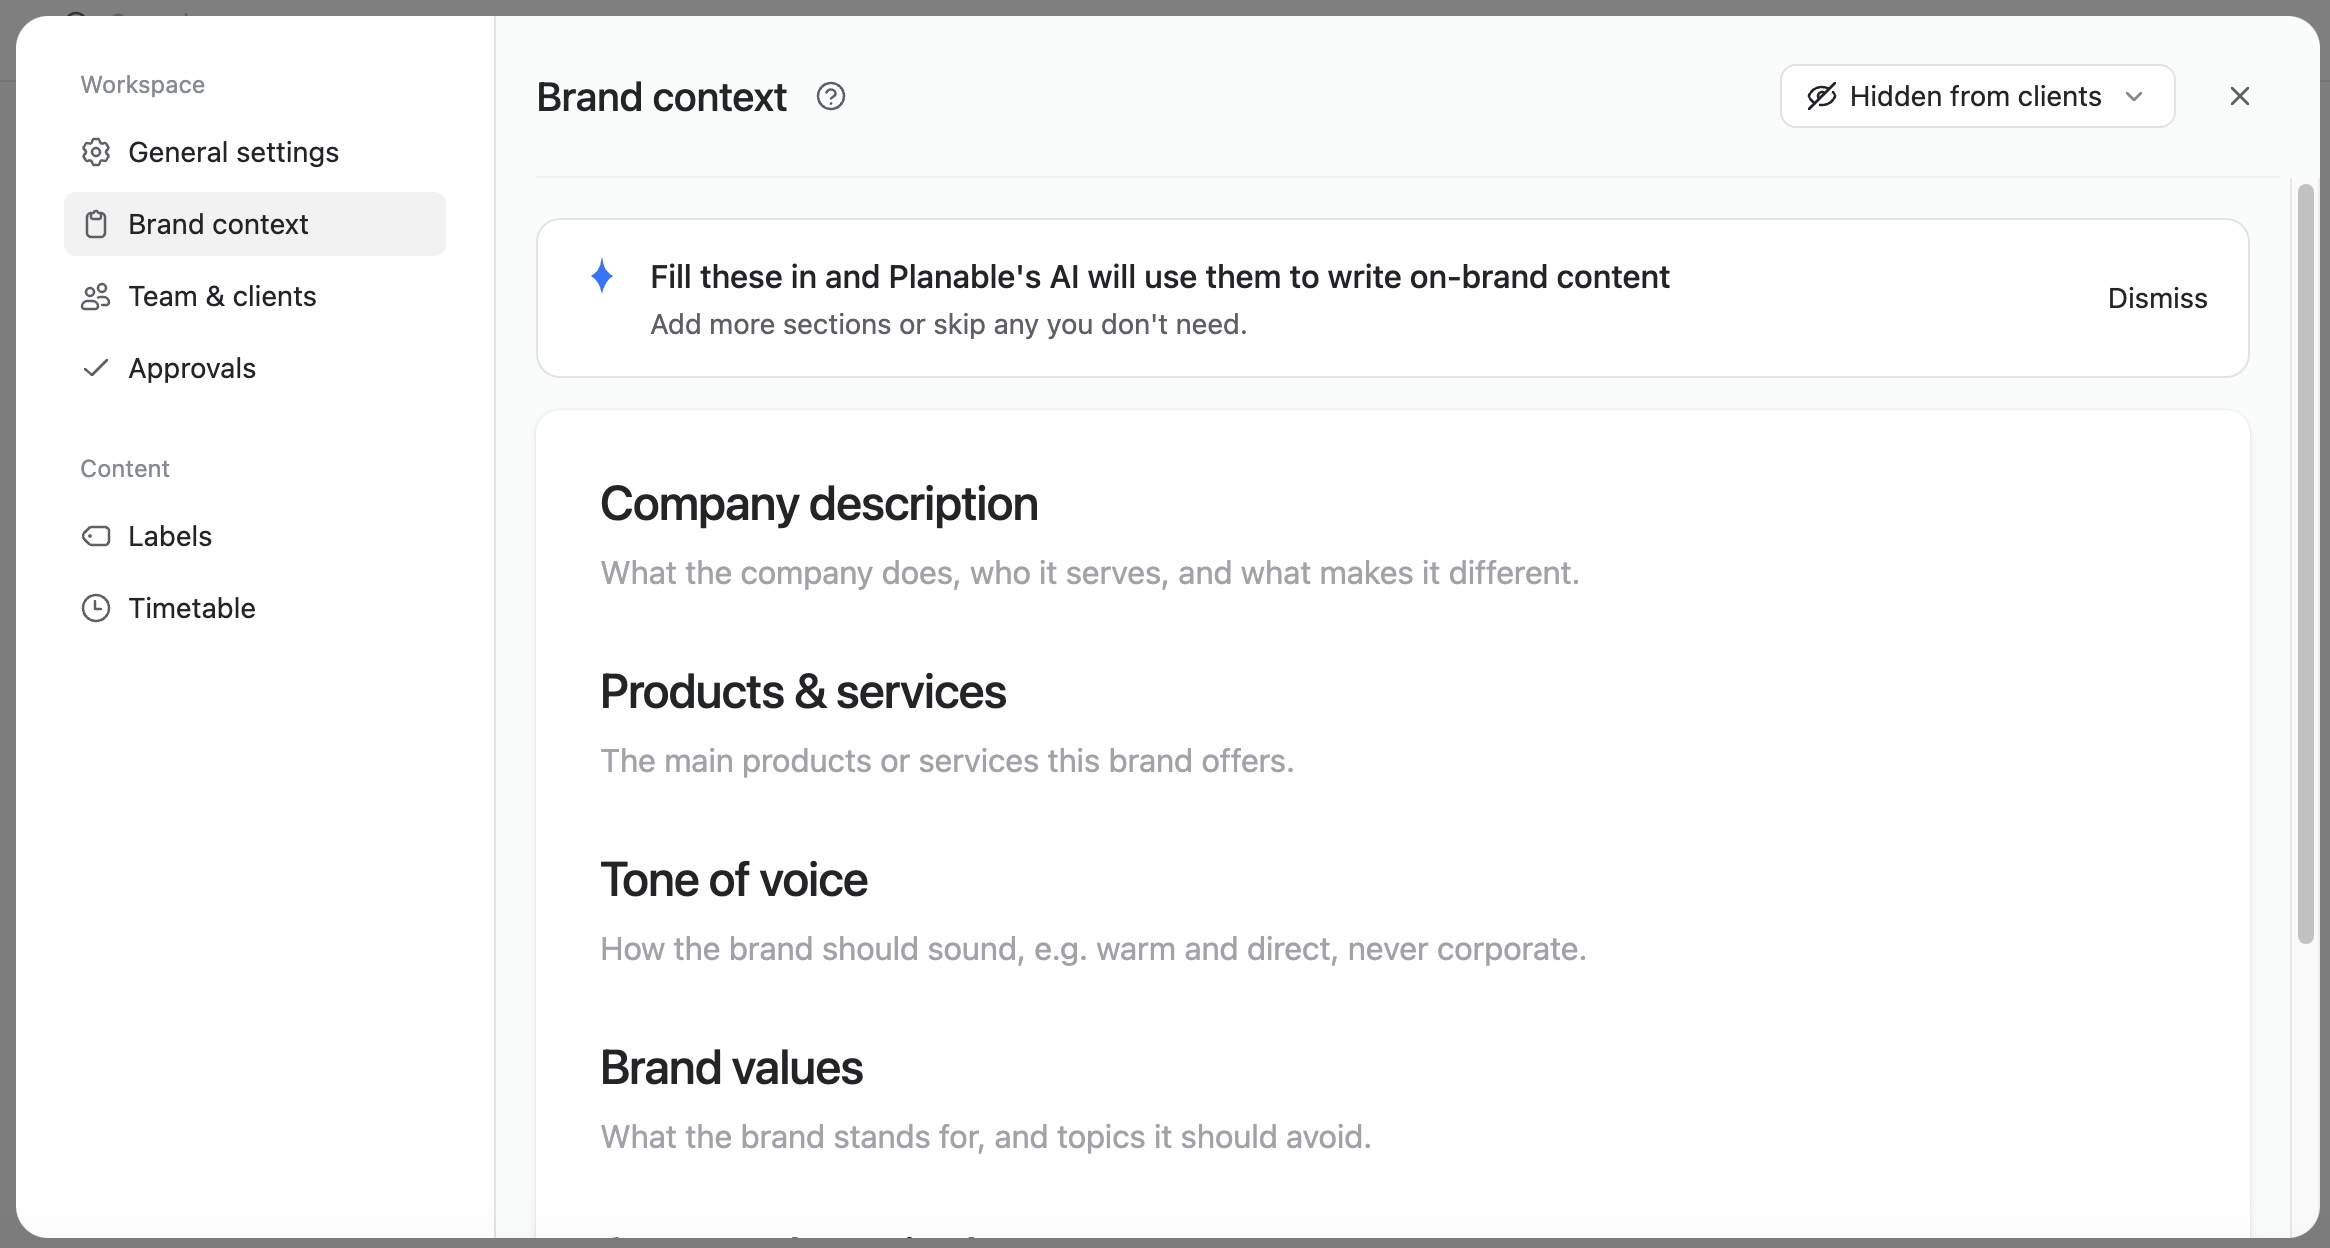
In Planable, go to Workspace Settings → Brand Context for each client workspace you want the agent to work with.
Brand Context is Planable’s per-workspace settings field where you store the client’s tone of voice, key messages, approved terminology, and any platform-specific guidance the AI should follow before writing. It’s per-workspace by design, so you configure it once per client and the agent picks it up automatically on every run.
Add company details, offerings, tone of voice, and values so Planable AI can create on-brand content.
Configure Brand Context before your first draft. Skip it and the agent produces generic social copy that could belong to any brand. Fill it in and the posts come back using the client’s vocabulary, matching their messaging priorities, in the right register for their audience. The difference is visible on the first output.
Step 3: Write your first prompt
Back in ChatGPT, write a plain-language instruction: “Draft five Instagram posts for [client name] about their summer sale, scheduled for next week.” That’s the whole prompt.
ChatGPT reads the workspace’s existing posts to match tone and check for scheduling conflicts, then places each draft on the content calendar on the dates you specified.
You don’t need to pre-format for a particular platform or manually reference the brand voice. The agent pulls that context from the workspace.
A useful prompt covers four things:
Client or workspace name
Platform(s)
Topic or campaign
Quantity and timing
A concrete example:
“Draft three LinkedIn posts for Horizon Realty about their Q3 market report, spread across next week, Tuesday through Thursday.”
That instruction gives the agent everything it needs. Drafts land on-brand, on-topic, and already sitting in the right calendar slots.
This step is where the agent earns the most time back. Brainstorming post ideas is the top AI use case among social media professionals.
For teams managing high-volume content calendars, that translates to hours every week reclaimed from first-draft work.
Step 4: Review and approve AI drafts in Planable
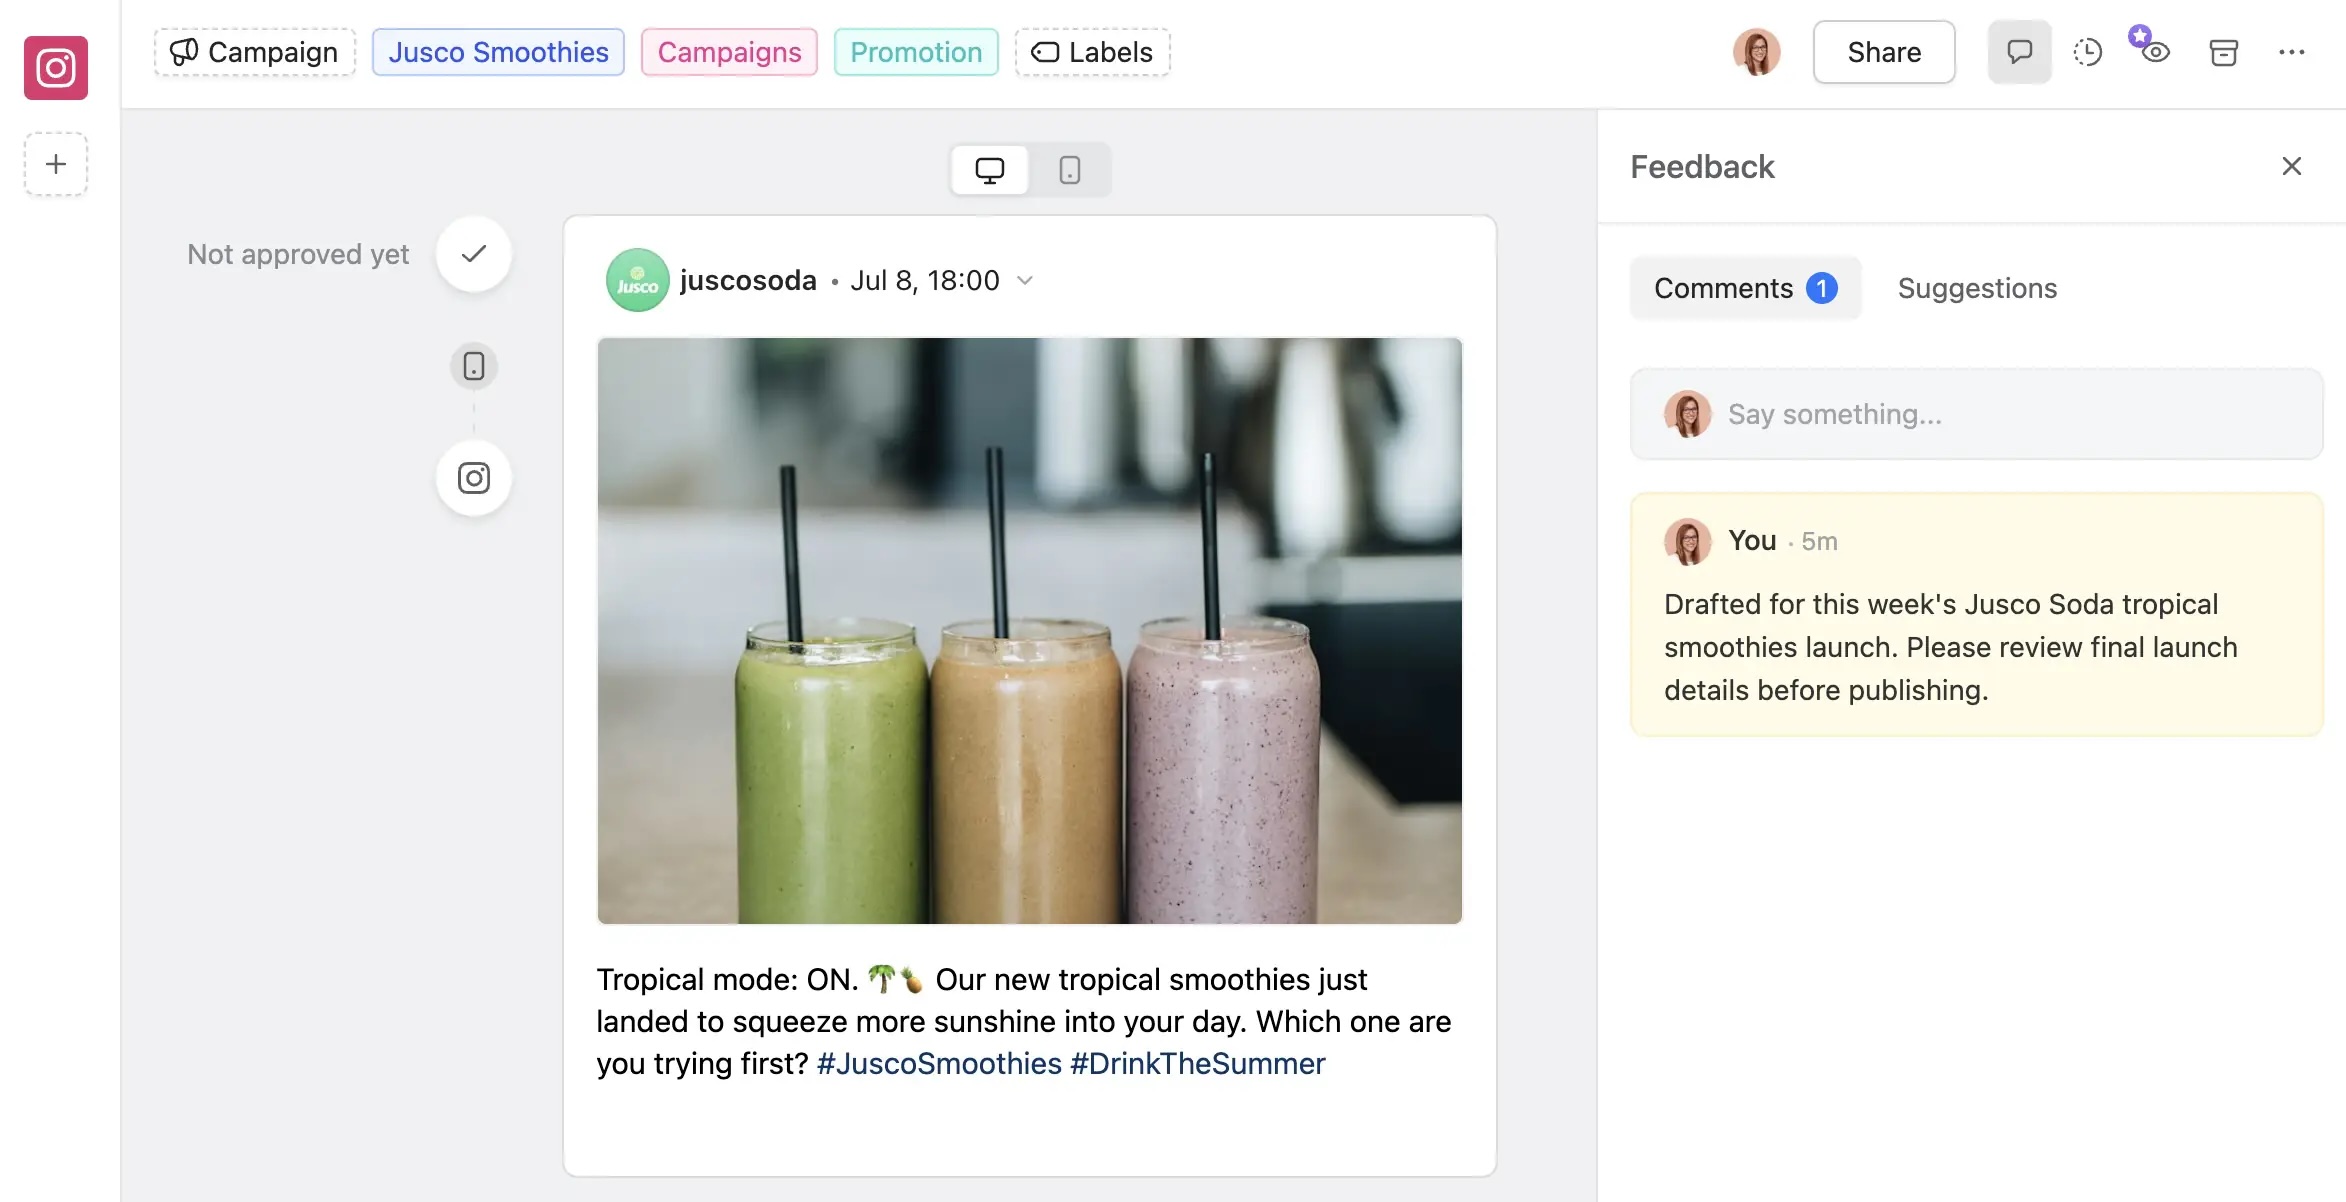
Switch to Planable. The drafts appear in the workspace calendar with a Draft status, in the same view your team uses for all other content.
Feedback happens directly on the post. Team members leave comments and feedback through Planable’s standard collaboration tools. No new interface to learn. AI-created drafts enter the review workflow your team already uses for every other post.
Review an AI-assisted social media draft, leave feedback, and approve the post before publishing.
For agencies and teams where a single bad post carries real consequences, enable Required Approval in Workspace Settings → Approvals (available on Pro and above plans).
Required Approval is a workflow setting that prevents any post from publishing until a designated approver explicitly signs off. With it active, no AI-generated draft goes live without a human check. The agent creates; a person decides.
Once approved, posts move to Scheduled status and publish automatically at the set date and time. No manual step required at publish time.
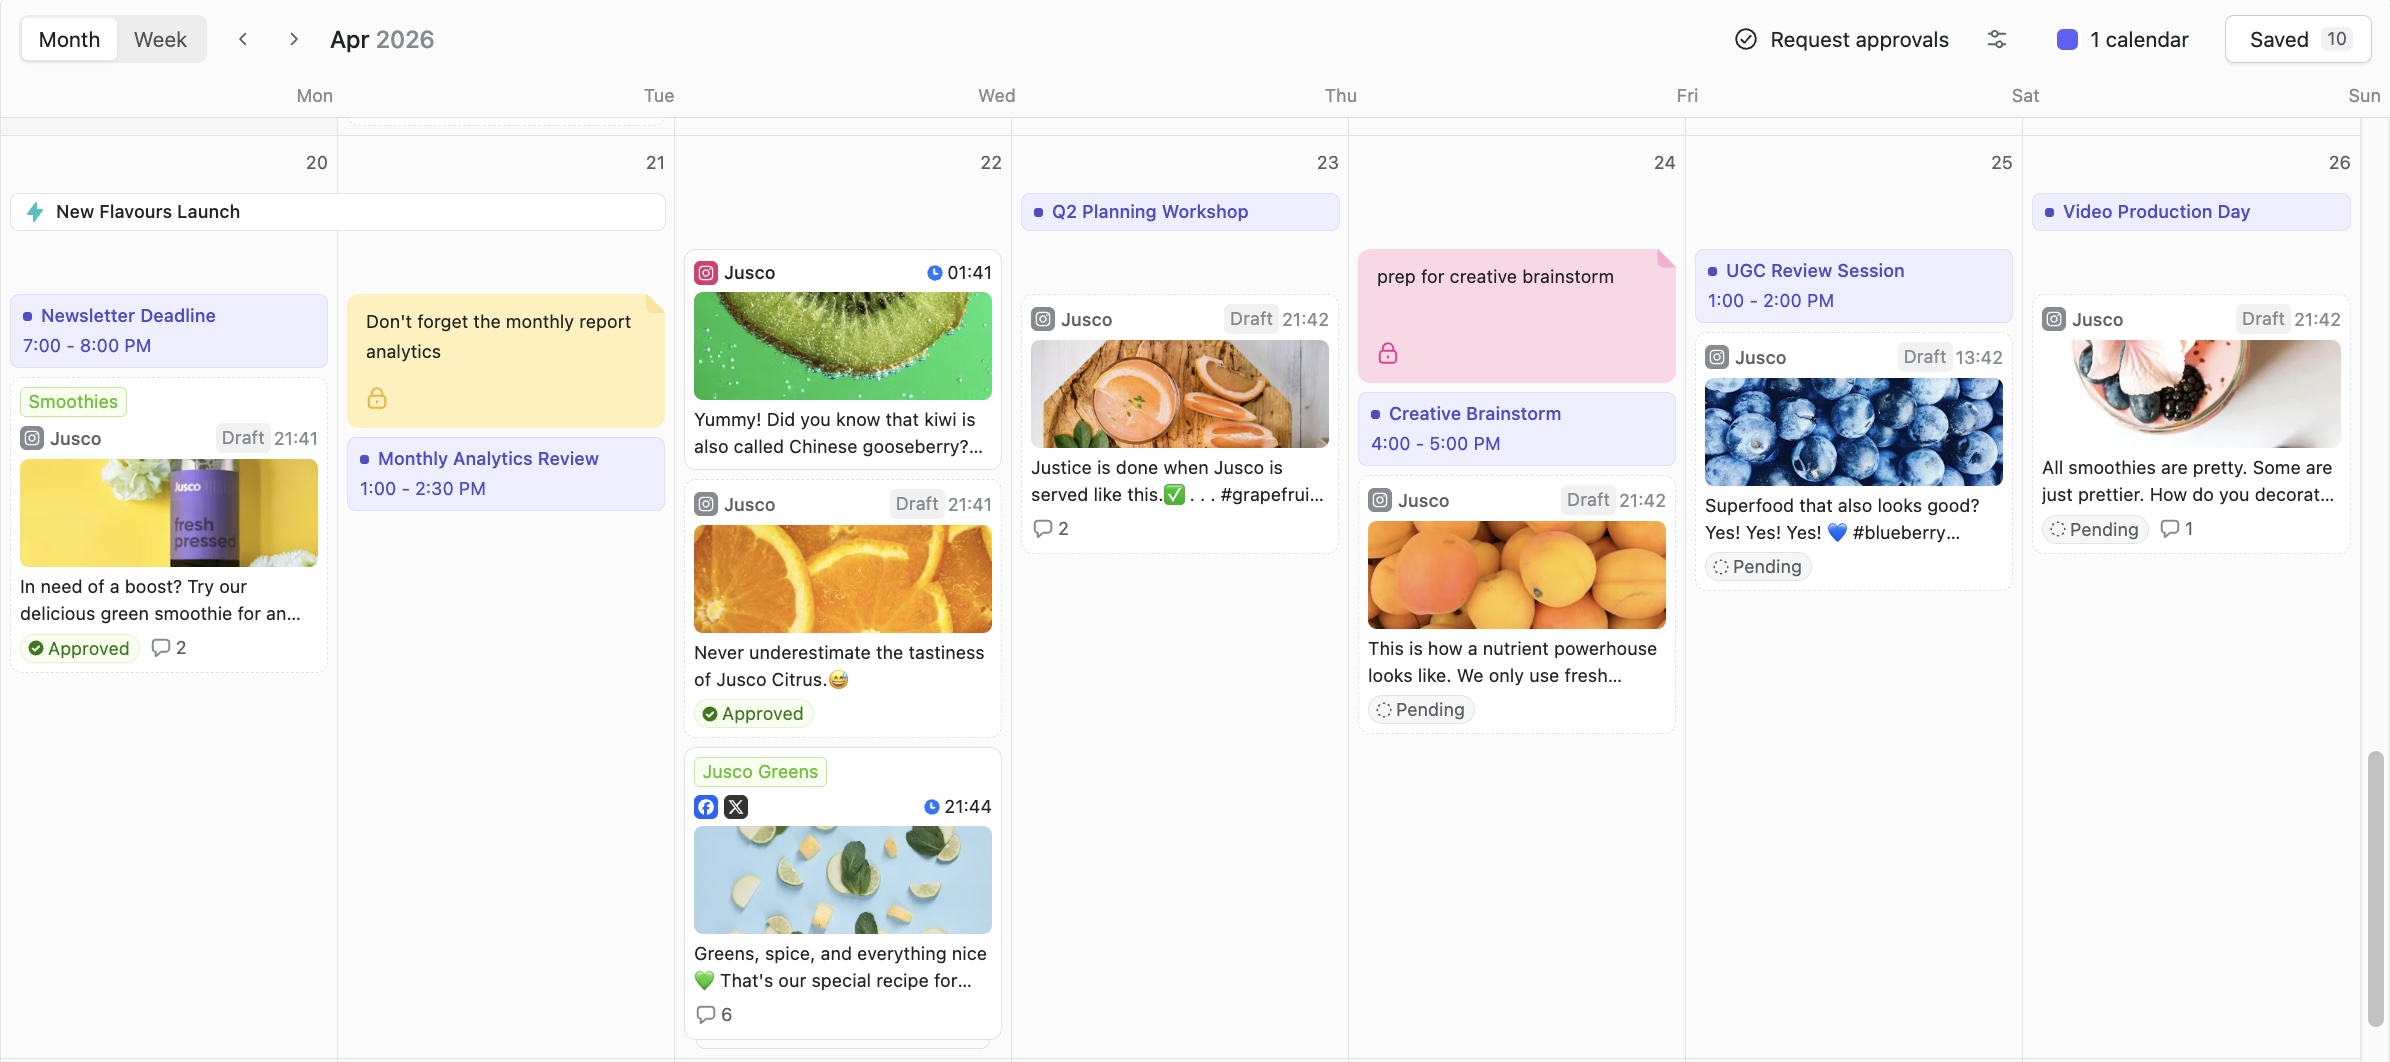
To adjust timing, drag and drop the post to a new slot in the calendar view.
Plan and track social posts, campaign activities, deadlines, notes, and approvals in Planable’s calendar.
For agencies managing multiple clients: each workspace operates independently. The calendar for each client shows only that client’s content. Moving or rescheduling a post in one workspace has no effect on any other.
5 practical ways agencies can use this agent
Once the connection is in place, the agent handles the recurring workflows agencies run on repeat, and returns real time to the team in the process.
“One marketing professional can supervise a team of agents, potentially driving growth, boosting productivity, and freeing human colleagues to focus on higher-level tasks like creativity and strategy.”
These five workflows are what that looks like when it’s running inside a Planable setup.
1. Batch content drafting for a client
Prompt to use in ChatGPT: “Draft 20 Instagram posts for [client name] for August, one per weekday. Read the existing posts first to avoid repeating topics and match their tone.”
The agent reads the workspace calendar, identifies what topics are already covered, and lands new drafts on specific dates. One prompt replaces hours of individual drafting every week.
2. Daily approvals roundup
Ask ChatGPT: “Show me everything pending approval across all my client workspaces, grouped by client.”
The agent surfaces the full queue in one response, without you opening each workspace separately. For agencies managing 10 or more clients, this single prompt reclaims a meaningful block of time every week.
Pro tip: The daily approvals query works across every workspace your Planable account can see. Schedule or run it at the start of each day to get your full review queue in one response, no workspace-hopping required.
3. Calendar audit
Ask: “What’s scheduled in the [client name] workspace for the next two weeks?”
The agent reads the content calendar and reports gaps, overlaps, or missing platforms without you scanning each workspace by hand. You get a clear picture of where content is thin before your client asks why a slot went dark.
4. Bulk copy edits
When a product name changes, a URL rotates, or a campaign hashtag needs updating, ask ChatGPT to find and replace the phrase across all scheduled posts in a workspace. The agent updates every relevant post in one operation, with no post-by-post editing required.
Ask: “Give me a performance summary for the [client] Instagram account for last month.”
The agent returns a natural-language summary without a spreadsheet download. This requires the Planable Analytics add-on, so flag it for clients on a standard workspace plan.
Once agent drafts land in Planable, team members can make quick caption edits without switching tools. The native “Rewrite with AI” button in the composer handles individual post revisions in place, as a complement to the ChatGPT agent workflow. Planable’s built-in AI features cover that part of the stack.
What the agent can and can’t do
The Planable MCP integration handles a lot, and being clear about where it stops is more useful than discovering the edge cases mid-workflow.
Media attachments: The agent can’t attach images or video files directly to a post. Provide an external image URL in your prompt, or add media inside Planable after the draft is created.
Campaign assignment: The agent can’t assign a draft to a Planable campaign through ChatGPT. Campaign assignment happens in Planable once your drafts are live.
Session duration: Sessions expire after 8 hours of inactivity and auto-refresh. Your authorization remains valid for 180 days total. If a session lapses, the agent will prompt you to reconnect before continuing.
Custom GPT permissions: Sharing a Custom GPT gives teammates access to your agent configuration, but each person needs their own Planable account connected, and the agent can only do what that person’s Planable role allows.
AI-created posts always land as drafts in Planable. The agent cannot auto-publish, and that’s deliberate.
Microsoft’s Work Trend Index, based on responses from 20,000 knowledge workers across 10 countries, found that 86% of AI users treat AI-generated output as a starting point rather than a final answer. Respondents also said they remain responsible for the thinking behind the work.
The report describes a broader shift in how people use AI: employees are moving from generating every answer themselves to evaluating, refining, and taking ownership of AI-assisted work. Planable’s approval workflow reinforces this review-first approach by making human evaluation and accountability part of the publishing process, rather than an optional final check.
Each team member connects their own Planable account to the agent individually, and permissions follow the individual.
If your role in Planable doesn’t include publishing rights, the agent can’t publish on your behalf. The agent inherits your permissions, for better or worse.
What do I do if AI drafts don’t match my client’s brand voice?
Start by filling in Brand Context in Workspace Settings. That’s the primary input that shapes how the agent writes for each client.
If drafts still miss the mark, edit them directly in Planable before approving, or tighten the instructions in your prompt. With Required Approval active, nothing publishes until you’ve signed off. Every AI draft is a starting point you refine before it reaches a client.
What you’ve built here goes beyond saving hours every week on drafts. When your AI agent handles content creation and Planable holds the approval workflow, you have a content operation that absorbs new clients without breaking the process.
Connect Planable in Account Settings → Integrations → MCP — the setup takes a few minutes and gives your agent access to every workspace your account can see. Try it now!
FAQs
What’s the difference between a Custom GPT and a ChatGPT Project?
A Custom GPT is a shared agent your whole team can use (one link, same instructions, consistent output regardless of who’s prompting). A ChatGPT Project is a personal, persistent workspace per client (your conversation history, uploaded brand files, and instructions carry over between sessions). Most agencies use both: a Custom GPT for team-wide workflows and a Project per client for ongoing account management.
Do I need to build a Custom GPT or Project to use this agent?
No. You can connect the Planable app in any standard ChatGPT conversation and use plain-language prompts immediately. Custom GPTs and Projects add persistence. Your instructions stay loaded without re-entering them every session. They’re worth setting up once you’re managing more than 2-3 active clients consistently.
How much does it cost to build a social media AI agent?
The Planable MCP connection is included on all Planable plans at no extra cost. ChatGPT integration requires a ChatGPT account, which has a free tier. If you want Required Approval (the feature that prevents AI drafts from publishing without sign-off), you’ll need Planable Pro. No API keys or developer work required. The only real cost decision is whether your workflow requires that approval layer.
Do I need to know how to code?
No. The whole setup runs through ChatGPT’s chat interface and Planable’s settings panel. You search for the Planable app in ChatGPT and connect it to your Planable account. That’s the full technical lift. After that, the agent runs entirely on typed prompts. Anyone already using ChatGPT can get this working. If your team has been putting this off because it sounded like a dev project, it isn’t.
Does this agent work with other AI tools besides ChatGPT?
Yes. The Planable MCP connector works with any MCP-compatible AI tool, including Claude (Anthropic) and Gemini (Google). The ChatGPT walkthrough in this article is the most accessible starting point for most teams, but the underlying MCP connection is identical regardless of which AI client you use. If your team already runs a different AI tool, you can connect it to Planable without rebuilding anything.
Can I use the agent across multiple client workspaces at once?
Yes. One ChatGPT session connected to your Planable account can access every workspace your account has permission to see. Draft content for one client, then run a pending-approvals check across all of them, in the same conversation. For teams managing multiple clients, that cross-workspace visibility alone saves hours every week of status-checking and context-switching. Each client’s content stays in its own workspace, nothing bleeds across.
Monica leads product marketing at Planable. She owns go-to-market for new features and shapes how Planable fits into the broader SE Ranking product family. She joined in 2023 as Planable's first product marketer, built the function from scratch, and now runs the team's competitive intelligence program. With a background in product management and Romania's startup scene (How To Web, MVP Academy), she writes about competitor analysis, product launches and marketing workflows from the builder's side. Before Planable, she spent almost five years managing Orange Fab Romania, Orange's startup acceleration program, where she supported 40 startups and helped generate over €2.2M in commercial value.







 Creation
 Scheduling
 Planning
 Social Inbox
 Collaboration
 Analytics
 Approval
 Social Listening